Maytag MEDX700XW Support and Manuals
Get Help and Manuals for this Maytag item
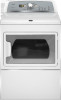
View All Support Options Below
Free Maytag MEDX700XW manuals!
Problems with Maytag MEDX700XW?
Ask a Question
Free Maytag MEDX700XW manuals!
Problems with Maytag MEDX700XW?
Ask a Question
Most Recent Maytag MEDX700XW Questions

Installing Side Vent
Hi do we get the back panel off to install a side vent?
Hi do we get the back panel off to install a side vent?
(Posted by Anonymous-104509 11 years ago)
Popular Maytag MEDX700XW Manual Pages
Owners Manual - Page 4
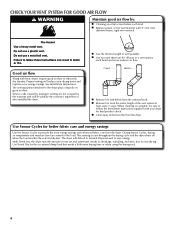
... the customer, regardless of the vent system at least every 2 years.
See Installation Instructions. n Use the shortest length of time set and sometimes results in good air flow.
n Clear away items from the entire length of who installed the dryer. n Remove lint from the front the dryer.
This sensing occurs throughout the drying cycle and the...
Owners Manual - Page 5
... removed, or the Wrinkle Prevent setting ends.
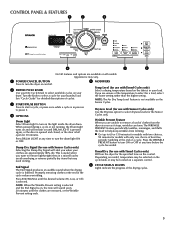
6 CYCLE STATUS LIGHTS ... can form. See "Cycle Guide" for use with only one...dryer drum.
Dryness Level (for the specified time on a separate control. The WRINKLE PREVENT feature periodically tumbles, rearranges, and fluffs the load to remove lightweight items in your laundry load. CONTROL PANEL & FEATURES
1
2
3
6
5
4
Not all models...
Owners Manual - Page 6
... on model, temperature...models. If you are default settings...it.
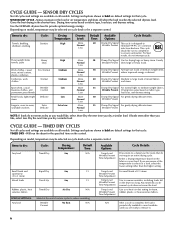
6 CYCLE GUIDE - SENSOR DRY ...GUIDE - TIMED DRY CYCLES
Not all cycles and settings...the lower setting rather than...heat (air dry) setting for that cycle.
...dryer for items that do not require an entire drying cycle.
Drying time varies based on all models. SENSOR DRY CYCLES
Not all cycles and settings are default settings...
Owners Manual - Page 8
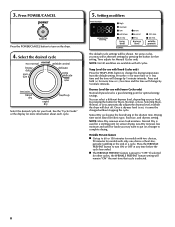
See the "Cycle Guide" or the display for...Prevent feature n Get up to turn on the dryer.
4. Press the WRINKLE PREVENT button to 60 or 150 minutes for models with two choices,
90 minutes for more time...WRINKLE PREVENT feature setting will be changed without stopping the cycle. If selected for optimal energy savings. Select the desired cycle
Select the desired cycle for Manual Cycles only....
Owners Manual - Page 9
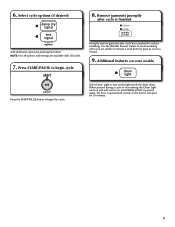
...the dryer drum. Use the Wrinkle Prevent feature to avoid wrinkling when you are available with all cycles.
7. Press START/PAUSE to begin the cycle. A dditional features (on some models)... load from the dryer as soon as it stops.
9. Select Drum Light to begin cycle
Promptly remove garments after cycle is left open for 30 minutes.
9 NOTE: Not all options and settings are unable to reduce...
Owners Manual - Page 11
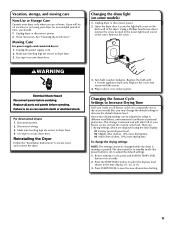
... are 3 drying settings, which are at home. Replace the bulb with the screw.
4. The dryer must be adjusted to adapt to secure dryer door.
Locate the light bulb cover on some models)
1.
See "Cleaning the Lint Screen." Unplug the power supply cord. 2. Unplug dryer or disconnect power.
2. Remove the cover. Reinstalling the Dryer
Follow the "Installation Instructions" to save...
Owners Manual - Page 12
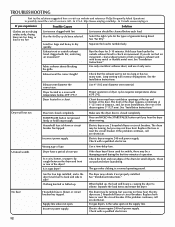
... doors must have heat. Check with lint, restricting air movement? See "Installation Instructions." If the problem continues, call an electrician.
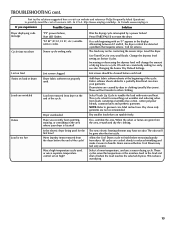
TROUBLESHOOTING
First try the solutions suggested here or visit our website and reference FAQs (Frequently Asked Questions) to possibly avoid the cost of the dryer? http://www.maytag.com/help -
Select the right cycle for most...
Owners Manual - Page 13
... the end of wrinkle-free cotton, cotton polyester blends, common knits and synthetic garments.
http://www.maytag.com/help - Sensor cycle ending early.
TROUBLESHOOTING cont. Alternating between F# and E#, the dryer control has detected a problem that can stain your dryer is best for the first time? Lint on high? Loads are not recommended. This cycle is...
Owners Manual - Page 14
.../or installation instructions.
2. Pick up and delivery. Repairs to parts or systems resulting from state to state or province to you need repair service, rst see the "Troubleshooting" section of the Use & Care Guide. Some states and provinces do not allow limitations on the duration of implied warranties of merchantability or tness, so this information on the model and...
Installation Instructions - Page 4
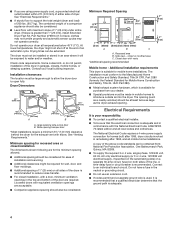
... spacing of 1" (25 mm) on both sides of installation and servicing.
■■ Additional clearances might not shut off at...dryer might be considered. Some codes limit, or do not permit, installation of 200 lbs. (90.7 kg). Recessed area B.
Check code requirements. The installation must conform to the Manufactured Home Construction and Safety Standard, Title 24 CFR, Part...
Installation Instructions - Page 13
...■■ Do not install in final dryer location.
■■ Remove excess to seal all governing codes and ordinances.
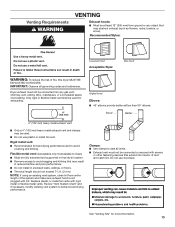
Venting Requirements
...Replace plastic or metal foil vents with screws or other fastening devices that may be fully extended and supported in enclosed walls, ceilings, or floors. ■■ The total length should not exceed 73/4 ft. (2.4 m). Review...
Installation Instructions - Page 19
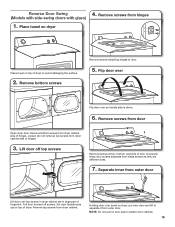
...inner from dryer cabinet side of dryer. NOTE: Do not pull on top of door (4 screws). Remove screws from hinge screws as they are in large part of ...dryer cabinet. Keep door screws separate from door
Open dryer door. Set door (handle side up) on dryer, pry inner door and lift to door.
5. Reverse Door Swing (Models with side-swing doors with glass)
1. Place towel on dryer...
Installation Instructions - Page 20
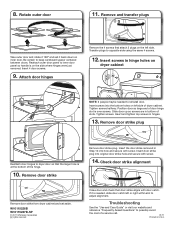
...and set aside....service call.
01/11 Printed in hinge holes on left side. Remove door strike plug
Reattach door hinges to dryer...dryer cabinet
NOTE: 2 people maybe needed , slide door catch left or right within slot to possibly avoid
the cost of slots. Insert and tighten top screws in Step 10 into hole and secure with door catch.
8. Troubleshooting
See the "Use and Care Guide...
Warranty Information - Page 1

Pick up and delivery. Replacement parts or repair labor on the duration of implied warranties of merchantability or fitness, so this limitation may not apply to you need repair service, first see the "Troubleshooting" section of the Use & Care Guide. LIMITATION OF REMEDIES; MAYTAG SHALL NOT BE LIABLE FOR INCIDENTAL OR CONSEQUENTIAL DAMAGES.
If you think you . You must...
Dimension Guide - Page 1

...installation, with vents
*Additional spacing recommended
3"* (76 mm)
The dimensions shown following are for the minimum spacing allowed.
■■ Additional spacing should also be large enough to allow the dryer door to an individual branch circuit. Exhaust venting: Exhaust your dryer to change materials and specifications... Dryer
PRODUCT MODEL NUMBERS
MEDX700X
Electrical: This dryer...
Maytag MEDX700XW Reviews
We have not received any reviews for Maytag yet.