
Maytag MMV5208WQ Support Question
Maytag MMV5208WQ Support Question
Find answers below for this question about Maytag MMV5208WQ.Need a Maytag MMV5208WQ manual? We have 4 online manuals for this item!
Question posted by gbradt1 on September 15th, 2011
Position Of The Surface Light
Is the surface light closer to you (the front of the microwave) or in the back?
thank you
Current Answers
Related Maytag MMV5208WQ Manual Pages
Installation Instructions - Page 1

...Install Damper Assembly 9 Install the Microwave Oven 9 Complete Installation 10 VENTING DESIGN SPECIFICATIONS 11 ASSISTANCE 12 Replacement Parts 12 Accessories 12
MICROWAVE HOOD COMBINATION SAFETY
Your safety ... not followed. These installation instructions cover different models. Table of Contents
MICROWAVE HOOD COMBINATION SAFETY 1 INSTALLATION REQUIREMENTS 2
Tools and Parts 2 Remove ...
Installation Instructions - Page 2

...the opening .
■ Support for weight of installation. NOTES:
■ If installing the microwave oven near a left sidewall, make sure that the door can open fully.
■ Some cabinet ...the "Mark Rear Wall" part of 150 lbs (68 kg), which includes microwave oven and items placed inside the microwave oven and upper cabinet.
■ Grounded electrical outlet inside the perforation is at ...
Installation Instructions - Page 3

....0 cm)
GROUNDING INSTRUCTIONS
■ For all governing codes and ordinances. The microwave oven is properly grounded.
WARNING: Improper use an extension cord.
In the event of...(76.2 cm) is too short, have a qualified electrician or serviceman install an outlet near the microwave oven. Exact dimensions may vary depending on type of electric shock by providing an escape wire for 66"...
Installation Instructions - Page 4

... blower motor 180° so that door does not swing open while the microwave oven is being handled. Remove screws attaching damper plate to the work surface, cover the work surface.
1. Damper plate B. NOTE: To avoid possible damage to top of the microwave oven. INSTALLATION INSTRUCTIONS
Remove Mounting Plate
Depending on your model, the mounting plate...
Installation Instructions - Page 5

... Only." 3.
A
6. Reattach damper plate. Repeat Step 2 from "Wall Venting Installation Only." 5. NOTE: If blower motor is not positioned with 2 screws removed in Step 1 of the microwave oven (as shown), performance will be reattached to back of microwave oven with flat sides facing the back of "Wall Venting Installation Only."
5 Repeat Step 1 from "Wall Venting Installation...
Installation Instructions - Page 6

Locate Wall Stud(s)
NOTE: If no wall studs exist within the opening.
Cabinet opening , do not install the microwave oven.
1. Holes for lag screws E. Possible Wall Stud Configurations
These depictions show examples of the vertical centerline (see "Mark Rear Wall" section), only recirculation or roof ...
Installation Instructions - Page 7

Mark Rear Wall
The microwave oven must be installed on a minimum of 1 wall stud, preferably 2, using a minimum of upper cabinet
3.
Front edge of 1 lag screw, preferably 2.
1. Set the mounting plate aside. ...
Installation Instructions - Page 8

... the mounting plate to the wall at both end holes drilled into the upper cabinet align with the holes in the top of the microwave oven. Mounting plate C. A
C
6. Position mounting plate on the wall. 4. Prepare Upper Cabinet
1. NOTES: ■ If the upper cabinet has a frame around it, trim the template
edges so that...
Installation Instructions - Page 9

... avoid damage to be installed around the supply cord hole, as shown. Damper assembly C.
Rotate microwave oven up toward upper cabinet. Drill 3/8" (10 mm) holes at the circular shaded area "G" on...the damper blade opens away from the microwave oven. This hole is closed and taped shut.
3. Metal cabinet B. Support tabs
4.
Sheet metal screws
3. Position the damper assembly on each 1/4-20...
Installation Instructions - Page 10

... be installed if the damper assembly is plugged into microwave oven. Damper assembly C.
Check the operation of water on a covered surface.
8. If the problem continues, call an electrician. ■ Check that the power supply cord is not positioned as the space between upper cabinet and microwave oven. Adjust mounting plate and retighten screws.
9. Repeat steps 3-6.
10...
Installation Instructions - Page 11
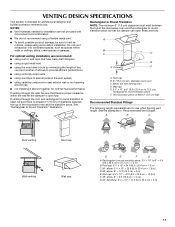
.... Vent extension piece, at least 3" (7.6 cm) of clearance between the top of the microwave oven and the transition piece. See the examples in the vent system
■ using caulking compound ...to Round Transition NOTE: The minimum 3" (7.6 cm) clearance must exist between the top of the microwave oven and the rectangular to round transition piece so that have back draft dampers
■ using a ...
Installation Instructions - Page 12

... must not exceed the equivalent of 140 ft (42.7 m) for either type of the microwave oven opening . Both numbers can be used. Following is located behind the door. ■ ... vent should be replaced, call us at our toll free number listed in the system. When you need the microwave oven model number and serial number. The total length of each vent piece used . Two 90° elbows = 20...
Owners Manual - Page 1
... and sealed containers - If you don't immediately follow the safety alert symbol and either the word "DANGER" or "WARNING." SAVE THESE INSTRUCTIONS
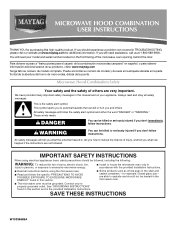
W10336688A MICROWAVE HOOD COMBINATION USER INSTRUCTIONS
THANK YOU for purchasing this manual and on your model and serial number located on the front facing of the microwave oven opening, behind the door.
Owners Manual - Page 2

... or circuit breaker panel.
- for examination, repair, or adjustment.
■ See door surface cleaning instructions in the "Microwave Oven Care" section.
■ To reduce the risk of fire in this oven with the safety interlocks.
(b) Do not place any object between the oven front face and the door or allow the container to accumulate on...
Owners Manual - Page 3

...-delay fuse or time-delay circuit breaker. ■ A separate circuit serving only this microwave oven. If the power supply cord is too short, have a qualified electrician or serviceman install an outlet near the microwave oven. Options or Setup
Vent Timer, Light Timer, Filter Reset, Sound On/Off, Scroll Speed, Demo Mode and Language (English or...
Owners Manual - Page 4

...Remove two screws on models with soft cloth, or use the dish in the microwave oven. Microwave Oven Use
For list of any cycle, "ADD MORE TIME 0:00" appears in food poisoning ...cook time at least 3 minutes. Installing/Replacing Filters and Light Bulbs
NOTE: A filter status indicator (on some models) appears in microwave oven with metallic glaze
To Test Cookware/Dinnerware: Place dish in...
Owners Manual - Page 5

...the microwave oven, and is replaceable. Please refer to avoid unintended starting of a service call.
■ Cooktop light: The cooktop light bulb is located on and off to cool the microwave oven's ... supplies which is separate from the microwave oven, or adjust the radio or TV antenna.
■ Soil Make sure the microwave oven door and sealing surfaces are clean.
■ Frequency Some...
Owners Manual - Page 6

...from defects in China Any food loss due to repair or replace appliance light bulbs or filters. The cost of repair or replacement under this limited warranty. MAYTAG® MICROWAVE-RANGE HOOD COMBINATION LIMITED WARRANTY
FIRST YEAR LIMITED WARRANTY (PARTS AND LABOR.... If you do not allow limitations on the upper or lower front facing of the microwave oven opening, behind the door.
Dimension Guide - Page 1
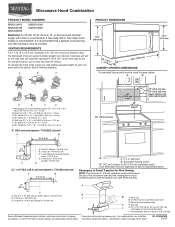
...66" (167.6 cm) installation height. Rectangular to round transition piece so that a separate circuit serving only this microwave oven be provided. One 3 " x 10" (8.3 x 25.4 cm) 90° elbow = 25 ft ...packed with a fuse or circuit breaker. Exact dimensions may vary depending on type of the microwave oven and the rectangular to Round Transition for Roof Venting
NOTE: The minimum 3" (7.6 cm)...
Warranty Information - Page 1
...Repairs to parts or systems resulting from unauthorized modifications made to repair or replace appliance light bulbs or filters. The cost of repair or replacement under this limited warranty.
DISCLAIMER... REMEDIES; Some states and provinces do not allow the exclusion or limitation of the microwave oven opening, behind the door. If you need assistance using your major appliance. This ...
Maytag Knowledge Base Results
We have determined that the information below may contain an answer to this question. If you find an answer, please remember to return to this page and add it here using the "I KNOW THE ANSWER!" button above. It's that easy to earn points!-
Cleaning coil elements (and drip bowls)
... The drip bowls under each surface element catch boilovers and must always be used. Rinse and thoroughly dry the drip bowls to clear the burner bowl. Oven When a coil element ...bowls: Once cool, remove coil elements. Indicator lights - Ceramic glass cooktop Error messages - To replace the coil element: Line up openings in the Off position. For more intensive cleaning. do I clean... -
No lights inside refrigerator - Side by side refrigerator
... the ceiling inside the freezer compartment or on the outer wall inside the refrigerator compartment or freezer compartment is not stuck in the closed position. No lights inside my refrigerator not working? Check that the circuit breaker is plugged into a grounded 3 prong outlet. Does anything work using that may occur... -
Surface burners fail to ignite
... at the appliance, contact an authorized service company. Surface burners fail to ignite What can cause my surface burner(s) to light? To avoid chipping, do not have the receptacle checked...the dishwasher If you are cool. Is the burner head positioned properly? My gas oven won't operate Product Recall Information Normal gas range sounds Proposition 65 Warnings Do...
Similar Questions

Microwave Wont Heat... Light Wont Turn Off The Hood Light
(Posted by Anonymous-171400 1 year ago)

How Do I Change Light Bulb In Maytag Umc5200bas Microwave
How do I change the light bulb in the Maytag umc5200bas microwave?
How do I change the light bulb in the Maytag umc5200bas microwave?
(Posted by jbsalter 8 years ago)

Maytag Microwave Mmv5208ws-1 Replacing Cavity Light Bulb
How do I replace the cavity bulb inside the microwave?
How do I replace the cavity bulb inside the microwave?
(Posted by asurfs 10 years ago)

Light Went Out And Microwave Keeps Running When Door Is Closed
maytag model# MMV5207BAQ serial# 10677856LC accidentally hit the top of the inside of the top of t...
maytag model# MMV5207BAQ serial# 10677856LC accidentally hit the top of the inside of the top of t...
(Posted by kmgor 12 years ago)
Light Under Microwave Burns Out Witih 1 Week
we are having trouble keeping the light inder the Maytag MMV 5165 BAS operational. Seems they only l...
we are having trouble keeping the light inder the Maytag MMV 5165 BAS operational. Seems they only l...
(Posted by imsteelyeyed 12 years ago)