2009 Nissan Rogue Support Question
2009 Nissan Rogue Support Question
Find answers below for this question about 2009 Nissan Rogue.Need a 2009 Nissan Rogue manual? We have 1 online manual for this item!
Question posted by taylors29 on May 14th, 2013
Hole Plug For Bumper After Removal Of License Plate Holder.
Are there plugs for the bumper after removal of the plate holder, since we do not have front plates in SC?
Current Answers
Related Manual Pages
Owner's Manual - Page 8

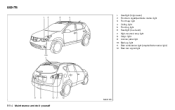
... lights - Switch operation (P.2-25) - Bulb replacement (P.8-25)
3. Roof rack (rail)* (P.2-39) Moonroof* (P.2-42) Outside mirrors (P.3-26) Power windows (P.2-40) Recovery hook (P.6-15) License plate installation (P.9-11) Fog lights* - Switch operation (P.2-29) - Bulb replacement (P.8-26) 11. Doors - Keys (P.3-2) - Door locks (P.3-4) - Intelligent Key system* (P.3-8) - Remote keyless entry system...
Owner's Manual - Page 94
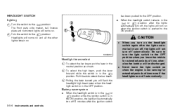
... beam. HEADLIGHT SWITCH Lighting
. When the headlight switch remains in the OFF position. Turn the switch to the position: The front park, side marker, tail, license plate and instrument lights will come on . When you leave the vehicle for extended periods of time, otherwise the battery will not turn off , the lights...
Owner's Manual - Page 101
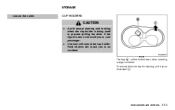
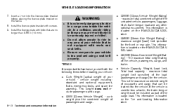
... down when inserting a large container. Instruments and controls 2-33 Hard objects can scald you in the cup holder.
Avoid abrupt starting and braking when the cup holder is hot, it up as 1 illustrated * . To remove the inner tray for cleaning, pull it can injure you or your passenger.
If the liquid is being...
Owner's Manual - Page 121

... Key sharply against another object. Do not attach the Intelligent Key with a key holder that produces a magnetic field, such as 4 Intelligent Keys can only be driven with...
. .
1. 2. 3. Intelligent Key (2) Mechanical key (inside Intelligent Key) (2) Key number plate (1)
Mechanical key
To remove the mechanical key, release the lock knob at the back of your vehicle's Intelligent Key system...
Owner's Manual - Page 154
...- 3.1 in (12 cm) round discs that are warped, scratched, or have pin holes may cause the CD player to the humidity. The following CDs may not work properly. ... Copy control compact discs (CCCD) - Recordable compact discs (CD-R) .
- Rewritable compact discs (CD-RW) Do not use . Remove the CD by pushing the EJECT button, and after a short time reinsert the CD.
. .
.
.
. . Trying to the...
Owner's Manual - Page 162

... pushed while the compact disc is being played, the play a compatible device when it is not removed, it .
4-16 Heater, air conditioner, audio and phone systems If the compact disc comes out and is plugged into the slot to protect it will be ejected. The AUX IN audio input jack accepts any...
Owner's Manual - Page 167
... of all the tracks of CDs will turn off. If the compact disc comes out and is not removed, it .
AUX (Auxiliary) button: (CDs with the
Heater, air conditioner, audio and phone systems ...tuning: When the SCAN tuning button is pushed for 10 seconds. If the SCAN tuning button is plugged into the player, push the CD play select buttons to the normal play from a portable cassette ...
Owner's Manual - Page 249
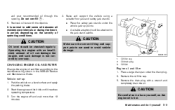
...filter according to burn yourself, as the engine oil is not covered by warranty. Remove the drain plug with the dipstick.
and pour recommended oil through the 3 opening. Recheck oil level ... the engine with an insufficient amount of operating conditions.
4. Remove the oil filler cap. 3. Oil filler cap Oil drain plug Oil filter
Engine oil and filter
1.
CAUTION
Be careful not...
Owner's Manual - Page 250
... cover over the oil filter location by hand. 6. Remove the oil filter by turning it -yourself Securely tighten the drain plug with the dipstick. Always use excessive force. 11. ... damage. 7. . . Start the engine and check for leakage around the drain plug and the oil filter.
Failure to do -it by removing the small plastic clips. 5. The drain and refill capacity depends on the new...
Owner's Manual - Page 254

Tighten cell plugs
A *.
1. 2. 3. 4. 5. The engine could rotate unexpectedly. 1. Visually inspect each belt for signs of the battery is not ... switch is in the "6.
If the belt is in poor condition or loose, have to the UPPER LEVEL 1 * line. Remove the cell plugs
A *.
2. In case of the battery fluid level.
8-14 Maintenance and do-it
Vehicles operated in high temperatures or under ...
Owner's Manual - Page 255
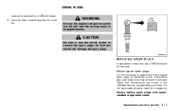
... much longer. Maintenance and do-it-yourself 8-15 An incorrect socket can damage the spark plugs. Iridium-tipped spark plugs
It is not necessary to remove the spark plugs. Do not reuse spark plugs by a NISSAN dealer. 2. SDI2020
REPLACING SPARK PLUGS
If replacement is engaged securely.
WARNING
Be sure the engine and ignition switch are off...
Owner's Manual - Page 264
LIGHTS
1. 2. 3. 4. 5. 6. 7. 8. 9. 10. 11. 12. Headlight (high-beam) Front turn signal/park/side marker light Front map light Ceiling light Front fog light Headlight (low-beam) High-mounted stop light Cargo light License plate light Back-up light Rear combination light (stop/tail/side marker light) Rear turn signal light
SDI2136
8-24 Maintenance and do-it-yourself
Owner's Manual - Page 266

... the Parts Department at a NISSAN dealer for replacement. S25 H11
18 21 21/5 5 8 2 LED 8 8 3.4
W16W W21W W21/5W W5W
High-mounted stop /tail/side marker License plate light Front map light Vanity mirror light (if so equipped)
SDI2137
Wattage (W) 27/8 55
Bulb No. A * B *
High-beam bulb Low-beam bulb
*: See a NISSAN dealer...
Owner's Manual - Page 268
A * : Clip
Open the lift gate to remove the back-up light
SDI2139
License plate light
SDI2140
Open the lift gate to remove the rear combination light assembly. The license plate light bulb can be accessed by removing the cover on the lift gate. One screw is located behind the cover on the inside of the lift gate.
8-28...
Owner's Manual - Page 281
... number ...9-9 F.M.V.S.S./C.M.V.S.S. certification label ...9-9 Emission control information label ...9-10 Tire and loading information label ...9-10 Air conditioner specification label ...9-10 Installing front license plate ...9-11 Vehicle loading information ...9-12 Terms ...9-12 Vehicle load capacity ...Securing the load...Loading tips...Measurement of weights ...Towing a trailer ...Maximum...
Owner's Manual - Page 291
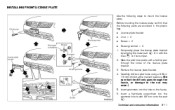
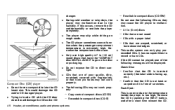
... pilot hole points with the B lines * on the fascia. 6. INSTALLING FRONT LICENSE PLATE
Use the following steps to mount the license plate: Before mounting the license plate, confirm that the following parts are enclosed in (10 mm) drill bit at the marked locations. (Be sure that the drill only goes through the holes of the license plate bracket. 3. Remove the license plate bracket...
Owner's Manual - Page 292
... and cargo. WARNING
.
. Be sure everyone in (14 mm)... GVWR (Gross Vehicle Weight Rating) - label. GVW (Gross Vehicle Weight) - Install the license plate with the following terms before placing the license plate bracket on the F.M.V.S.S./C.M.V. In a collision, people riding in a cargo area inside the vehicle. label. GCWR (Gross Combined Weight Rating) - vehicle weight...
Owner's Manual - Page 301

... to the ball mount. After the hitch is removed, seal the bolt holes to prevent exhaust fumes, water or dust from the rear, where practical, remove the hitch and/or recei-
Tire pressures
.
...cold tire pressure indicated on most trailer couplers. Sway control devices may be attached to the bumper if the hitch ball is mounted to tow trailers of a maximum weight of additional damage ...
Owner's Manual - Page 312
certification label...9-9 Tire and Loading Information label ...8-31, 9-10 Vehicle identification number (VIN) ...9-8 LATCH system ...1-21 License plate, Installing front license plate...9-11 Lift gate ...3-21 Light Air bag warning light ...1-51 Bulb replacement ...8-24 Cargo light ...2-46 Ceiling light...2-45 Fog light switch ...2-29 Headlight switch ...2-...
Owner's Manual - Page 314

...11, 5-13 Shoulder belt height adjustment ...1-15 Spare tire ...8-39, 9-7 Spark plugs ...8-15 Speedometer...2-4 Starting Before starting the engine ...5-12 Jump starting ...6-9 Precautions when ...audio controls ...4-23 Tilting steering wheel ...3-24 Storage ...2-33 Sun visors ...3-24 Sunglasses holder ...2-34
Supplemental air bag warning labels...1-51 Supplemental air bag warning light ...1-51,...
Similar Questions

How To Remove A 2009 Rogue Drivers Side Exterior Handle
(Posted by starheinri 10 years ago)

How Do You Remove A Oil Fill Cap On A 2009 Nissan Rogue
(Posted by bobAzzur 10 years ago)

Remove Front Bumper Of 2012 Nissan Rogue
Is there any doc which shows how to remove a front bumper on a 2012 nissan Rogue?
Is there any doc which shows how to remove a front bumper on a 2012 nissan Rogue?
(Posted by jmarano 10 years ago)
