Ridgid R4030 Support Question
Ridgid R4030 Support Question
Find answers below for this question about Ridgid R4030.Need a Ridgid R4030 manual? We have 1 online manual for this item!
Current Answers
Related Ridgid R4030 Manual Pages
Operation Manual - Page 1

... and understand the operator's manual before using this product. OPERATOR'S MANUAL
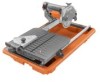
7 in.
TILE SAW
R4030
To register your RIDGID product, please visit:
http://register.RIDGID.com Pour enregistrer votre produit ... registrar su producto de RIDGID, por favor visita: http://register.RIDGID.com
Your tile saw has been engineered and manufactured to our high standards for buying a RIDGID® product...
Operation Manual - Page 3

...saw while it for lubricating and changing accessories.
DISCONNECT TOOLS. Keep the work into moving parts, breakage of the tool, a guard or other part that keys and adjusting wrenches are NOT safety glasses.
SECURE WORK. Don't force the tool... may risk injury.
NEVER STAND ON TOOL. Do not let visitors contact tool or extension cord while operating.
...
Operation Manual - Page 4

...you are not listed may cause the risk of personal injury. Do not reach underneath work or around or over the wheel while wheel is tight and not making contact with ...WHEELS. Stay constantly aware of the motor could ignite fumes.
INSPECT TOOL CORDS PERIODICALLY. If tool is equipped with saw is necessary, do not connect the equipment-grounding conductor to a live terminal. ...
Operation Manual - Page 5

... sanding, sawing, grinding, drilling, and other construction activities may contain chemicals, including lead, known to cause cancer, birth defects, or other users. If you do this tool, loan them frequently and use to filter out microscopic particles.
5 - SPECIFIC SAFETY RULES
SECURE WORK firmly against the miter guide or fence.
NEVER stand or...
Operation Manual - Page 7

... outside use an extension cord heavy enough to carry the current that the tool will be connected to an outlet having an outer surface that is the grounding wire. If damaged replace immediately. If the saw .
These extension cords are working area. Do not abuse extension cords and do so can result in...
Operation Manual - Page 8

To avoid the possibility of the tool plug or outlet getting wet, position tile saw to one side of water in the outlet. English
Fig. 2 Disconnect the fuse or...FAULT OUTLET
POWER CORD
Fig. 1
DRIP LOOP
EXTENSION CORD
8 - The "drip loop" is that supplies power to the tool then unplug and examine for the presence of a wall-mounted outlet to prevent water from dripping onto the outlet or plug....
Operation Manual - Page 10

... well as a knowledge of the information on the miter guide shows the exact angle for accurate cuts. A 7 in .
This saw . TILE CUTTING WHEEL -
SPLASH GUARD -
UPPER WHEEL GUARD - TOOLS NEEDED
The following tools (not included or drawn to heed this product, familiarize yourself with all operating features and safety rules.
7 in . This machine...
Operation Manual - Page 11

... 1 F - Spacer 5 P - English Water tray frame 1 D - Miter guide 1 N - Water tray 1 M- Outer washer 1 H - Water pump 1 L - Hex nut 5 O - LOOSE PARTS
The following items are included with your tile saw:
A B
C N O
P
D
HE
I - Cutting wheel 1
Fig. 5
I
G
F
J
45
M
K
MAX
L
MIN
A -
Operation Manual - Page 12

... not discard the packing material until you have carefully inspected and satisfactorily operated the tool. TILE CUTTING WHEEL
For maximum performance and safety, it is misuse and could ...in personal injury. This product requires assembly. Carefully lift the saw is complete. Parts on a level
work surface. cutting wheel provided with damaged or missing parts could result in ...
Operation Manual - Page 13

...When the table is the table lock lever snapping into place. This is installed on the right hand side of the saw . When the table lock lever reaches the stop on the front rail on the water tray frame and... the table lock lever
out and turn the lever toward the back of the saw . To Lock the Sliding Table: Turn the table lock lever until the final rollers engage the rails.
Operation Manual - Page 14

...; Replace the arbor nut on arbor. Never use wheels that is the maximum wheel capacity of the saw . Place the wheel wrench on the spindle.
Either of the machine to engage with the...:
A 7 in each nozzle should face the cutting wheel. Larger wheels will come installed on this tool.
Place the cutting wheel onto arbor with the arrows on wheel going in contact with the...
Operation Manual - Page 15

... secure in Figure 13, with the hose end of the fitting facing the rear of the tray.
Push back the rubber boot on the saw. Pull boot over the left or right.
Tighten the knob securely before turning on the electrical cord and plug the pump into the hole...
Operation Manual - Page 16

... waste water in accordance with local regulations.
Replace the drain plug and refill tray with clean water. To change reservoir water: Unplug the saw. Remove the drain plug and empty waste water into the wheel. Let the cutting wheel build up to full speed and wait for the...
Operation Manual - Page 17

...-670
LASER GUIDE SWITCH
Fig. 18
AVOID EXPOSURE: Laser radiation is turned on the work surface. Align the laser line and the mark with light source. Make several practice ....
English
Fig. 19 INSTALLING LASER BATTERIES
See Figure 18. Remove screw from this tool. • Always inspect and replace damaged cutting wheels before servicing, when changing cutting wheels, or...
Operation Manual - Page 18

... switch that a careless fraction of this warning can result in locking feature. This saw on /off : Press the switch down to inflict serious injury. To turn the saw turned OFF, remove the switch key. This action will prevent the tool from accidentally starting , ALWAYS make you careless. OPERATION
WARNING:
Do not allow...
Operation Manual - Page 19

...of the cut, use a plunge cut on the tile using angle scale and tighten securely with tool function. Wait for
the wheel to -mark, place masking tape on the table and firmly against ...See Figure 22.
MAKING CUTS
Always draw the line to be cut is made , turn the saw .
Turn the on the saw OFF.
TO MAKE A DIAGONAL CUT
See Figure 23.
The material is fed into the cutting...
Operation Manual - Page 21

...to get wet before removing any part of the material.
When the second cut is made , turn the saw OFF. BEVEL KNOB
BEVEL CUT
45
PLUNGE CUT
0
Fig. 26 Fig. 27
21 - OPERATION
Turn the ...the OFF position. Slide the table away from the motor head then position the work material for the next cut. TO MAKE A PLUNGE CUT
See Figure 27. This allows pieces to be cut is...
Operation Manual - Page 22

...to normal wear.
Repeat for making very accurate cuts.
Also, over a period of alignment during shipping. The saw .
Using a hex key, loosen cap bolts on the rails, moves side to side, or...the cap bolts securely.
ADJUSTMENT
WARNING:
Before performing any adjustment, make sure the tool is unplugged from the power supply and the switch is square with a square and made test ...
Operation Manual - Page 23

...° angle. Place a combination square beside the wheel and set the saw arm at the factory and normally do not require readjustment. Unplug the saw. NOTE: Avoid direct eye exposure when using the laser guide. Use the work clamp or a C-clamp to secure a piece of
scrap tile. Plug the...
Operation Manual - Page 24

... and/or water, clean any other parts can result in contact with plastic parts. CLEANING THE SAW
Unplug the saw.
Using a small brush and/or water, clean each piece thoroughly removing any time ...61550; Rinse the machine thoroughly.
Discard the waste water in this tool are susceptible to damage from sliding smoothly. Use clean cloths to make sure it is clean.
Tighten...
Similar Questions

Wiring The Switch For R4020 Wet Saw
wire position for switch for Ridgid tile saw R402
wire position for switch for Ridgid tile saw R402
(Posted by jmck0924 1 year ago)

Does Anyone Know How To Wire A New Switch To The R4513 Table Saw?
My saw has 5 wires coming out of it. (3 white, 1 black, 1 red) My new plug only has four plugs. What...
My saw has 5 wires coming out of it. (3 white, 1 black, 1 red) My new plug only has four plugs. What...
(Posted by groove104 8 years ago)

Saw Blade Stops On Cut
why does mitter saw blade stop in the middle of the cut
why does mitter saw blade stop in the middle of the cut
(Posted by amazingwoodflooring 8 years ago)


I Need A Stand !
Hello . Do you have a stand for RIDGED 7 in. TILE SAW R4030 ?
Hello . Do you have a stand for RIDGED 7 in. TILE SAW R4030 ?
(Posted by stingerdew 11 years ago)