Sanyo DP55441 Support Question
Sanyo DP55441 Support Question
Find answers below for this question about Sanyo DP55441.Need a Sanyo DP55441 manual? We have 1 online manual for this item!
Question posted by aylacminku on July 25th, 2014
Sanyo Dp55441 How To Set Default Channel
The person who posted this question about this Sanyo product did not include a detailed explanation. Please use the "Request More Information" button to the right if more details would help you to answer this question.
Current Answers
Related Sanyo DP55441 Manual Pages
Owners Manual - Page 3

...Unplug this apparatus near any ventilation openings. If an outside antenna is connected to the television equipment, be sure the antenna system is provided to call the CATV system installer's
...attention to Article 820-40 of the NEC that provides guidelines
for choosing SANYO. The product should not be maintained. Please read all servicing to provide some protection...
Owners Manual - Page 4
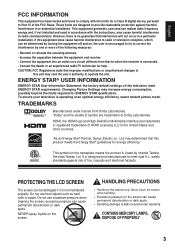
...television reception, which the receiver is connected. -
has determined that improper modifications or unauthorized changes to
this television ...STAR requirements.
"As an Energy Star® Partner, Sanyo Electric co., Ltd. Do not use excessive pressure when... factory default settings of HDMI Licensing LLC in the United States and other countries.
Changing Picture Settings may cause...
Owners Manual - Page 5

...GETTING STARTED-CONNECTIONS.....10 POWER CONNECTION 11 INITIAL SETUP 11 INITIAL CHANNEL SCAN 11 GETTING STARTED-POWER CONNECTION/CHANNEL SEARCH..11
ADVANCED AV CONNECTIONS........... 12 ADVANCED DIGITAL SIGNAL CONNECTIONS-... MODE 14
ON-SCREEN MENU OPERATION 15 MENU NAVIGATION MAP 15 CHANNEL ADJUSTMENT 15 CHANNEL LIST OPERATION 16 PARENT ADJUSTMENT 17 PICTURE/ AUDIO/ ADVANCED ADJUSTMENT ...
Owners Manual - Page 7
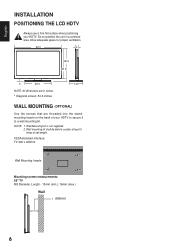
...
4
36.5 33.5
3
29.3
14.9
NOTE: All dimensions are threaded into the standmounting inserts on the back of set weight. Wall Mounting kit is not supplied. 2.
Do not position the unit in inches.
* Diagonal screen: 54.6 ...your HDTV. NOTE: 1. English
INSTALLATION POSITIONING THE LCD HDTV
Always use a firm-flat surface when positioning your HDTV to secure it to a wall mounting kit.
Owners Manual - Page 8

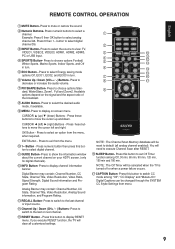
...new and old or batteries with marks inside the Remote Control.
Analog or Clear QAM cable channels from an antenna.
ANTENNA
OR
ANALOG/DIGITAL ANTENNA IN
CABLE
THE TUNER IN THIS HDTV CAN... direct Cable TV connection. Please recycle used up batteries.
2 Antenna Connection for Clear QAM Cable channels. (see page 11)
For the best picture, connect your Cable box or Satellite receiver to ...
Owners Manual - Page 9
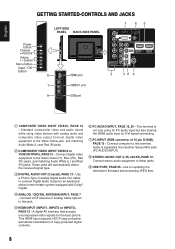
...25 - English
V DEO 1 NPUT
GETTING STARTED-CONTROLS AND JACKS
Input / OK button
LEFT-SIDE PANEL BACK-SIDE PANEL
Y
PC INPUT
PC AUDIO
INPUT
Pb
Pr
Pb
L
Pr
R
L
R
DEO3 INPUT V DEO2... or INPUT3), PAGE 12 - A digital AV interface that accepts uncompressed video signals for updating the television's firmware and accessing JPEG files.
8
PC AUDIO INPUT, PAGE 12, 20 - Audio is not...
Owners Manual - Page 10
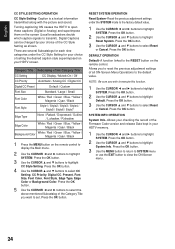
... menu, when required. RESET Button - If you execute RESET function, the TV will be reset to default (all customized settings. Digital Captions can be changed through the SYSTEM CC Stytle Settings from the menu.
1-- Press to select digital channel.
CAPTION Button- Numeric Buttons-
EXIT Button - Press numeric button then press this button to execute...
Owners Manual - Page 11
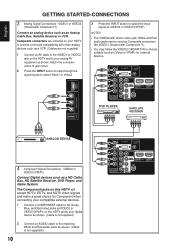
... button to step through the signal inputs to select Video1 or Video2.
3 Press the INPUT button to your compatible external devices.
1 Connect a COMPONENT cable to set Green, Blue, and Red video jacks asVIDEO2 or VIDEO3(YPbPr) on the HDTV and to select the input signal as shown.
English
GETTING STARTED-CONNECTIONS...
Owners Manual - Page 12

... antenna being plugged-in to tuner connector.
8 Use the CURSOR ▲ and ▼ buttons to highlight the
Channel Scan. Press the OK button. English
GETTING STARTED-POWER CONNECTION/CHANNEL SEARCH
POWER CONNECTION
5 Plug in Channel List and can be scanned using the CURSOR ▲ and ▼ buttons.
11 Choose the Scan to highlight...
Owners Manual - Page 15
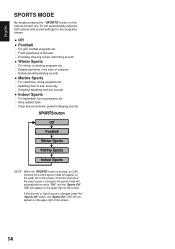
..., powerful banging sounds
NOTE : When the "SPORTS" button is changed , the sports mode will automatically be set to "Off", and the "Sports Off" OSD will appear on the upper right of the screen. Once the channel or the input source is changed under the "Sports Off" status, the "Sports Off" OSD will...
Owners Manual - Page 16

... Press the OK button.
3 Use the CURSOR ▲ and ▼ buttons to highlight CHANNEL. Move
OK Enter
MENU Return EXIT Exit
15 Press the OK button.
Press the OK button....
2 Highlight Air or Cable. Cable Search: It looks for analog and digital
channels that are two categories:
● Air
● Cable
AIR(Antenna) Search: It will appear beside...
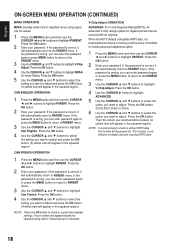
Owners Manual - Page 18
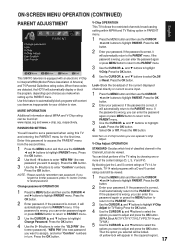
...Press the OK button. NOTE : Please carefully remember new password. Block the broadcast of classified channel in PARENT menu.
1 Press the MENU button and then use the CURSOR
◄ and...TV Rating. PASSWORD SETTING You will automatically return to reset password. ON-SCREEN MENU OPERATION (CONTINUED)
English
PARENT ADJUSTMENT
This SANYO television is wrong, you can operate V-Chip...
Owners Manual - Page 19
... is correct, it will appear in memory and the menu is only effective for digital channels including RRT5 data.
18 V-Chip Adjust OPERATION
ADVANCED- NOTE : If current program stream ... adjust and press the OK button. (A yellow lock will automatically return to make or cancel the selected settings. Press the OK button.
2 Enter your password. Press the OK button.
4 Use the CURSOR ...
Owners Manual - Page 20
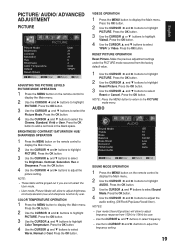
...Use the CURSOR ▲ and ▼ buttons to highlight
PICTURE. Make the previous adjustment settings under the PICTURE mode recovered from 100Hz to 10kHz by user. Press the OK button. ... ► buttons to adjust the
frequency setting.
19
English
NOTES: • User mode (Sound Equalizer) will allow to adjust
frequency response from the factory default value.
1 Use the CURSOR ◄...
Owners Manual - Page 21
... to highlight
AUDIO.
Press the OK button. It can reset previous adjusting settings during the AUDIO mode to the factory default value.
1 Use the CURSOR ◄ and ► buttons to highlight...buttons to the HDMI1 port. HDMI AUDIO OPERATION HDMI AUDIO SETTINGS HDMI1 includes three categories, Auto, Digital and Analog. (Default setting is selected from HDMI port or PC AUDIO INPUT port...
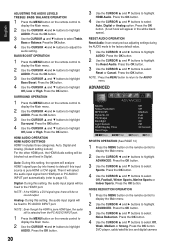
Owners Manual - Page 23
...8226; When you select to PC source or USB mode, the120Hz
CONDITION default setting is set to select
Reset or Cancel. Press the OK button.
3 Use the...location, U.S.A. Press the OK button.
RESET ADVANCED OPERATION Reset Advanced- Reset the previous adjustment settings under the ADVANCED mode to the factory default value.
1 Use the CURSOR ◄ and ► buttons to highlight
Time. Press the...
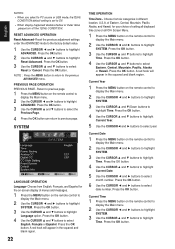
Owners Manual - Page 24

... display the Main menu.
2 Use the CURSOR ◄ and ► buttons to highlight
SYSTEM. The default setting is Off.
1 Press the MENU button on the remote control to display the Main menu.
2 Use ...9660; buttons to highlight
Power Saving. Choose from eight types of captions for Analog TV signal for your panel.
1 Press the MENU button on the remote control to display the Main menu.
2 Use the ...
Owners Manual - Page 25
... Color or Background Color.
Press the OK button. Allows your checking the record of the Category Title
CC Setting
CC Display / Muted=On / Off
CC Priority
Automatic / Analog CC / Digital CC
Digital CC Preset
Default / Custom
Font Size
Standard / Large / Small
Font Color
White / Red / Green / Blue / Yellow / Magenta / Cyan / Black
Font...
Owners Manual - Page 29
... to All)
• Adjust Volume. English
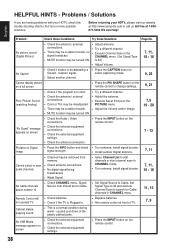
Problem:
Check these Conditions:
Try these Solutions:
Page No. No Caption
• Check if station is Plugged in the
CHANNEL menu. (Set Signal Type
• MUTE function may be turned ON.
• Check the Audio / Video connections.
• Press the INPUT button on the remote control...
Owners Manual - Page 30
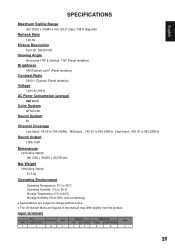
...
Full HD 1920X1080
Viewing Angle
Horizontal 178° & Vertical: 178° (Panel tentative)
Brightness
450(Typical) cd/m2 (Panel tentative)
Contrast Ratio
5000:1 (Typical) (Panel tentative)
Voltage
120V AC 60Hz
AC Power Consumption (average)
342 Watts
Color System
NTSC3.58
Sound System
M
Channel Coverage
Low band: 54.00 to 144.00MHz Mid band: 145...
Similar Questions

Sanyo 27 Inch And 32 Inch Tv Set
What retailers in Northern Virginia sell Sanyo 27 in flat screen television set? What retailers in N...
What retailers in Northern Virginia sell Sanyo 27 in flat screen television set? What retailers in N...
(Posted by bbriston 9 years ago)

Can I Connect My Care Sara Hydrophone To My Sanyo Dp46840 Flat Panel Tv And How
(Posted by freespirittonya 9 years ago)

Sanyo Dp55441 How Do I Get Hdmi Channel To Be Default Channel On Start Up
(Posted by joycndsgu 10 years ago)

Without Remote How Do I Set Up Channel Search
we got this tv without a remote. I bought a generic remote but cant find any channel but 3. How can ...
we got this tv without a remote. I bought a generic remote but cant find any channel but 3. How can ...
(Posted by jkloss3 11 years ago)