Singer 1512 PROMISE II Support Question
Singer 1512 PROMISE II Support Question
Find answers below for this question about Singer 1512 PROMISE II.Need a Singer 1512 PROMISE II manual? We have 1 online manual for this item!
Question posted by doctorwhogrl on February 16th, 2015
Help! I Keep Breaking My Thread!
My thread keeps breaking usually between the 1st - 4th stitch. Sometimes it will randomly break halfway through. I tested the tension on scrap of the same fabric and it will be fine one time then break the next. It's brand new thread, brand new needle, brand new machine, I'm just learning basics myself. I don't know what else to do. I'm pretty sure that I have it threaded correctly for the bobbin and the upper thread. I'm just so lost.
Current Answers
Related Singer 1512 PROMISE II Manual Pages
Instruction Manual - Page 2
... parts. Always unplug sewing machine from outlet. 15.
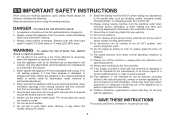
To reduce the risk of burns, fire, electric
shock, or injury to the nearest authorized dealer or service center for household use the proper needle plate. Use this manual. 3. Never operate the appliance with the appliance. Do not pull or push fabric while stitching. To disconnect...
Instruction Manual - Page 6

... Lifter ...15 Accessories ...16
Threading the Machine Winding the Bobbin ...18 Inserting the Bobbin ...20 Threading the Upper Thread ...22 Raising the Bobbin Thread ...24 Thread Tension...26
Sewing How to Choose Your Pattern ...28 Sewing Straight Stitch ...30 Reverse Sewing/ Removing the Work/ Cutting the Thread 32 Blind Hem ...34 Sew 4-step Buttonholes ...36 Sewing on Buttons ...38 Free Motion...
Instruction Manual - Page 9

Needle plate
9
7. Bobbin stopper
3
11. Face plate
5. Thread take-up lever
3. Pattern selector dial
2
9. Presser foot 8
6. Reverse sewing lever
4
11
5
6
7
9 EN Principal Parts of the Machine
1. Thread tension dial
2. Removable extension table/ accessory storage
1
10
8. Thread guide
10. Thread cutter
4.
Instruction Manual - Page 11

Bobbin winding spindle 14. Power cord
11 Handwheel 16. Power and light switch 17. Main plug socket 18. Foot speed control 21. Handle 13. EN Principal Parts of the Machine
12. Presser foot lifter 20. Bobbin thread guide 19. Spool pins 15.
Instruction Manual - Page 13
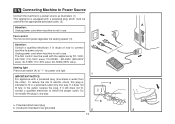
Sewing light
Press main switch (A) to " l " for power and light.
1
IMPORTANT NOTICE
For appliance with a polarized plug (one way. Do
not modify the plug in the outlet, reverse the plug.
If it does not
fit fully in any way. EN Connecting Machine to Power Source
Connect the machine... polarized outlet. (2)
Attention: Unplug power cord when machine is not in use . If it still does ...
Instruction Manual - Page 16

Button sewing foot
e. Darning plate
Optional accessories (2)
2
(These 6 accessories are however available as special accessories from your local
dealer.)
l. Blind hem foot
p. Spool pin felt (2x)
h. Bobbin (3x)
k. they
are not supplied with this machine; Overcasting foot
n. Satin stitch foot
q. All purpose foot
b. L-screwdriver
f. Edge/ quilting guide
j. Hemmer foot
o....
Instruction Manual - Page 18
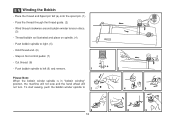
... Pass the thread through the thread guide. (2) - Step on spindle. (4) -
Thread bobbin as illustrated and place on foot control pedal. (7) - Wind thread clockwise around bobbin winder tension discs.
(3) - Push bobbin spindle to left (9) and remove. Hold thread end. (6) - Please Note: When the bobbin winder spindle is in "bobbin winding" position, the machine will not sew and the hand...
Instruction Manual - Page 20

... direction (arrow). 4. Insert it into the shuttle. Pull the bobbin case tab (a) and remove the bobbin case. 3. Pull the thread through the slit and under the finger. Leave
a 6 inch tail of thread. 5. Open the hinged cover. 2. Hold the bobbin case with one hand. Hold the bobbin case by the hinged latch. 6.
Attention...
Instruction Manual - Page 22
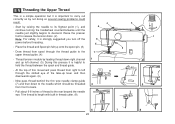
...helpful to hold the thread between the spool and thread guide. - Raise the presser foot to release the tension discs. (2) Note: For safety, it is strongly suggested you turn off the power before threading. - EN Threading the Upper Thread... several sewing problems could result. - Thread tension module by leading thread down to the needle which should be threaded from right to left ...
Instruction Manual - Page 24

...: If it is difficult to raise the bobbin thread, check to make sure the thread is not trapped by the hinged cover or the Removable Extension Table.
1
Gently pull on the upper thread to bring the bobbin thread up through the needle plate hole. (2) Lay both threads to the back under the presser foot. (3)
2
3
24...
Instruction Manual - Page 26

... number down. Normal thread tension for straight stitch sewing. To reduce the tension, turn the dial to good sewing.
- Thread tension too tight for straight stitch sewing. Correct thread tension is A
B
usually only desirable for straight stitch construction sewing.
- 90% of your fabric. For all sewing will always obtain a nicer
stitch and less fabric puckering when the upper...
Instruction Manual - Page 28

Reverse Sewing Lever
28
Pattern Selector Dial b. a b
a. The pattern selector dial may be turned in either direction. EN How to Choose Your Pattern
To select a stitch, simply turn the pattern selector dial (a).
Instruction Manual - Page 30
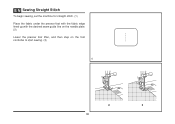
EN Sewing Straight Stitch
To begin sewing, set the machine for straight stitch. (1) Place the fabric under the presser foot with the fabric edge lined up with the desired seam guide line on the needle plate. (2) Lower the presser foot lifter, and then step on the foot controller to start sewing. (3)
1
2
3
30
Instruction Manual - Page 32

..., raise the presser foot and remove work
1
behind the needle and presser foot. (2)
Cutting the Thread
Pull the threads under and behind the presser foot. Sew a few reverse stitches. Pull threads down the reverse sewing lever (A). Release the lever and the machine will sew forward again. (1)
A
Removing the Work
Turn the handwheel toward you (counterclockwise) to bring
the...
Instruction Manual - Page 34
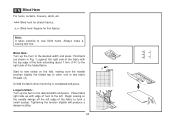
... top to the left edge of hem to catch one or two fabric threads. (2)
Unfold the fabric when hemming is completed and press. Begin sewing so
the needle swings off the left .
Note: It takes practice to the desired width and press. Tightening the tension slightly will produce a
deeper scallop.
34 Blind hem for firm...
Instruction Manual - Page 36
... upper thread tension will produce better
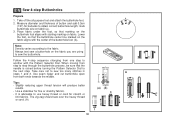
results. - mark buttonhole size on the fabric you are using to another with the Pattern Selector Dial. Place fabric under the foot, so that the needle is advisable to the fabric. The zig-zag should sew over the heavy thread or cord. (A)
36
(a) (b) 3
2 1
3 4
1 2
3
4
2
1
A
4 EN Sew 4-step Buttonholes
Prepare
1. Always test sew a buttonhole...
Instruction Manual - Page 38
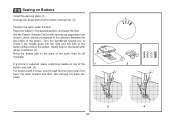
... the desired position and lower the foot. If a shank is required, place a darning needle on top of the
1
2
button and sew. (4)
For buttons with about 10 stitches. (3)
Bring the thread tails to button sewing foot. (2)
Position the work under the foot. Turn the handwheel toward you to the distance between the two holes of...
Instruction Manual - Page 40
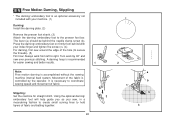
... tighten the screw (c). (4)
For darning, first sew around the edge of the hole (to coordinate sewing speed and movement of fabric and batting together.
A darning hoop is recommended
for straight stitch.
a
b c
5 3
4
40 Press the darning/ embroidery foot on firmly from left to the presser foot bar. It is accomplished without the sewing machine internal feed system.
Instruction Manual - Page 46
... on top and bottom.
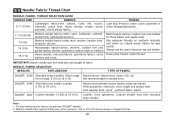
18 (110)
Heavy woolen, overcoat fabrics, upholstery fabrics, some Heavy duty thread, carpet thread. Always use genuine SINGER® needles. 2.
Natural and synthetic woven fabrics, polyester blends. For best sewing results always use the same thread on natural woven fabrics for best
Heavyweight fabrics-canvas, woolens, outdoor tent and results.
thin to large...
Instruction Manual - Page 55
...
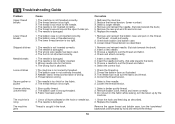
Problem Upper thread breaks
Cause 1.
The wrong foot is attached. 1.The machine is too tight. 1. Select a larger needle. 4. Remove and reinsert the bobbin case and pull on the fabric while sewing, let it be taken up by hand and remove the thread. Select a finer needle. 2. Clean the hook and feed dog as described. 1. The thread tension is not...
Similar Questions

I Get E7 Error Message On My Singer Model 7258 Sewing Machine. There Is No Refe
Error message E7 is up on my Singer Stylist model 7258 sewing machine. It is not working at all. I t...
Error message E7 is up on my Singer Stylist model 7258 sewing machine. It is not working at all. I t...
(Posted by ebellamybellamy9 5 years ago)


For Singer Promise Ii, Teeth Not Moving Clothe Forward
For my Singer Promise ii, why are the teeth not moving the cloth forward? The machine is brand new a...
For my Singer Promise ii, why are the teeth not moving the cloth forward? The machine is brand new a...
(Posted by mailingyen 9 years ago)

Beeping From Singer Sewing Machine Stylist Ii 5625
My sewing machine will beep and stop sewing after three inches of sewing. I have taken it to be repa...
My sewing machine will beep and stop sewing after three inches of sewing. I have taken it to be repa...
(Posted by arusheria 9 years ago)
When He Foot Pedal Is Pressed The Machine Does Not Engage
(Posted by Clydephillips 10 years ago)