Get support for Singer 7470 Confidence

Singer 7470 Confidence Support Question

Singer 7470 Confidence Support Question

Find answers below for this question about Singer 7470 Confidence.
Need a Singer 7470 Confidence manual? We have 1 online manual for this item!
Question posted by Rosebautista25rb on June 5th, 2021

What Is The Cause Of My Singer Not To Stitch? I Did All The Maintenance Work And

The person who posted this question about this Singer product did not include a detailed explanation. Please use the "Request More Information" button to the right if more details would help you to answer this question.

Current Answers

Answer #1: Posted by Odin on June 5th, 2021 12:29 PM
This answer was accepted by the poster of the original question.
Odin

Member since:
April 10th, 2010

Points: 41,236,630
1,100
points
Per Singer:

You may have accidentally lowered the buttonhole lever located just to the left of the needle bar. To make sure it is in the correct position for sewing, place your finger under the lever and push up.

Also make sure the needle is set at the highest position and the bobbin winding spindle has been pushed back to the left.

NOTE: To set the needle at the highest position, turn the hand wheel TOWARDS you, until the needle moves to the highest position.

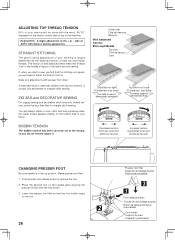
Finally, push the reverse button a couple of times, this will reset the machine.

If none of the troubleshooting techniques above solved the issue, please contact a SINGER Service Center to have your machine serviced.


Hope this is useful. Please don't forget to click the Accept This Answer button if you do accept it. My aim is to provide reliable helpful answers, not just a lot of them. See https://www.helpowl.com/profile/Odin.
Answer #2: Posted by SonuKumar on June 5th, 2021 9:39 PM
SonuKumar

Member since:
May 9th, 2021

Points: 16,667,050
100
points
https://www.manualslib.com/manual/262311/Singer-Confidence-7470.html

https://www.youtube.com/results?search_query=singer+7470+confidence+sewing+machine

https://www.youtube.com/watch?v=vzj2QG8yc_g

https://www.youtube.com/watch?v=iafvkrXHYkA

https://www.youtube.com/watch?v=04jMgPN2fx8

https://www.youtube.com/watch?v=5HiUR5Y5EVo

https://www.youtube.com/watch?v=ueFC9-3gdo0

https://www.youtube.com/watch?v=2oMrUtIa51c

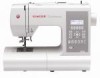
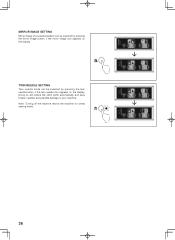
If Thread Loops Are Showing on the Underside of the Fabric

Thread looping on the underside of the fabric is always an indication that the upper thread is not correctly threaded. This happens when the upper thread is not correctly placed in the tension mechanism and has not been threaded through the take-up lever. To resolve this, rethread the machine, making sure to first raise the presser foot lifter and raise the needle to its highest position, so that the thread can be properly seated in the tension mechanism and take up lever.

f Thread Is Shredding

Thread can shred when you sew if it is old or poor quality. Thread can also shred if the machine needle is worn out, or if the needle is the wrong style and size for the thread being used. The thread should pass freely through the eye of the needle in order to sew properly. Use threads that have a smooth, even filament.

If Fabric Is Not Feeding Properly

If the machine is not feeding fabric when you start sewing, it could be that the presser foot lifter has not been lowered before stepping on the foot controller. Lower the presser foot and resume sewing.

Another reason the machine may not be feeding fabric is that the feed dogs (or feed teeth) are disengaged, so make sure that they are properly engaged for sewing. (Note: If your machine has drop feed, resume normal sewing by moving the drop feed lever to regular sewing mode, then turn the hand wheel toward you one full revolution to re-engage the feed dogs).

The machine may also not feed fabric if the stitch length control is set to "0". Increase the stitch length setting and resume sewing.

If Needles Are Breaking

Needles can break if they are bent, dull or damaged. Discard the old needle and insert a new needle, appropriate for the thickness and type of fabric being sewn.

Needles can also break if you are "pushing" or "pulling" the fabric while sewing, as this causes the needle to deflect. The feed dogs (or feed teeth) are actually designed to do the work of drawing the fabric under the foot as you sew - you just need to guide the fabric!

If Upper Thread Is Breaking

If the upper thread is breaking, it could be that the thread path is obstructed, the machine is not correctly threaded or the upper thread tension is set to tightly. Be sure that the machine is correctly threaded and there are not obstructions (for example, thread getting caught behind the spool cap or a "rough spot" on the spool itself). Check also that the upper thread tension control is set correctly (consult your machine manual).

If Stitches Are Skipping

If your stitches are skipping on the fabric as you sew, this could be an indication that the needle was inserted incorrectly. Make sure that the needle goes all the way up into the needle clamp and that the flat side (at the top section of the needle) is facing toward the back.

Another reason stitches can be skipping is if the needle is the wrong style for the fabric. For instance, if you are sewing a stretch knit fabric using a regular point needle, you could be experiencing skipped stitches. Switching to a ball point needle will prevent stitches from skipping on stretch knit fabrics.

Worn out or damaged needles can also cause skipped stitches on a variety of fabric types. Discard the needle and insert a new one, appropriate for the fabric you will be sewing.

If Stitches Appear Distorted

Stitches can appear distorted on the fabric if you are "pushing" or "pulling" the fabric as you sew. Just let the feed dogs (or feed teeth) do the job of drawing the fabric along under the foot.

Another reason stitches could appear distorted is if the incorrect presser foot is used. For example, dense stitches usually require the use of either a Satin Foot or Open Toe Foot, so that the stitching can pass freely underneath. If the regular, All-Purpose Foot is used for dense stitching, stitches could get "stuck" under the foot. Just switch to a presser foot more appropriate for these types of stitches.


Please respond to my effort to provide you with the best possible solution by using the "Acceptable Solution" and/or the "Helpful" buttons when the answer has proven to be helpful.

Regards,
Sonu
Your search handyman for all e-support needs!!

Related Singer 7470 Confidence Manual Pages

Instruction Manual - Page 3

... panel 28 - 31 Reverse operation button 32 - 33 2. CARING FOR YOUR MACHINE Cleaning hook area and feed dogs 80 - 81 4. OTHER INFORMATION Satin stitch foot, Twin needle 82 - 83 Straight stitch needle position 84 - 85 5. KNOWING YOUR SEWING MACHINE Machine identification 6 - 7 Accessories 8 - 9 Setting up your machine 10 - 11 Spool pins, Presser foot lifter 12 - 13 Feed dog...
Instruction Manual - Page 6

1. KNOWING YOUR SEWING MACHINE MACHINE IDENTIFICATION 1. Extension table (Accessory box) 7. Cord socket 15. Needle ...control 35. Bobbin winder shaft 8. Automatic needle threader 20. Power line cord 34. Thread tension control 4. Reverse stitch button 10. Feed dog control 18. Buttonhole lever 19. Bobbin cover plate 25. Identification plate 16. Presser foot ...
Instruction Manual - Page 8

... foot 11. Blind stitch foot 13. The Satin Foot (11) is called the General Purpose Foot and will be sure they are Class I5 J. 1 2 3 4 5 6 7 8 9 10 11 12 13  Bobbins (4 total - 1 in machine) 3. Spool pin cap (mini) 6. Buttonhole opener/Brush/Seam Ripper 9. Spool pin felt discs (2) 5. ACCESSORIES FOR SEWING MACHINE 1. Needles 2. Satin stitch foot 12.
Instruction Manual - Page 14

... and pull it off to reach places. 14 With the extension table removed the machine converts into place until it provides a large working surface as shown. To replace, slide the extension table back into a slim free-arm model for sewing children's clothes, cuffs, trouser legs, and other difficult to the left as a standard...
Instruction Manual - Page 24

...before a new sewing project. FABRICS THREAD The fabrics below can go. 6. Insert the new needle into the needle plate slot. 24 Flat side toward the back. 5. Always disconnect the machine from power ... 16/100 purple band * Do not use on stretch fabrics. * For best sewing results, always use a Singer Branded Needle. Flat side Côté plat Lado plano Pin Butée Pasador...
Instruction Manual - Page 26

... TOP THREAD TENSION 90% of your sewing will be less than that for straight stitch sewing. Raise presser foot lifter. 1. Helpful Hint: A slight adjustment to adjust it. side of AUTO will always obtain a nicer stitch and less puckering when the upper thread appears slightly on top of the machine. Place the desired foot on the...
Instruction Manual - Page 28

...machine is turned on, straight stitch is selected and pop-up screen for continuous pattern sewing. Function 1 (Button A to E) - Function 2 (Button B to E) - used to sew repeatedly. 9. used to toggle between single and continuous pattern sewing of modified settings for decorative stitches... cause pattern sequences to modify stitch width and length settings. CONTINUOUS SEWING ...
Instruction Manual - Page 30

When sewing patterns, buttonhole lever is displayed, fix the problem following the instructions below. 1. When an error message is ...; Check bobbin winder and move it again to left. 3. Bobbin winder is made, the sewing machine will not operate with beep sound and an error message will stop sewing. Push it to stop needle at down position whenever you stop at up position. 12. ...
Instruction Manual - Page 32

... carried out while the reverse stitch button is pushed. REVERSE OPERATION BUTTON Dual purpose reverse/tacking stitch switch Reverse stitch switch Interrupteur couture arrière interruptor de puntadas hacia atrás * Reverse stitch function for tie-off of other stitches ( ) The sewing machine makes 4 tiny tacking stitches to tie off the sewing pattern to sew in the pattern where...
Instruction Manual - Page 34

... change stitch length and stitch width of stitch length, width and needle position. These stitches sew continuously when selected. These stitches sew in the machine until the machine is selected automatically and a pop-up screen for longer length. UTILITY AND CONTINUOUS STITCHES These stitches will sound. The other stitches to change between stitch patterns while the machine remains...
Instruction Manual - Page 36

Note: Turning off the machine returns the machine to your machine. Doing so will reduce the stitch width automatically and save broken needles and possible damage to normal sewing mode.   36 MIRROR IMAGE SETTING Mirror image of a selected pattern can be selected by pressing the twin needle button, if the twin needle ...
Instruction Manual - Page 40

... the fabric. 5 5. STRAIGHT STITCHING A Straight stitch is most frequently used for piecing quilt blocks and also for all types of sewing. 1 Let's begin by following the steps below. 1. When reaching the edge of the machine, leaving about 6" (15cm) clear. 3. First turn the handwheel toward the back of the material, stop the sewing machine. 2 4 3 NOTE: The Needle...
Instruction Manual - Page 42

... the zipper foot. Press the foot control and the machine will sew 4 stitches forward and then 4 stitches in forward and stop. 42 To sew down the right side, attach left side of the foot. When sewing the machine will sew 4 stitches in reverse and then 4 stitches in reverse and continue to sew forward until you acheive the desired appearance. 4. Baste the...
Instruction Manual - Page 44

... avoid puckering. General Purpose Foot :Thread tension control - PLACEMENT OF PATTERNS Stitch width of stitch and sewing speed, but the bobbin thread must never appear on the sewing machine. Under side Côté de dessous Reverso Top side Côté de dessus Cara ADJUSTING STITCH WIDTH AND LENGTH Dark grey box indicates the Auto/default value...
Instruction Manual - Page 48

... This is recommended for bartacks, mending tears, patching, sewing towelling, patch-work and attaching flat elastic. For this reason it makes three short stitches where the normal zig-zag makes only one. NOTE: Mending a tear or overedging as its name implies, it is a strong stitch because as shown in illustration requires manual adjustment of...
Instruction Manual - Page 52

... STITCH The Blanket stitch is traditionally a hand sewn stitch used for picot-like edges, for heirloom sewing and for decorative stitching on blankets. Lightweight woven fabrics will be used for overcasting and attaching elastic and stretch lace. 1. This multi-purpose stitch can also be a series of the fabric easier. ENTREDEUX STITCH Useful for applique work. The Entredeux stitch...
Instruction Manual - Page 54

.... For drawn thread work, choose a coarse linen type fabric. DOUBLE OVERLOCK STITCH The Double overlock stitch has three main uses. LADDER STITCH The Ladder stitch is primarily used for the ladder stitch is couching over thin tape in a same or contrasting color. Place the stitch in one operation. It is primarily used for sewing over narrow ribbon, yarn...
Instruction Manual - Page 80

... (4). 6. Make sure that the needle is suggested. Remove the bobbin case (2). 3 4. Remove two screws on the hook race as illustrated. (3) (4) 80 CARING FOR YOUR MACHINE CLEANING HOOK AREA AND FEED DOGS 1 Always disconnect the machine from power supply by the arrows. (A, B) NOTE: Singer Brand Sewing Machine Oil is at all purpose" oil as illustrated for...
Instruction Manual - Page 82

... thread through each spool pin. Turning off the machine returns the machine to thread the twin needle. NOTE: Needle threader cannot be used primarily for single needle sewing. THREADING THE TWIN NEEDLE 1. OTHER INFORMATION SATIN STITCH FOOT The Satin stitch foot is an attractive stitch used to normal sewing mode. Slightly loosen top thread tension for pin...
Instruction Manual - Page 94

.... To unplug, grasp the plug, not the cord. 10. Switch the sewing machine off before operating machine. Moving parts-To reduce risk of electric shock, this manual. 3. SAVE THESE INSTRUCTIONS This product is for all. (European Union only) ® SINGER is not working properly, if it in the outlet, reverse the plug. POLARIZED PLUGS CAUTION...

Similar Questions

Bobbin Winder
The Bobbin Winder stops after 4 seconds the screeches, why?
(Posted by pattiashton1 1 year ago)
Singer7470 Making A Beeping Sound And Not Working
hi my singer 7470 which i just recieved is making a beeping sound every time i press the pedal and i...
(Posted by jamespyper 3 years ago)
I Get E7 Error Message On My Singer Model 7258 Sewing Machine. There Is No Refe
Error message E7 is up on my Singer Stylist model 7258 sewing machine. It is not working at all. I t...
(Posted by ebellamybellamy9 5 years ago)
Beeping From Singer Sewing Machine Stylist Ii 5625
My sewing machine will beep and stop sewing after three inches of sewing. I have taken it to be repa...
(Posted by arusheria 9 years ago)
Singer Sewing Machine 7470
I stopped sewing for a minute and tried to start again. The machine will beep twice and post no erro...
(Posted by Jmtlcat 10 years ago)
Ask a New Question
Use the box below to post a new question about this Singer product .
Points & Prizes
  • You can earn points for nearly everything you do on HelpOwl.com
  • You can trade in those points for gift cards at leading retailers such as Amazon.com and Walmart
  • It's that simple!
See How it Works
Create a Free Account

Singer Manuals

Find free Singer 7470 Confidence manuals and user guides available at ManualOwl.com. Try out our unique manual viewer allowing you to interact with manuals from directly within your browser!

Singer Reviews

View thousands of Singer user reviews and customer ratings available at ReviewOwl.com.

Contact Information

Complete Singer customer service contact information including steps to reach representatives, hours of operation, customer support links and more from ContactHelp.com.

Scoreboard Ratings

See detailed Singer customer service rankings, employee comments and much more from our sister site.