Singer 8500Q MODERN QUILTER Support Question
Singer 8500Q MODERN QUILTER Support Question
Find answers below for this question about Singer 8500Q MODERN QUILTER.Need a Singer 8500Q MODERN QUILTER manual? We have 1 online manual for this item!
Question posted by caithness1 on September 13th, 2017
Top Thread Bunching And Tangling In The Bobbin Space
fault C 9 appears - the top thread is bunching below the fabric and tangling in the bobbin space
Current Answers


Related Singer 8500Q MODERN QUILTER Manual Pages
Instruction Manual - Page 2
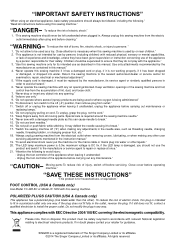
³,03257$176$)(7
Instruction Manual - Page 5
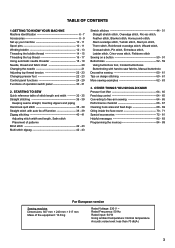
...machine 10 - 11 Spool pins 10 - 11 Winding bobbin 12 - 13 Threading the bobbin thread 14 - 15 Threading the top thread 16 - 17 Using automatic needle threader 18 - 19 Needle, thread and fabric chart 20 Changing the needle 21 Adjusting top thread...European version
Sewing machine Dimensions: 567 mm × 240 mm × 317 mm Mass of operation switch panel 30 - 31
2. STARTING TO SEW Quick ...
Instruction Manual - Page 10
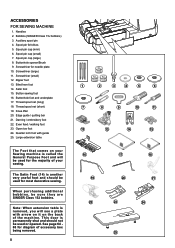
... Foot and will be sure they are SINGER Class 15J bobbins.
Needles 2. Button sewing foot 16. Darning / embroidery foot 22. Open toe foot 24. Auxiliary spool pin 4. Screwdriver (small) 12. Spool pin cap (large) 8. ACCESSORIES FOR SEWING MACHINE
1. Spool pin felt discs 5. Buttonhole opener/Brush 9. Thread spool net (short) 19. See page 64 65 for...
Instruction Manual - Page 12

... corriente/luz "ON"
SPOOL PINS HORIZONTAL SPOOL PIN for normal thread spool
Place thread spool on the pin and secure with or without the foot control (see page 30 - 31). NOTE: In sewing mode, the machine can be disconnected from the power supply.
When servicing the machine, or when changing needles or lights, etc., the...
Instruction Manual - Page 14
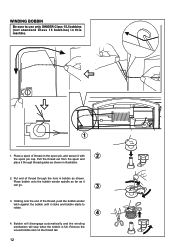
... through the hole in this machine.
1
1. WINDING BOBBIN
Be sure to rotate.
4
4. Remove the wound bobbin and cut the thread tail.
12
Bobbin will disengage automatically and the winding mechanism will stop when the bobbin is full. Place a spool of the thread, push the bobbin winder latch against the bobbin until it clicks and bobbin starts to use only SINGER...
Instruction Manual - Page 22

... Needle. Always refer to needle and thread selection. They are listed as in the bobbin as examples of thread is a practical guide to it before a new sewing project. Corduroy Weight Flannel
Gabardine Gingham ... coser el material nuevo.
TYPE
Light- NEEDLE, THREAD AND FABRIC CHART
Your fabric will determine the choice of any ¿EHU
FRWWRQOLQHQVLONZRRO synthetic, rayon, ...
Instruction Manual - Page 24

...tensión
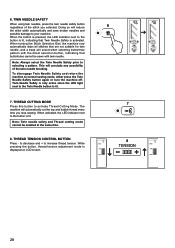
BOBBIN TENSION
The bobbin tension has been correctly set at the factory, so you will always obtain a nicer stitch and less puckering when the upper thread appears slightly on ... BUTTON HOLE SEWING
For zigzag sewing, satin stitch and decorative stitch functions, thread tension should be less than that the machine is in the middle of layers of the fabric you are sewing.
,IZKHQ\...
Instruction Manual - Page 30
...button is displayed on LCD screen.
6
7 8
28 This will automatically cut the top and bobbin thread every time you selected. Twin Needle Safety is only active when the LED light next to ...cannot be enabled at the same time.
8. The machine will preclude any possibility of the stitch you stop sewing. Note: Twin needle safety and Thread cutting mode cannot be sewn with the direct selection ...
Instruction Manual - Page 32
...; Green light indicates machine is ready to thick fabric, the
lower speed continues.
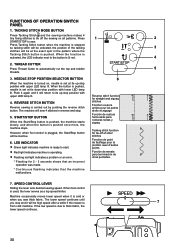
30 FUNCTIONS OF OPERATION SWITCH PANEL
1. TACKING STITCH MODE BUTTON
Press Tacking Stitch and the sewing machine makes 4
WLQ\ ¿[LQJ VWLWFKHV WR WLH RII WKH VHZLQJ RQ DOO SDWWHUQV 3UHVV
1
2
START/STOP to automatically cut the top and bobbin
5
threads.
3. NEEDLE STOP...
Instruction Manual - Page 38
... hands. Start/stop the sewing machine.
Power/light switch
F G
2
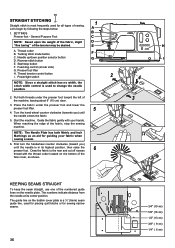
NOTE: Since a straight stitch has no width, the stitch width control is used to the rear and cut off excess
6
thread with your fabric when sewing a seam.
6. Tacking stitch mode button C. When reaching the edge of the numbered guide lines on the bobbin cover plate is a ¼...
Instruction Manual - Page 40
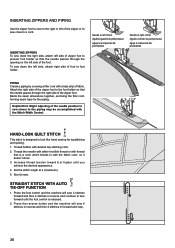
... holder. STRAIGHT STITCH WITH AUTO
TIE-OFF FUNCTION
16
1. INSERTING ZIPPERS To sew down the left side of foot to the piping may be accomplished with the fabric color, so it doesn't show.
3. Thread bobbin with desired top stitching color.
2. To sew down the right side, attach left side, attach right side of zipper foot...
Instruction Manual - Page 42
...é, bar-tacking, etc.
General Purpose Foot
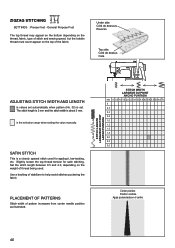
The top thread may appear on the bottom depending on the thread, fabric, type of stitch and sewing speed, but the bobbin thread must never appear on the weight of the fabric. Set the stitch length between 0.5 and 2.0, depending on the top of thread being used for satin stitching. ZIGZAG STITCHING 04 05...
Instruction Manual - Page 56
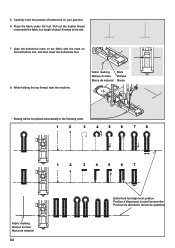
... mark the position of about 4 inches to the rear.
7. While holding the top thread, start the machine.
Fabric marking Marque du tissu Marca de material
Mark Marque Marca
* Sewing will be completed automatically in the following order.
1
2
3
4
5
6
7
8
1
2
3
4
5
6
7
Fabric marking Marque du tissu Marca de material
54
Buttonhole foot alignment position Position d'alignement du...
Instruction Manual - Page 68

... page 52 - 55). * Buttonhole lever is being pulled or pushed against machine feeding
action. - Guide it gently. * Bobbin has not been wound evenly. - Guide it gently. * Needle size is not correct for thread and fabric. (see page 22 - 23). * Fabric is not lowered when sewing buttonhole.
- Adjust thread tension.
(see page 21). Wait for sheer or soft...
Instruction Manual - Page 70
... power
CAUTION supply by the arrows. (A, B)
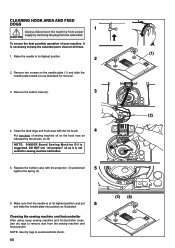
NOTE: SINGER Brand Sewing Machine Oil is VXJJHVWHG '2 127 XVH ³DOO SXUSRVH´ RLO DV LW LV QRW
suited for removal.
3. Remove the bobbin case (2).
3
4. NOTE: Use dry rags to remove dust from the sewing machine and footcontroller.
Use dry rags to avoid electrical shock.
68
(3) (4) Replace the...
Instruction Manual - Page 72

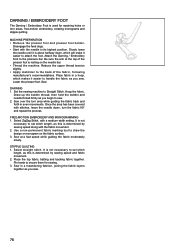
... and lint before it is used frequently : It should be oiled periodically. Remove two screws and face cover. 2.
For best results always use SINGER Brand Sewing Machine Oil. OILING INSIDE THE FACE COVER
1. For the machine used after a long interval : It should be oiled before oiling. Put one drop of oil other than...
Instruction Manual - Page 74
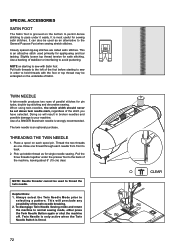
... . Helpful Hints: 1. Closely spaced zig-zag stitches are called satin stitches. Use of a SINGER Brand twin needle is most useful for satin stitching. Always select the Twin Needle Mode prior to normal sewing mode, either press the Twin Needle Button again or shut the machine off. Pick up bobbin thread as one thread through each spool...
Instruction Manual - Page 78
...
the needle until it easier to attach the foot. Set the sewing machine to the pressure bar.
Draw up the bobbin thread, then hold the bobbin and QHHGOHWKUHDG¿UPO\DV\RXEHJLQWRVHZ 2. FREE-MOTION EMBROIDERY AND MONOGRAMMING 1. Use a non-permanent fabric marking tool to secure them for repairing holes or torn areas...
Instruction Manual - Page 80

... layers of its own set of feed dogs that work in conjunction with the sewing machine's feeding system to aid the movement of the fabric, right sides together, under the presser foot. Place all layers of the area that you will be removed easily in case the stitching does not ...
Instruction Manual - Page 82

... four leg extensions. QUARTER INCH FOOT WITH GUIDE
This Quarter Inch Foot with a soft towel. Sew, keeping the fabric's edge even with Guide.
2. Turn table upright. 3. Readjust legs height if needed, so that the needle is flush around sewing machine (unevenness of table could cause uneven feeding of circle sizes. 1. Attach large extension table...
Similar Questions

Arrived With Locked Wheel. What Is Wrong?
(Posted by Raniarneson 4 years ago)

I Get E7 Error Message On My Singer Model 7258 Sewing Machine. There Is No Refe
Error message E7 is up on my Singer Stylist model 7258 sewing machine. It is not working at all. I t...
Error message E7 is up on my Singer Stylist model 7258 sewing machine. It is not working at all. I t...
(Posted by ebellamybellamy9 5 years ago)

Having A Power Problem With My Modern Quilter 8500q
I have a Singer Modern Quilter 8500Q sewing machine , it is about 10 months old and tonight it just ...
I have a Singer Modern Quilter 8500Q sewing machine , it is about 10 months old and tonight it just ...
(Posted by Rosbel1227 7 years ago)

Keep Getting Error Messages That Thread Is Broken When It Is Not
And also get message that bobbin is jammed and to clean. When I retread and clean the bobbin area st...
And also get message that bobbin is jammed and to clean. When I retread and clean the bobbin area st...
(Posted by Anonymous-148126 9 years ago)

Beeping From Singer Sewing Machine Stylist Ii 5625
My sewing machine will beep and stop sewing after three inches of sewing. I have taken it to be repa...
My sewing machine will beep and stop sewing after three inches of sewing. I have taken it to be repa...
(Posted by arusheria 9 years ago)