Singer 8768 HERITAGE Support Question
Singer 8768 HERITAGE Support Question
Find answers below for this question about Singer 8768 HERITAGE.Need a Singer 8768 HERITAGE manual? We have 1 online manual for this item!
Question posted by evamadera on November 2nd, 2015
Manual in Spanish how can I get lost
The person who posted this question about this Singer product did not include a detailed explanation. Please use the "Request More Information" button to the right if more details would help you to answer this question.
Current Answers
Answer #1: Posted by TommyKervz on December 5th, 2015 3:01 AM
TommyKervz

Member since:
January 10th, 2013 Points: 17,776,813

Member since:
January 10th, 2013 Points: 17,776,813
Related Singer 8768 HERITAGE Manual Pages
Instruction Manual - Page 2

... attachments recommended by or near children." 2. "Never drop or insert any object into water or other user servicing adjustments mentioned in this sewing machine is necessary when this manual." 4. "Always unplug sewing machine from all instructions before
servicing. Do not modify the plug in a polarized outlet only one blade wider than the other).
"DANGER--To...
Instruction Manual - Page 5

... - 11 Spool pins 12 - 13 Presser foot lifter, Feed dog control 12 - 13 Converting to -sew fabrics
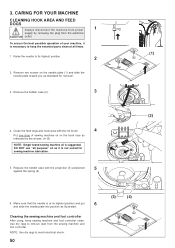
3. CARING FOR YOUR MACHINE Cleaning hook area and feed dogs 50 - 51
Cleaning the sewing machine and foot controller
4. STARTING TO SEW Quick reference table of stitch length and width ---------- 30 - 31 Straight stitching 32 - 35
Keeping seams...
Instruction Manual - Page 8

...
34. Thread cutter/holder
7. Reverse stitch button
11. Power/light switch
15. Instruction manual
20
21 22 23 24
1
8
9
10
11
19
16 17 18 25 26 27 28 29 30 31 32
33
34
35
6 KNOWING YOUR SEWING MACHINE
MACHINE IDENTIFICATION
1. Bobbin winding tension disk 3. Horizontal spool pin
12. Hand wheel
7
14. Presser...
Instruction Manual - Page 10

Spool pin cap (small) 6. Spool pin cap (medium) 7. Screwdriver for most of your decorative sewing - Buttonhole foot
The foot that comes on your sewing machine is another very useful foot and should be used for needle plate 10. Auxiliary spool pin 4. Spool pin cap (large) 8. Satin stitch foot 12.
Needles 2. ...
Instruction Manual - Page 12

...FOOT CONTROL
Connect the plug of the power line cord into the machine socket. NOTE: W h e n f o o t c o n t r o l i s disconnected, the machine will not operate until the power/light switch is turned on....power and the light. Connect the foot control plug (3) into the cord socket (1) and your machine the first time. Power/light switch "OFF" Interrupteur moteur/lumière « Fermé...
Instruction Manual - Page 14

Down Basse Abajo
Feed dog control Levier de contrôle des griffes Control de dientes
CONVERTING TO FREE-ARM SEWING
Your machine can be placed to change presser foot.
3.
If the thread spool has a thread retaining slit, it will see the feed dog control when you with a ...
Instruction Manual - Page 16

... end of thread on the foot control again to continue
to the
right until it through the hole in bobbin as shown in illustration.
1
2. Start machine. Push shaft to the left position, if it is down.
4. The bobbin will automatically stop to fill, stop turning
when completely filled. Push bobbin winder...
Instruction Manual - Page 26
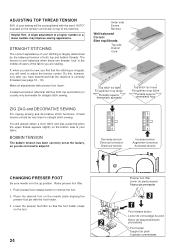
... tension should be accomplished with the word "AUTO" exposed on the tension control dial on top of the machine.
You will be less than for straight stitch sewing.
ADJUSTING TOP THREAD TENSION
90% of your sewing will always obtain a nicer stitch and less puckering when the upper thread appears slightly on the bottom...
Instruction Manual - Page 28
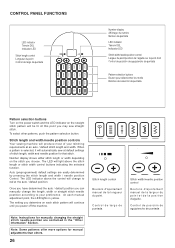
... of stitch length, width and needle position for manually changing the straight stitch needle position are easily determined by pressing the stitch length and width / needle position Control. Stitch length and width/needle position controls
Your sewing machine will be lit. The LED will automatically sew at the auto / default position. Once you have...
Instruction Manual - Page 30

... long as the reverse stitch button is pressed.
* Tacking stitch function for tie-off the sewing pattern to tie off the sewing on all patterns except straight and zigzag stitches. The position of other stitches ( ) The sewing machine makes 4 tiny tacking stitches to avoid raveling at the exact spot in the pattern where the...
Instruction Manual - Page 34

... the tension may be desired.
The numbers indicate distance from the needle at the start and end of
the machine, leaving about 6" (15cm) clear. 3. Pull both metric and inch markings as those in doll clothes or...the weight of the fabric, slight "fine tuning" of the fabric, stop the sewing machine. Place the fabric under the presser foot toward the back of the seam.
KEEPING SEAMS...
Instruction Manual - Page 36

..., pin or tack to the piping may be accomplished with desired top stitching color. Thread bobbin with the stitch width control. When
sewing, the machine will pull this thread to sew. Increase thread tension a little at a time and continue until
you acheive the desired appearance. 4. Helpful hint: Slight adjusting of the needle position...
Instruction Manual - Page 38

...Cara
ADJUSTING STITCH WIDTH AND LENGTH
Dark grey box indicates the auto/default value set manually. NOTE: The values shown in the chart are experiencing puckering, slightly reduce the tension...bottom depending on the thread, fabric, type of stitch and sewing speed, but the bobbin thread must never appear on the sewing machine.
The light grey boxes indicate all the possible personal preference ...
Instruction Manual - Page 40

...
Envers
Envers
Reverso
Reverso
3. The stitch width control changes the swing of the guide.
4. Sew slowly, guiding the fabric carefully along the edge of the needle for overcasting all types of ... the right side of fabrics. NOTE: Mending a tear or overedging as shown in illustration requires manual adjustment of the fabric. Medium to the left. It
3
B
should just pierce the fold ...
Instruction Manual - Page 42

... ideal for smocking and useful for overcasting and attaching elastic and stretch lace. 1. it sews and finishes the seam in repairing raw or worn edges of strain. It's very effective... suitable for edging neck-bands, armholes, sleeves and hems. When manually adjusted to a very narrow width, it locks three times - NOTE: When sewing the honeycomb stitch, the satin stitch foot MUST be a series ...
Instruction Manual - Page 48

...button and calculates the size buttonhole required. While holding the top thread, start the machine. Pull out the bobbin thread
underneath the fabric to a length of about 4...
(A)
(B) Buttonhole foot
Pied boutonnière
Prensatelas de ojales
(C)
(C)
8. SEWING A BUTTONHOLE
USING BUTTONHOLE FOOT
Your machine offers you two different widths of bartack buttonholes sewn by a system that it...
Instruction Manual - Page 52
....
50
(3)
(4)
NOTE: Use dry rags to its highest position and put
6
and slide the needle plate into position as illustrated for sewing machine lubrication.
5. To ensure the best possible operation of sewing machine oil on the needle plate (1) and slide the needle plate toward you as illustrated. Remove the bobbin case (2).
3
4. DO NOT use...
Instruction Manual - Page 54

... in broken needles and possible damage to 13 different positions with your machine. Doing so will preclude any possibility of tissue paper or interfacing for appliqueing and bar tacking. Draw one . Slightly loosen top thread tension for single needle sewing. Use a backing of the twin needle breaking. 2.
Helpful hints: 1.
Use of the...
Instruction Manual - Page 56

... page 18 - 19). * Thread is not threaded correctly (see page 23). Lower presser foot. * Stitch length is not lowered when sewing buttonhole.
- Raise feed dogs. Replace needle (see page 23). * Machine is caught in hook. - THREAD PROBLEMS
Thread bunches. * Top and bobbin threads are not drawn back under presser foot about 6 inches...
Instruction Manual - Page 58

... is pushed. Select a stitch pattern that it drops down to start sewing before the presser foot was pushed down vertically between the stoppers. however the buttonhole lever is not an error message. No correction is selected on the machine.
Buttonhole stitch is needed.
1. SYSTEM ERROR
All system error corrections are displayed...
Similar Questions

Singer Heritage Lights
Got this singer heritage 2 months ago and both lights went out. anyway I can fix ?
Got this singer heritage 2 months ago and both lights went out. anyway I can fix ?
(Posted by edisonman 8 years ago)

Led Lights Go On And Off When Sewing
I just purchased this sewing machine. The 3 LED lights that come on when sewing, do not stay on. Any...
I just purchased this sewing machine. The 3 LED lights that come on when sewing, do not stay on. Any...
(Posted by crfrancis51 10 years ago)

Pin Popped Out On The Auto Threader ! Singer 8768
A pin popped out on my three month old singer heritage sewing machine. the pin is from theauto threa...
A pin popped out on my three month old singer heritage sewing machine. the pin is from theauto threa...
(Posted by skeyc78 10 years ago)

7256 Sewing Machine Users Manual
I need the users manual for Singer sewing machine 7256.
I need the users manual for Singer sewing machine 7256.
(Posted by 7kAkqa3fP9 10 years ago)