Singer 9960 Quantum Stylist Support Question
Singer 9960 Quantum Stylist Support Question
Find answers below for this question about Singer 9960 Quantum Stylist.Need a Singer 9960 Quantum Stylist manual? We have 2 online manuals for this item!
Question posted by vajvel on July 14th, 2014
How To Oil Singer Quantum Stylist 9960
The person who posted this question about this Singer product did not include a detailed explanation. Please use the "Request More Information" button to the right if more details would help you to answer this question.
Current Answers
Related Singer 9960 Quantum Stylist Manual Pages
Instruction Manual - Page 1

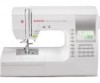
INSTRUCTION MANUAL 9960
Instruction Manual - Page 2

... instruction manual. 16. Do not unplug by an authorized service representative.
2 SINGER is being used or where oxygen is a registered Trademark of The Singer Company Ltd. Always use outdoors. 7. Always unplug sewing machine from the electric outlet immediately after using and before using a sewing machine, basic safety precautions should be performed by pulling on top of...
Instruction Manual - Page 3

............. 42
A. After darning or free-hand embroidery 42
TWIN NEEDLE SEWING 43 DECORATIVE & LETTER STITCH SEWING ... 44
A. SELECTING DECORATIVE & LETTER STITCH (selecting mode 44
B. SHIFTING THE CURSOR 44 C. TO DELETE PATTERN 45 F. EDIT BUTTON 12 I . INSERTING THE BOBBIN 15
THREADING THE MACHINE 16
A. TURNING CORNERS 20 E. ATTACHING THE DARING/ EMBROIDERY FOOT 26...
Instruction Manual - Page 4

... of this sewing machine when considered necessary without notification or obligation.
EU only
1. Children should be connected to operate the machine.
Copyright © 2010 THE SINGER COMPANY All Rights...board. This machine intended for household use will provide you with the International Electrotechnical Commission requirements of the CISPR. MODEL 9960
PREFACE Thank you...
Instruction Manual - Page 6
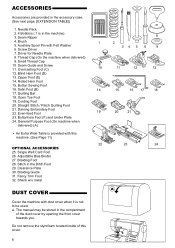
...27. Fancy Trim Foot 32. Rolled Hem Foot
15. Button Sewing Foot
16. Cording Foot
20. General Purpose Foot (On machine when
delivered) (A)
• An Extra Wide Table is provided...(See next page, [EXTENSION TABLE])
7
1. Needle Pack
2. 4 Bobbins ( 1 is not to be stored in the machine)
3. Seam Ripper
8
4. Screw Driver
1
2
34 5 6
9
7. Blind Hem Foot (D)
13. Straight Stitch /...
Instruction Manual - Page 19

... you reach the end of the stitch. This function can be made and lower the presser foot. 2.
Tack mark will change to sew. Sew 4-5 reverse stitch. 3. Place the fabric in reverse stitch. C. Press and hold reverse button and sew 4-5 reverse stitches. Machine will disappear.
19 Machine will sew tacking stitches automatically and then start /
stop automatically. 4. B.
Instruction Manual - Page 25

... reverse stitch
General Purpose Foot (A)
A. Position the fabric under the presser foot and lower it . 2. Press the thread cutter button .
Machine will sew a few stitches backward and sew a few stitches forward and stop sewing. 4. Press the thread cutter button.
25 Position the fabric under the presser foot and
lower it .
2. Straight Stitch 1. Straight Stitch...
Instruction Manual - Page 26

...
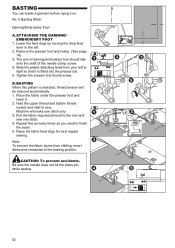
3. Tighten the presser foot thumb screw. Be sure the needle does not hit the dress pin, while sewing.
26 Lower the feed dogs by moving the drop feed lever to sew. Machine will be reduced automatically. 1. Repeat this pattern is fitted into the presser bar.
5. BASTING
You can ... it is selected, thread tension will make one stitch. 4. Raise the fabric feed dogs for next regular sewing.
Instruction Manual - Page 39

... the foot and cut the threads remaining about 10 cm to back of the foot from the fabric. After sewing, move fabric to adjust the stitch width again.
Insert a straight pin or sewing machine needle under the center slit of button and wind around stitches to the right. Tie them stand away from...
Instruction Manual - Page 43
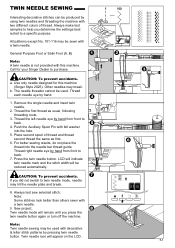
... prevent accidents.
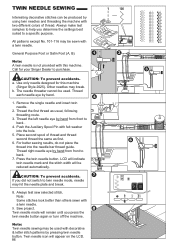
The needle threader cannot be used with this machine
(Singer Style 2025). Sew project. Twin needle icon will be reduced automatically. TWIN NEEDLE SEWING
Interesting decorative stitches can be produced by using twin needles and threading the machine with a twin needle.
9. Call for this machine. a. b. Remove the single needle and insert twin needle.
2. Thread...
Instruction Manual - Page 48

... selected patterns. When you stopped sewing at the end of selected patterns, machine will sew from first pattern.) 3. c. SEWING 1. You must shift the cursor to the pattern you where you start sewing again, machine will start sewing. (When the "I . TO SEW PATTERN FROM BEGINNING a. Repeat sewing The pattern combination will sew repeatedly without combining the tack stitch at the...
Instruction Manual 2 - Page 2

... position (symbol "O"), then remove plug from all instructions before cleaning. Always unplug sewing machine from the accumulation of lint, dust, and loose cloth. 5. Do not operate where aerosol (spray) products are being administered. 8. To reduce the risk of The Singer Company Ltd. Do not allow to persons: 1. Do not use outdoors. 7. SAVE THESE...
Instruction Manual 2 - Page 3

... J. WINDING THE BOBBIN 28 D. INSERTING THE BOBBIN 30
THREADING THE MACHINE 32
A. BASTING 52
ELASTIC STITCH SEWING 54 QUILTING 54
A. USING THE GENERAL PURPOSE FOOT 58 C. SELECTING DECORATIVE...FOOT 82 B. EDITING OF EACH PATTERN 92 G. SEWING THE SELECTED PATTERNS 96 I. CONTENTS
IMPORTANT SAFETY INSTRUCTIONS 2 MODEL 9960 8 FOR EUROPEAN AND SIMILAR TERRITORIES: ...... 8 ...
Instruction Manual 2 - Page 8

.... The wire which is used , a 5 Amp.
MODEL 9960
PREFACE Thank you for your purchase of this appliance may not correspond with the colored markings identifying the terminals in your sewing machine, read the entire instruction manual before attempting to operate the machine. Please refer to this sewing machine when considered necessary without notification or obligation. To...
Instruction Manual 2 - Page 38
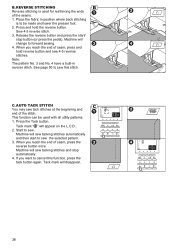
... patterns. 1. C. When you reach the end of the seams. 1. Place the fabric in reverse stitch. See page 50 to forward sewing. 4.
Machine will disappear.
38
Start to cancel this stitch. Machine will appear on the L.C.D.. 2.
Tack mark " " will change to sew this function, press the tack button again. B. REVERSE STITCHING Reverse stitching is to...
Instruction Manual 2 - Page 50

.... Left needle position (No.2) is most suited for sewing light weight fabrics. Straight Stitch With Auto-lock Stitch (Pattern No. 3, 4)
1. Machine will sew 4-5 stitches forward and sew 4-5 stitches backward and continue sewing forward.
3. No. 1. Machine will sew a few stitches backward and sew a few stitches forward and stop sewing. 4. Press the thread cutter button.
50 Hold the...
Instruction Manual 2 - Page 52
Slide the plastic attaching head from shifting, insert dress pins crosswise to the basting position.
Machine will be reduced automatically. 1. Note: To prevent the fabric layers from your left .
2. No.... Hold the upper thread and bobbin thread
loosely and start to the rear and sew one stitch only. 3. CAUTION: To prevent accidents. Be sure the needle does not hit the dress pin, while...
Instruction Manual 2 - Page 78
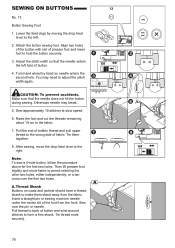
... to back of button and wind around stitches to the wrong side of fabric. Attach the button sewing foot. You may break.
5. Pull the end of the foot from the fabric. Insert a straight pin or sewing machine needle under the center slit of bobbin thread and pull upper thread to form a firm shank...
Instruction Manual 2 - Page 86
... Foot (A, B)
Note: A twin needle is not provided with a twin needle.
9.
CAUTION: To prevent accidents. b. Press the twin needle button. Always test sew selected stitch, Note: Some stitches look better than others sewn with this machine
(Singer Style 2025). TWIN NEEDLE SEWING
Interesting decorative stitches can be produced by using twin needles and threading the...
Instruction Manual 2 - Page 96
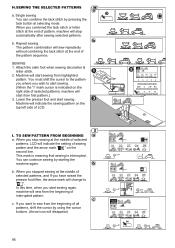
... the tack stitch by starting the machine again. This mark is meaning that sewing is indicated on the right side of selected patterns, machine will start sewing again, machine will indicate the sewing pattern on the second line. Lower the presser foot and start sewing from the beginning of LCD. b. SEWING 1.
Machine will sew from highlighted
pattern. I " mark cursor is...
Similar Questions

Why Is My Singer Quantum Stylist 9960 Stuck In Reverse Sewing
(Posted by kelsydan1 1 year ago)

I Get E7 Error Message On My Singer Model 7258 Sewing Machine. There Is No Refe
Error message E7 is up on my Singer Stylist model 7258 sewing machine. It is not working at all. I t...
Error message E7 is up on my Singer Stylist model 7258 sewing machine. It is not working at all. I t...
(Posted by ebellamybellamy9 5 years ago)

Bobbin Case On Singer 9960 Quantum Stylist Noisey
when I sew I hear a clicking sound and some rattling of the bobbin occurs. more so when I sew on the...
when I sew I hear a clicking sound and some rattling of the bobbin occurs. more so when I sew on the...
(Posted by sdshowen 8 years ago)

Beeping From Singer Sewing Machine Stylist Ii 5625
My sewing machine will beep and stop sewing after three inches of sewing. I have taken it to be repa...
My sewing machine will beep and stop sewing after three inches of sewing. I have taken it to be repa...
(Posted by arusheria 9 years ago)
