Singer Futura XL-400 Support Question
Singer Futura XL-400 Support Question
Find answers below for this question about Singer Futura XL-400.Need a Singer Futura XL-400 manual? We have 1 online manual for this item!
Question posted by jimpicac on May 4th, 2014
How To Center Design On Futura Xl 400
The person who posted this question about this Singer product did not include a detailed explanation. Please use the "Request More Information" button to the right if more details would help you to answer this question.
Current Answers
Related Singer Futura XL-400 Manual Pages
Instruction Manual - Page 2

To reduce the risk of electric shock:"
1. "T his appliance is for its intended use as described in this manual. Return the sewing machine to the nearest authorized dealer or service center for their safety. "Indoors use bent needles." 16. "Do not unplug by persons (including children) with relevant National legislation relating to electrical/ electronic...
Instruction Manual - Page 5

...Using buttonhole foot, Procedure, Corded buttonholes Buttonholing with Futura Multi hoop 88 - 95 Helpful messages when embroidering 96 - 97
4. STARTING TO SEW Quick reference table of stitch length and width ----------... 104 - 105 Special accessories 106 - 107 Helpful messages 108 - 109
For European version
Sewing machine Dimensions: 567 mm × 240 mm × 317 mm Mass of the equipment: ...
Instruction Manual - Page 10

... additional bobbins, be
used for more information.
8
2
3
4
5
6
8
9
10
11
13
14
15
17
18
20
21
22
23 Bobbins 21. Embroidery software CD
19
FUTURA embroidery is "system" of your
7
Sewing machine is another
12
very useful foot and should be sure they are Class I5 J.
16
FOR EMBROIDERY
19. To install the...
Instruction Manual - Page 12

...a spool cap to wipe off any surplus oil from needle plate area before using sewing machine only. VERTICAL SPOOL PIN for normal thread spool
Place thread spool on .
Place ... Connecteur de la machine Conector de la máquina
2 1
Pin Butée Pasador
3
Power line cord Cordon Cordón de la linea eléctrica
Foot control Rhéostat
XL-550-P04-1.Ceonptrsol por pedal
Power/light...
Instruction Manual - Page 24

... bobbin tension has been correctly set thread tension at the factory, so you are sewing. STRAIGHT STITCHING
The correct appearance of your stitching is recommended for straight stitch sewing. It is largely determined by the balanced tension of the machine. Helpful Hint: A slight adjustment to set at E. ADJUSTING TOP THREAD TENSION
90% of...
Instruction Manual - Page 28

.... At each of the potential adjustments. LED turns on when twin needle sewing is to your stitching requirements at default settings of stitch length, width and...sewing can manually change the length, width or straight stitch needle postition according to move the control knobs while sewing slowly. Stitch length and width/needle position controls
*Auto/Default settings Your sewing machine...
Instruction Manual - Page 30

... lamp lit. SPEED CONTROL LEVER
Sliding the lever sets desired sewing speed. When foot control is pushed once more, the machine stops. The sewing machine makes 4 tiny tacking stitches to tie off of the tacking stitches
will return to start.
Red light indicates machine is carried out by pushing the reverse stitch button. The...
Instruction Manual - Page 34

..., as an aid for sewing narrow seams.
32
3/4" (19 mm) 5/8" (16 mm) 1/2" (13 mm) 3/8" ( 9 mm) 1/4" ( 6 mm) Start/stop the sewing machine. Start the machine. Draw the fabric to ... I J
4
NOTE: Since a straight stitch has no width, the
stitch width control is in its center position. Presser foot lifter H. Turn the hand wheel counter clockwise (towards you ) until the needle enters ...
Instruction Manual - Page 36
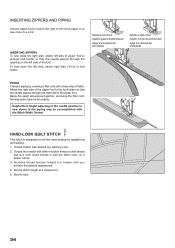
... to a cord.
Needle to left side of zipper foot to presser foot holder so that is designed to look like hand sewing for the piping. Helpful Hint: Slight adjusting of the needle position to sew closer to the piping may be accomplished with the fabric color, so it doesn't show.
3. Thread the needle...
Instruction Manual - Page 38
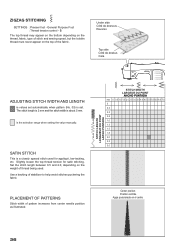
...0.5 1.0 1.5 2.0 2.5 3.0 3.5 4.0 4.5 5.0 5.5 6.0 6.5 7.0 0 0.3 0.5 0.8 1.0 1.3 1.5 1.8 2.0 2.5 3.0
Center position Position centrale Aguja posicionada en el centro
36 S
The top thread may appear on the bottom depending on the thread, fabric, type... of stitch and sewing speed, but the bobbin thread must never appear on the weight of the ...
Instruction Manual - Page 56

...the buttonhole mark on the fabric with the mark on your garment. 6. While holding the top thread, start the machine.
Be careful not to cut any of about 4 inches to open up the fabric in the following order.
1...Marca de material
mark Marque Marca
* Sewing will be completed automatically in the center of buttonhole on the buttonhole foot, and then lower the buttonhole foot.
8.
Instruction Manual - Page 76

... not open up your machine. Double click on the Futura Icon on your hard disk, an error message will prompt you are now ready to select and transmit a design to the highest position by clicking on "Cancel". It will finish when it has reached to use your computer and sewing machine.
1. Turn off your embroidery...
Instruction Manual - Page 78

... a time. To reverse continuously, press and hold this button. NOTE: When sewing designs created by the software for
Photo Stitch (optional) it is advancing through a design that the machine malfunctions. FORWARD STITCH BUTTON After the embroidery design has been transferred to the machine, the embroidery can be reversed all the way back to start /stop...
Instruction Manual - Page 84
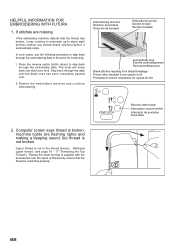
HELPFUL INFORMATION FOR EMBROIDERING WITH FUTURA
1.
Restart the embroidery machine and continue embroidering.
Upper thread is not broken. Rethread upper...procedure to step back through the embroidery data. Computer screen says thread is broken, machine lights are missing
If the embroidery machine detects that the thread is supplied with the accessories over .
2.
Reverse stitch ...
Instruction Manual - Page 86

... 149% and down sizing to 51% and while still being able to change the stitch count.
5. When sizing designs in the Futura software you have a limitation of an imported design when sizing, but only when using the DESIGN>CHANGE SIZE option. Left click, drag a box around the desired letter, and size accordingly. After resizing...
Instruction Manual - Page 90

...Futura software that will allow embroidery data which is larger than a single embroidery hoop to be sent to the machine...design that is too large for the hoop, it and sew accordingly. Multi-Hoop utilizes a system where three alignment points (A, B, and C) are input, they inform the machine... angles.
Mark a line horizontally across the center of smaller embroidery elements and/or lettering, ...
Instruction Manual - Page 92

... on the fabric as Guide lines.
These marks are to Machine" tool on the screen.
The design data is sent to the machine for Multiple Hooping. There are markings which indicates the exact center of the embroidery data that is sent to the machine for sewing. In each side of the hoop there is built into...
Instruction Manual - Page 94

... cross line, and push the OK button. In the case of a 2 hoop design, where one hoop is stacked on top of the other, position the Guide Lines on the horizontal cross line and the Center Hoop Marking on the machine are lit to indicate the "cross line" positions of the fabric in the...
Instruction Manual - Page 104

... needle is necessary to its highest position and put
6
and slide the needle plate into position as illustrated for sewing machine lubrication.
5. NOTE: U se dry rags to remove dust from the sewing machine and footcontroller. Raise the needle to keep sewing machine and footcontroller clean. Remove the bobbin case (2).
3
4. To ensure the best possible operation of...
Instruction Manual - Page 106

... cause damage to the points indicated
by arrows.
1 Face cover Plaque frontale Cubierta frontal
Helpful Hints : For the machine used . Use of sewing machine oil to your machine. Screw Vis Guia
2
Screw Vis Guia
104 For the machine used after a long interval : It should be oiled before oiling.
For best results always use SINGER Brand...
Similar Questions

Copy Of Software For Singer Futura Xl 400
Can Anyone Help Me To Get A Copy Of Software For Singer Futura XL 400. Mine got damaged..?
Can Anyone Help Me To Get A Copy Of Software For Singer Futura XL 400. Mine got damaged..?
(Posted by amalilranaweera 3 years ago)

Replacement Part For Singer Futura Xl 400
I am looking for the embroidery arm unit for a Singer Futura Xl 400. Can you assist me in locating t...
I am looking for the embroidery arm unit for a Singer Futura Xl 400. Can you assist me in locating t...
(Posted by sjh4ba 3 years ago)

Singer Futura Xl-400
I am in need of a Singer Futura XL-400 Startup disc. Any idea where I can get one
I am in need of a Singer Futura XL-400 Startup disc. Any idea where I can get one
(Posted by fayevb 4 years ago)

Software Futura Xl-400 And Usb Cable
How can I get Futura XL-400 software to work. Currently, I cannot open software because the (I think...
How can I get Futura XL-400 software to work. Currently, I cannot open software because the (I think...
(Posted by idesktype 10 years ago)
