Waring MX1000XTX Support Question
Waring MX1000XTX Support Question
Find answers below for this question about Waring MX1000XTX.Need a Waring MX1000XTX manual? We have 4 online manuals for this item!
Question posted by qerobinson on July 27th, 2023
Where Can I Get A Diagram Of The Different Parts Making Up The Blade Assembly ?
Where can I get a diagram of the different parts making up the blade assembly ?
Current Answers
Answer #1: Posted by khanjee on July 27th, 2023 11:33 PM
khanjee

Member since:
July 23rd, 2016 Points: 205,300

Member since:
July 23rd, 2016 Points: 205,300
Please Accept my answer by providing you with the best possible solution. Would be more glade.
THANK YOU
Related Waring MX1000XTX Manual Pages
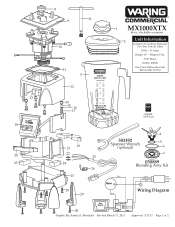
Parts List and Exploded Diagram - Page 1
...
Spanner Wrench (optional)
5 6
7
030889
Blending Assy. Kit
Black
Motor
Blue
Brown Green/Yellow
Blue
Wiring Diagram
Key Board
Main Board
30
M-
13
18 ON
OFF
PULSE
20 23
8
9
31
10
11 3
12...OUNCES MAX FILL LINE
64
56 48
40 32
MAX FILL LINE FOR CLEANING
24
®
1 MX1000XTX 64 oz. Montysko Revised March 17, 2011
M+
Approved 3/21/11 Page 1 of 2 stackable container
2
Unit ...
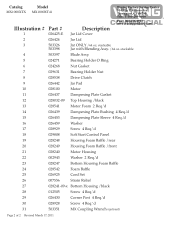
Parts List and Exploded Diagram - Page 2
...3
503326
Jar ONLY /64 oz. Grasso Ave. stackable
503398
Jar with Blending Assy. /64 oz. Catalog
Model
MX1000XTX MX1000XT41
Illustration # Part #
1
026425-E
Description
Jar Lid Cover
Waring Factory Service Center 314 Ella T. stackable
4
503397
Blade Assy.
5
024271
Bearing Holder O Ring
6
024268
Nut Gasket
7
029631
Bearing Holder Nut
8
028538
Drive Clutch
9
026442
Jar...
Instruction Manual - Page 2
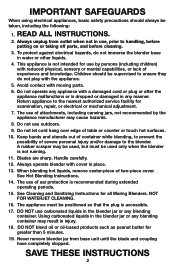
...unplug from base unit until the blade and coupling have completely stopped. Children should always be supervised to ensure they do not immerse the blender base in use of severe personal...o not operate any blending container. Return appliance to the blender. A rubber scraper may result in the blender jar or any appliance with moving parts.
6. DO NOT blend oil or oil-based products such...
Instruction Manual - Page 3
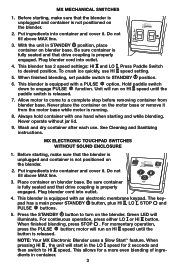
.... For momentary operation, press the PULSE button; MX Mechanical SwitchES
1. MX ELECTRONIC TOUCHPAD SWITCHES WITHOUT SOUND ENCLOSURE
1. Before starting , make sure that drive coupling is running.
8. Never place the container on the blender.
2. The keypad has a main power STANDBY button, plus HI , LO , STOP and PULSE buttons.
5. Never operate without jar lid...
Instruction Manual - Page 4
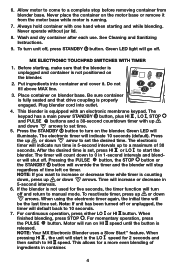
... will indicate 10 seconds (default). Press the up to 0 in container.
4 If the blender is counting down, press up or down arrows. Always hold container with up and down arrows... LO , STOP and PULSE buttons and a 30-second countdown timer with one hand when starting , make sure that drive coupling is set time.
5. Never operate without jar lid.
8. Before starting and while...
Instruction Manual - Page 5
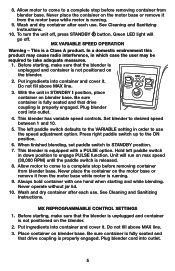
... in down position to a complete stop before removing container from blender base. Always hold container with a pulse option. Before starting and...make sure that drive coupling is a Class A product. Do not fill above MAX line.
3. PREP
3. With the unit in order to a complete stop before removing container from blender base. Be sure container is fully seated and that the blender...
Instruction Manual - Page 6
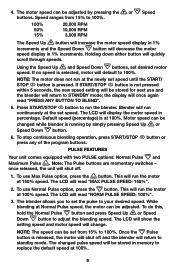
...options: Normal Pulse and
Maximum Pulse . This will decrease the motor speed display in percentage. The blender allows you to standby mode. Once the Pulse button is not pressed within 5 seconds, the new...speed, the motor can be adjusted by simply pressing Speed Up or Speed Down button.
6. Blender will be set speed until the Start/ Stop button is running by pressing the or Speed buttons...
Instruction Manual - Page 7
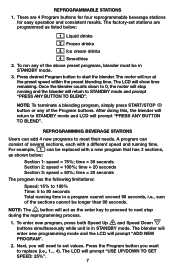
...Program buttons for four reprogrammable beverage stations for easy operation and consistent results.
The blender will enter new programming mode and the LCD will prompt "PRESS ANY BUTTON ... or any of the above preset programs, blender must be in a program cannot exceed 90 seconds, i.e., sum of the sections cannot be replaced with a different speed and running time.
time = 20 ...
Instruction Manual - Page 8
...the program set time.
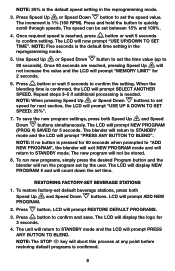
LCD will run new programs, simply press the desired Program button and the blender will prompt RESTORE DEFAULT PROGRAMS.
3.
The increment is needed. The speed can be stored.
8.... Down buttons to set speed for 60 seconds when prompted to "ADD NEW PROGRAM", the blender will exit new program mode and will prompt PRESS ANY BUTTON TO BLEND. The new program...
Instruction Manual - Page 9
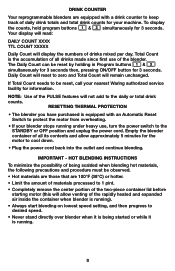
... hot materials, the following precautions and procedure must be reset, call your machine. To display
the counts, hold program buttons
&
simultaneously for 3 seconds.
Empty the blender container of all drinks made since first use , turn the power switch to the STANDBY or OFF position and unplug the power cord. Daily Count...
Instruction Manual - Page 10
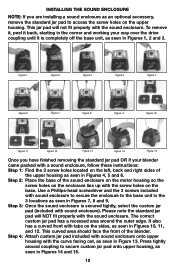
...the base unit, as seen in Figures 10, 11, and 12. Step 2: P lace the base of the blender. The correct custom jar pad has a recessed area around coupling to secure custom jar pad onto upper housing, as... jar pad to the base unit in the 3 locations as seen in the corner and working your blender came packed with a sound enclosure, follow these instructions: Step 1: F ind the 3 screw holes ...
Instruction Manual - Page 11
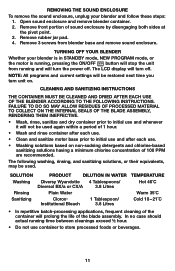
.../Off button will prolong the life of sound enclosure by disengaging both sides at the pivot point. 2. Open sound enclosure and remove blender container. 2. Remove front portion of the blade assembly.
In no case should actual running and will be restored next time you turn off .
CLEANING AND SANITIZING INSTRUCTIONS
THE CONTAINER MUST...
Instruction Manual - Page 12

... OR SANITIZING SOLUTION. 2.
Rinse
container interior and lid under running into motor base by wringing all excess moisture from blade assembly by an authorized service representative.
12 Wipe down exterior of washing solution. Allow parts to air-dry before using them. Empty container. To Wash and Rinse Container: 1. REMOVE CONTAINER FROM MOTOR BASE...
Spec Sheet - Page 1
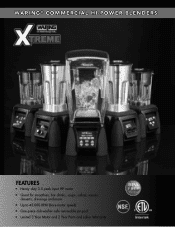
...; COMMERCIAL HI-POWER BLENDERS
Features
• Heavy-duty 3.5 peak input HP motor
• Great for smoothies, bar drinks, soups, salsas, sauces, desserts, dressings and more
• Up to 45,000 RPM (bare motor speed)
• One-piece dishwasher-safe removable jar pad
• Limited 3 Year Motor and 2 Year Parts and Labor Warranty...
Spec Sheet - Page 2
.... BPA-free copolyester container
MX1100XTS
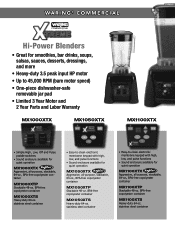
Heavy-duty 64-oz. WARING® COMMERCIAL
Hi-Power Blenders
• Great for smoothies, bar drinks, soups, salsas, sauces, desserts, dressings,...piece dishwasher-safe removable jar pad
• Limited 3 Year Motor and 2 Year Parts and Labor Warranty
MX1000XTX
MX1050XTX
MX1100XTX
• Simple High, Low, Off and Pulse paddle switches
•...
Spec Sheet - Page 3
...
Stackable 48-oz. BPA-free
copolyester container
MX1500XTS
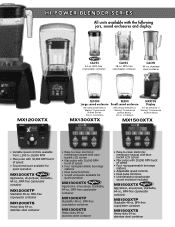
Heavy-duty 64-oz. HI-POWER BLENDER SERIES
All units available with 30,000 RPM burst of speed
• Four reprogrammable... BPA-free copolyester container
CAC93
48-oz. containers
SE500 Small sound enclosure
Retrofits all blenders in Waring® Commercial
Xtreme Series
MX1300XTX
MX1500XTX
• Variable speed controls available...
Spec Sheet - Page 4
BPA-free copolyester container
64-oz. containers
Replacement Blade Assembly
Spanner Wrench
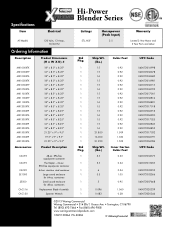
Hi-Power Blender Series
Listings
ETL, NSF
Horsepower (Peak Input)
3.5
Warranty
Limited 3 Year Motor and 2 Year Parts and Labor
Std Pkg.
1 1 1 1 1 1 1 1 1 1...13 Amps, 50/60 HZ
Ordering Information
Description
MX1000XTX MX1000XTP MX1000XTS MX1050XTX MX1050XTP MX1050XTS MX1100XTX MX1100XTP MX1100XTS ...
Sound Enclosure Installation Guide - Page 1
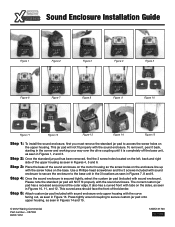
... holes on the enclosure line up
with tabs on the left, back and right
side of the blender. The correct custom jar pad has a recessed area around coupling to secure custom jar pad onto ...upper housing, as seen in Figures 14 and 15.
© 2012 Waring Commercial Part number - 027306 RV03 1212
12WC131700 IB-11899 It also has a curved front with the screw holes on
the...
Similar Questions

How Does The Blade Assembly Go Together?
I took the blade assembly apart to replace the bearings. I don't remember in which order the bearing...
I took the blade assembly apart to replace the bearings. I don't remember in which order the bearing...
(Posted by qerobinson 8 months ago)

Looking Down Into Bowl Which Way Does Blade Rotate
(Posted by gilbertperfecto 3 years ago)

Blades Won't Spin
Hello I have a waring blender model #mx1100xt41 blender turns in but blades don't spin all the time
Hello I have a waring blender model #mx1100xt41 blender turns in but blades don't spin all the time
(Posted by Albers1981 4 years ago)

Wiring Diagram Detail
The pin ROTOR my CB15 broke. The technician who changed the pin did not identify the cables so it ca...
The pin ROTOR my CB15 broke. The technician who changed the pin did not identify the cables so it ca...
(Posted by DOUZOH 8 years ago)

Clean The Blade Assembly
How do you remove the blade assembly for cleaning on MX1050XT11
How do you remove the blade assembly for cleaning on MX1050XT11
(Posted by Anonymous-154603 8 years ago)