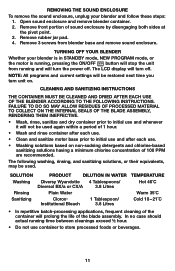
Waring MX1000XTX Support Question
Waring MX1000XTX Support Question
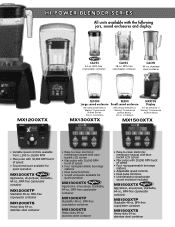
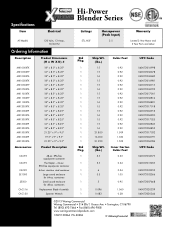
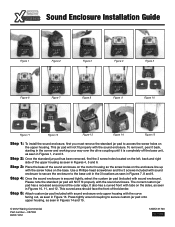
Find answers below for this question about Waring MX1000XTX.Need a Waring MX1000XTX manual? We have 4 online manuals for this item!
Question posted by qerobinson on August 1st, 2023
How Does The Blade Assembly Go Together?
Current Answers
Answer #1: Posted by khanjee on August 2nd, 2023 12:56 PM

Member since:
July 23rd, 2016 Points: 205,300

Thread the blade through the glass and use the white rubber gaskets against the glass and the stainless gaskets against the hardware. Then tighten the whole enchilada to the blender with the main nut (that goes on the bottom outside of the blender). Then once that's nice and tight tighten the flange that catches the blender teeth to the remaining portion of the protruding threads. Make sure you use the copper colored gasket first then the stainless washer then the stainless flange. Tighten that real good and you should be good to go.
To check if you've done it right spin the flange. If the blades spin independent of everything else you're good to blend away
Please Accept my answer by providing you with the best possible solution. Would be more glade.
THANK YOU
Answer #2: Posted by HelpHero on August 3rd, 2023 5:52 PM

Member since:
September 3rd, 2022 Points: 523,390
1. Start by identifying the main components: the two bearings, washers (if any), gaskets, and the spring clip.
2. If there were washers present, typically they sit next to each bearing on both sides.
3. Take one of the bearings and slide it onto the shaft, making sure it is fully seated.
4. If there are any washers, place them on each side of the bearing.
5. Then, place the gasket(s) on top of the washers, if applicable.
6. Next, slide the other bearing onto the shaft, aligning it with the first bearing.
7. Finally, carefully position the spring clip over the second bearing, securing it in place.
Please note that the specific order and arrangement may vary depending on the model and design, so it's essential to double-check your specific blender's instructions or consult the Waring customer support for accurate guidance. They might be able to provide you with a detailed parts breakdown or further assistance.
Remember, working with small parts can be tricky, so take your time and be patient during the reassembly process. Good luck, and I hope your blender is up and running smoothly again soon!
I hope this is helpful? PLEASE "ACCEPT" and mark it "HELPFUL" to complement my little effort. Hope to bring you more detailed answers.
Helphero
Related Waring MX1000XTX Manual Pages


Similar Questions

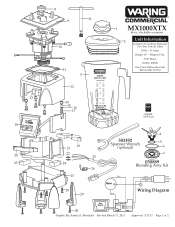
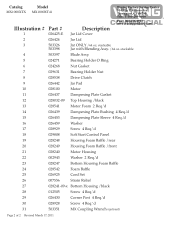
Where can I get a diagram of the different parts making up the blade assembly ?


Hello I have a waring blender model #mx1100xt41 blender turns in but blades don't spin all the time

The blender toggle switch won't turn blender on. I've only used blender about ten times.

How do you remove the blade assembly for cleaning on MX1050XT11