Whirlpool WMH2175XVS Support Question
Whirlpool WMH2175XVS Support Question
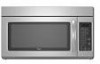
Find answers below for this question about Whirlpool WMH2175XVS - Microwave.Need a Whirlpool WMH2175XVS manual? We have 4 online manuals for this item!
Question posted by ottc on January 7th, 2014
Where Can I Buy A Whirlpool Microwave Model Number Wmh2175xvs
The person who posted this question about this Whirlpool product did not include a detailed explanation. Please use the "Request More Information" button to the right if more details would help you to answer this question.
Current Answers
Related Whirlpool WMH2175XVS Manual Pages
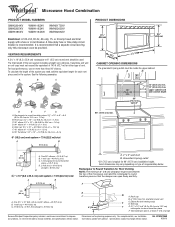
Dimension Guide - Page 1
...least 3" (7.6 cm) high
Because Whirlpool Corporation policy includes a continuous commitment .... ®
Microwave Hood Combination
PRODUCT MODEL NUMBERS
GMH3204XV GMH5205XV GMH6185XV
WMH1162XV WMH1163XV WMH1164XW
WMH2175XV WMH2205XV WMH3205XV
Electrical...wall venting only)
E
D. Elbow (for either type of the microwave oven and the rectangular to Round Transition for each vent piece used ....
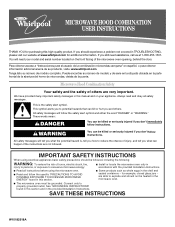
Installation Instructions - Page 1

...and on your appliance.
W10247296B These installation instructions cover different models. Always read and obey all safety messages. All safety messages... Install the Microwave Oven 9 Complete Installation 10 VENTING DESIGN SPECIFICATIONS 11 ASSISTANCE 12 Replacement Parts 12 Accessories 12
MICROWAVE HOOD COMBINATION SAFETY
Your safety and the safety of Contents
MICROWAVE HOOD COMBINATION...
Installation Instructions - Page 2

....
Sheet metal screws (2) G. Materials needed
■ Standard fittings for weight of packaging)
Aluminum grease filters
Charcoal filters (Depending on model, aluminum grease filter and charcoal filter may not be free of the microwave oven packaging is at least 6" (15.2 cm) of installation.
Set the cardboard template to the side and refer to exist...
Installation Instructions - Page 3

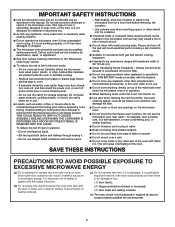
...THESE INSTRUCTIONS
3 Do not remove ground prong. Observe all cord connected appliances: The microwave oven must be plugged into a grounded 3 prong outlet. In the event of an ...delay fuse or time-delay circuit breaker.
■ A separate circuit serving only this microwave oven.
Consult a qualified electrician or serviceman if the grounding instructions are not completely understood, ...
Installation Instructions - Page 4

... plate B.
Slide damper plate toward the front of
microwave oven. Reattach damper plate. Damper plate
2. Remove any remaining contents from the microwave oven cavity.
2.
NOTE: Skip this section if you are inserted into the microwave oven. Exhaust port
6. A
A. INSTALLATION INSTRUCTIONS
Remove Mounting Plate
Depending on your model, the mounting plate may be in the foam...
Installation Instructions - Page 5

... in Step 3 cannot be poor.
Slots
8. Secure damper plate with flat sides facing the back of the microwave oven (as shown), performance will be reattached to back of microwave oven with 2 screws removed in the top of microwave oven. Securely tighten screws. A
B
C
A. Screws C. Lower blower motor back into the slots in Step 3 of "Wall Venting Installation...
Installation Instructions - Page 6

... Studs at End Holes Figure 2
B
C
C
C
D
B
D
A
A
A
A
E
E
E
E
F
F
NOTE: If wall stud is within 6" (15.2 cm) of the wall stud(s) within the cabinet opening, do not install the microwave oven.
1.
Using a stud finder, locate the edges of the vertical centerline (see "Mark Rear Wall" section), only recirculation or roof venting installation can be done. Locate...
Installation Instructions - Page 7

... bottom
³⁄₈" (1 cm)
4" (10.2 cm)
Centerline
6" (15.2 cm)
6" (15.2 cm)
8. or if both end holes are ideal hole locations.
7. Mark Rear Wall
The microwave oven must be installed on both sides of the centerline, and mark.
10.
Cardboard template C. Holding the cardboard template in place, mark both holes in "Locate...
Installation Instructions - Page 8

...head bolt B. Insert lag screw(s) into the hole(s) drilled into wall stud(s) in Step 2 of the microwave oven. Refer to make sure toggle nut has opened against the bottom of mounting plate, making sure it is ...
NOTE: Secure the mounting plate to use as guides. ■ If the wall behind the microwave oven (as at the other end hole.
Push the 2 bolts with toggle nut through the wall ...
Installation Instructions - Page 9

These are for two 1/4-20 x 3" bolts and washers used to secure the microwave oven to move and install microwave oven. Install Damper Assembly
(for the power supply cord.
Handle the microwave oven gently. 1. Place a washer on support tabs at one corner of microwave oven B. Make sure the microwave oven door is being handled.
Back of the shaded rectangular area "F" on the...
Installation Instructions - Page 10

...shock.
2.
Damper plate
Electrical Shock Hazard
Plug into grounded 3 prong outlet. 3.
If the microwave oven does not operate: ■ Check that a household fuse has not blown, or that a...cm). Check the operation of the damper plate. Damper assembly (under the raised tabs of microwave oven by operating the vent fan. 5. Do not remove ground prong. Replace the fuse or reset...
Installation Instructions - Page 11

...Vent extension piece, at least 3" (7.6 cm) of clearance between the top of the microwave oven and the rectangular to seal exterior wall or roof opening around cap
■ not ... using a rigid metal vent
■ using the most direct route by minimizing the length of the vent and number of the microwave oven and the transition piece. Roof cap: 3¹⁄₄" x 10" = 24 ft (8.3 x 25.4 ...
Installation Instructions - Page 12

... found on the front facing of available replacement parts. Each panel is round, a rectangular to keep the damper from your model number located on the model and serial number plate, which is a list of the microwave oven opening .
In addition, a rectangular 3" (7.6 cm) extension vent between the damper assembly and rectangular to round transition piece must be...
Owners Manual - Page 1
... safety and the safety of the microwave oven opening, behind the door. This is , tell you how to potential hazards that can kill or hurt you what can happen if the instructions are not followed. See "GROUNDING INSTRUCTIONS" found in this manual and on your model and serial number located on the front facing...
Owners Manual - Page 2
... to be inserted in harmful exposure to stand in water.
■ Keep cord away from the microwave oven is in this microwave oven outdoors. Do not use paper products when appliance is operated in the "PAN BROWN" mode (on models with metal scouring pads. for example, near a kitchen sink, in a wet basement, or near water...
Owners Manual - Page 3
...
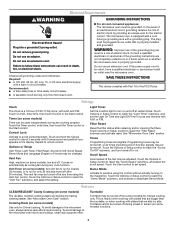
with plates that is too short, have a qualified electrician or serviceman install an outlet near the microwave oven. The microwave oven is a 12-hour (12:00-11:59) clock, with Part 18 of electric shock.
Vent Timer (on some models)
Use only for about 3 seconds until 2 tones sound and padlock icon appears in death, fire...
Owners Manual - Page 4

... power of preset programs, see the Cooking Guide label on cleaning products. Warm Hold (on some models)
Touch COOK TIME, touch number pads to enter time, touch COOK POWER (if not 100%), touch number pads to the microwave oven cavity, do not use stainless steel cleaner.
■ Turntable: mild soap and water or dishwasher.
■...
Owners Manual - Page 5

... usage
■ This is normal. The microwave oven's cooling fan (on some models), which may be replaced about the door appears in the display when it , then firmly close door. Replacing Filters and Light Bulbs
NOTE: A filter status indicator (on during microwave oven operation to cool the microwave oven. www.whirlpool.com
Microwave oven will not operate
Check the following...
Owners Manual - Page 6
...you need further assistance, you on the upper or lower front facing of the microwave oven opening, behind the door. All rights reserved.
® Registered Trademark/TM Trademark ... or cleaning products not approved by this User Instructions and model number information for future reference. The cost of Whirlpool, U.S.A.
461966100611 4/08
Printed in accordance with electrical or ...
Warranty - Page 1

...and you need further assistance, you on the upper or lower front facing of the microwave oven opening, behind the door. Expenses for travel and transportation for future reference. IMPLIED .... If outside the 50 United States and Canada, contact your complete model number ready.
Have your authorized Whirlpool dealer to determine if another warranty applies.
9/07
For additional product...
Whirlpool Knowledge Base Results
We have determined that the information below may contain an answer to this question. If you find an answer, please remember to return to this page and add it here using the "I KNOW THE ANSWER!" button above. It's that easy to earn points!-
How do I replace the grease filters in my microwave oven?
...service/modelnumber.jsp','modelnumber',500,480);return false;" href="#"> Lookup Model # How do I remove and clean the grease filters on my microwave oven? FSP replacement parts are made with the same precision used...to replace the aluminum filter/light lens, or charcoal filter pads on your model number in my microwave oven? To Remove/Replace: Squeeze the small tab on the outer edge of the frame... -
My microwave oven will not run
See "Microwave oven control" section in your product model number in the search tool below . Care Guide, find it online by entering your Use & See "...use of cold water for two minutes at 100% cooking power. Child Lock (on some models) or Start (on the display. Why won't my microwave oven run? If water does not heat, please call for five seconds until two tones sound ... -
The ice maker on my upright freezer is not producing ice or not enough ice
...: Product Category Washer or Dryer Refrigerator or Freezer Dishwasher Electric Range, Oven or Cooktop Gas Range, Oven or Cooktop Microwave Trash Compactor Window Air Conditioner Hot Water Dispenser Vent Hood Ice Machine Commercial...down ) position. See "Connect the water supply" in the space below to review your model number in the Use and Care Guide for the click to make sure the ice maker...
Similar Questions

Our Just Quit It Still Runs But Wont Heat??
No Heat Coming From Microwave It Stills Run And Has Power Any Thats
No Heat Coming From Microwave It Stills Run And Has Power Any Thats
(Posted by Charlesbrooksher 9 years ago)

Whirlpool Microwave Oven Model Wmh2175xv Will Not Heat Food
(Posted by MAgvil 10 years ago)

Where Is The Fuse In A Whirlpool Microwave Model Number Wmh1164xws-1
(Posted by seahat 10 years ago)

Where Is The Fuse In A Whirlpool Microwave Model Number Wmh1164xws-1 Located
(Posted by Oscaritabo 10 years ago)

My Microwave Oven Has Stopped Heating
(Posted by martinas68 12 years ago)