
Yamaha CC-70W Support Question
Yamaha CC-70W Support Question
Find answers below for this question about Yamaha CC-70W.Need a Yamaha CC-70W manual? We have 2 online manuals for this item!
Question posted by amann90793 on September 23rd, 2012
Display Lights Do Not Work??? How To Repair??
The person who posted this question about this Yamaha product did not include a detailed explanation. Please use the "Request More Information" button to the right if more details would help you to answer this question.
Current Answers
Related Yamaha CC-70W Manual Pages
Owner's Manual - Page 1
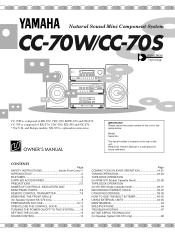
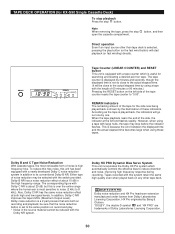
... MAINTENANCE 45 SPECIFICATIONS 46 TROUBLESHOOTING 47 ACTIVE SERVO TECHNOLOGY (for future reference. Retain this unit in the space below. Natural Sound Mini Component System
CC-70W/CC-70S Active Servo Technology
CC-70W is optional in some areas. and Europe models, NX-S70 is composed of RX-S70, CDC-S90, KX-S90 and NX-S70. * For...
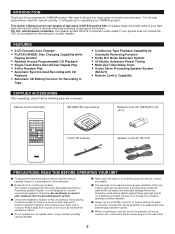
Owner's Manual - Page 4
...
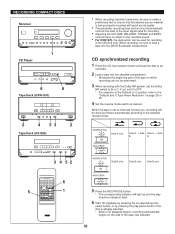
• Automatic CD Editing Function for Recording to connect other speakers than the provided speaker system.
So please check the model name of trouble-free enjoyment. If your dealer
s The...
DOWN
UP
A/B/C/D/E TUNER
PLAY
STOP
PLAY
TAPE
REC/PAUSE
DECK A/B
PHONO/AUX
POWER SLEEP DISPLAY
VOLUME
-
+
Indoor FM antenna
Speaker cords (for NX-S70)
PRECAUTIONS: READ THIS BEFORE...
Owner's Manual - Page 6
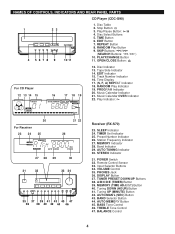
... Number Indicator 26. Remote Control Sensor 33. Input Selector Buttons 34. VOLUME Control 35. DISPLAY Button 37. AUTO/MAN'L (SEC) Button 43. TREBLE Tone Control 47. Disc Indicator 13... 9
10 11
1. Disc Table 2. PLAYXCHANGE Button 11. EDIT Indicator 15. Band Indicator 29. STEREO Indicator
31. AUTO MEMORY Button 45. Disc Select Buttons 5. TIMER Set Indicator 25. OPEN/CLOSE ...
Owner's Manual - Page 11
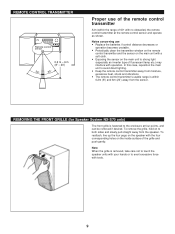
... the speaker. REMOVING THE FRONT GRILLE (for Speaker System NX-S70 only)
The front grille is fastened to avoid direct lighting.
• Keep the remote control transmitter away from... is removed, take care not to touch the speaker units with your hands or to strong light (especially an inverter type of fluorescent lamp etc.) may interfere with operation.
REMOTE CONTROL TRANSMITTER
Remote...
Owner's Manual - Page 14

... lead is on, pressing the POWER switch (or the POWER switch on the remote control transmitter) switches the system to the STANDBY mode. (In this mode, the display shows only the time.) In this system can be turned ON and OFF (STANDBY mode) by pressing the POWER switch on the front panel of...
Owner's Manual - Page 15
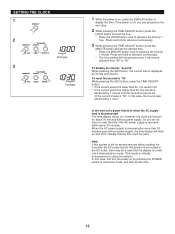
... 00. (If the current minute is "59", in this system is virtually unnecessary for several minutes without power supply.
The time display will go out, however, the clock will not advance even ...time. * Press the MINUTE button once to indicate that the display is turned into a demonstration mode. (This mode is left for using this system.) In this case, first turn the power on by 1
...
Owner's Manual - Page 17
...SKIP button on the remote control transmitter once or more than 20 tracks, the "OVER" indicator will light up .
* Up to three discs can be loaded on the trays. * 8 cm (3") discs... RANDOM REPEAT CD
PRESET
DOWN
UP
A/B/C/D/E TUNER
PLAY
STOP
PLAY
TAPE
REC/PAUSE
DECK PHONO/AUX A/B
POWER SLEEP DISPLAY
VOLUME
-
+
6, 1, 2 1
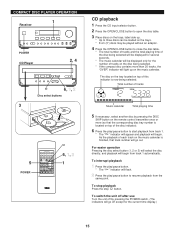
CD playback
1 Press the CD input selector button.
2 Press the OPEN...
Owner's Manual - Page 23
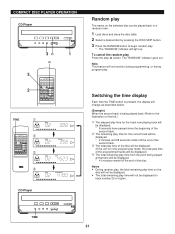
... minutes remain till the end of the programmed tracks will be displayed.)
The total remaining play time from the point being played back (Refer to begin random play.
* The "RANDOM" indicator will light up.
TIME
21 To cancel the random play .
Notes
• During random play, the total remaining play time...
Owner's Manual - Page 29

...CD
PRESET
DOWN
UP
A/B/C/D/E TUNER
PLAY
STOP
PLAY
TAPE
REC/PAUSE
DECK PHONO/AUX A/B
POWER SLEEP DISPLAY
VOLUME
-
+
Searching for tapes with * Material with long pauses or quiet passages. * Low ... out at the first or the last part of a selection, the searching may not work for the beginning of a desired selection
Carry out the following operation during playback, first press...
Owner's Manual - Page 30
...DISC SKIP RANDOM REPEAT CD
PRESET
DOWN
UP
A/B/C/D/E TUNER
PLAY
STOP
PLAY
TAPE
REC/PAUSE
DECK A/B
PHONO/AUX
POWER SLEEP DISPLAY
VOLUME
-
+
4 3
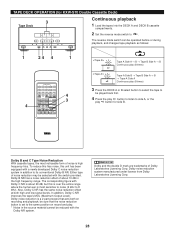
Tape A Side A → B → Tape B Side A → B Continuous ...(2 kHz to
. The corresponding figure with a newly developed Dolby C noise reduction system in the high frequency range. DOLBY B•.C NR
Dolby and the double D ...
Owner's Manual - Page 32
... tape counter to its conventional Dolby B NR. be reduced with the switch provided. Dolby HX PRO Dynamic Bias Servo System This unit incorporates the Dolby HX Pro system which is because the error between the displayed time and the actual elapsed time becomes large when using a tape with a newly developed Dolby C noise reduction...
Owner's Manual - Page 33

...PRESET
DOWN
UP
A/B/C/D/E TUNER
PLAY
STOP
PLAY
TAPE
REC/PAUSE
DECK PHONO/AUX A/B
POWER SLEEP DISPLAY
VOLUME
-
+
Searching for the beginning of a desired selection
Carry out the following operation ...The tape stops at the first or the last part of a selection, the searching may not work for tapes with * Material with long pauses or quiet passages. * Low recording levels or excessive...
Owner's Manual - Page 34
.../AUX A/B
POWER SLEEP DISPLAY
VOLUME
-
+
6 1
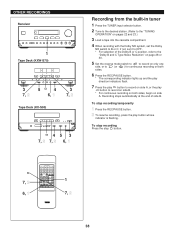
• When recording important selections, be sure to make a
preliminary test to ensure that side A faces you, recording will light up and the play direction...if not, set so that the desired source material is being properly recorded with the Dolby NR system, set the Dolby
NR switch to load a tape into the cassette compartment.
* Wind past ...
Owner's Manual - Page 40
...and 23.)
3 Load a tape into the cassette compartment.
4 When recording with the Dolby NR system, set it to OFF. * For selection of side B. if not, set the Dolby
NR...switch to record on both
sides.
6 Press the REC/PAUSE button.
* The corresponding indicator lights up and the play
direction indicators flash.
7 Press the play button to B or C;
To...SLEEP DISPLAY
VOLUME
-
+
1 7, 2
38
Owner's Manual - Page 49
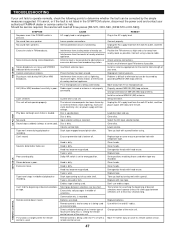
...the AC supply lead from nearby roads as lightning, flourescent lights, electric motors or thermostat of selections. Connect using ....electrical appliance. Cannot select preset stations. Buzzing or static during stereo broadcasts. Can't set too high. Can't record. Volume...the simple measures suggested. Remote control doesn't work.
Demagnetize heads with head eraser.
Move TV ...
Service Manual - Page 1
...body may
have therefore not been restated. For these reasons, we advise all work before you apply
power to exist, please contact the distributor's Service Division. ...I,. /00
(
I ga )
q
H,r7 JM
IMPORTANT NOTICE
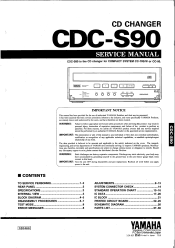
This manual has been provided for COMPACT SYSTEM CC-70S/W or CC-90.
CD CHANGER
CDC-S90 SERVICE MANUAL CDC-S90 is believed to be performed by grounding yourself to the...
Service Manual - Page 7
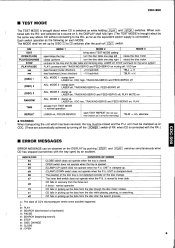
... push of the disc tray is not detected correctly on it is not for the servo system
PLAY command with TRACKING-SERVO and FEED-SERVO on each MODE.
and selected as the following... off, PLAY MUTE on , FOCUS-SEARCH
start TEST REPEAT (Do not use this function as it , the DISPLAY shall fully light. (The TEST MODE is brought about by the same way above CD without connecting to the RX-
MODE 3...
Service Manual - Page 8
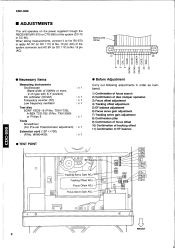
... adjustment 6) Focus servo gain adjustment 7) Tracking servo gain adjustment 8) Confirmation jitter 9) Confirmation of focus offset 10) Confirmation of tracking offset 11) Confirmation of the system (CC-70 or CC-90).
Focus Offset ADJ. When taking measurements, connect it to the RX-S70 or apply AC 8V (or DC 11V) to No. 15 pin...
Service Manual - Page 9
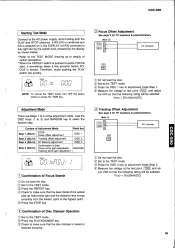
...If RX-S70 is combined and CD is selected on it, the DISPLAY (of RX) continues to fully light during the switch-hold, followed by the display as shown below.
* Refer to the TEST MODE drawing as to... (1 to 3) and RANDOM key to make sure that the laser diode of the optical
pick-up head emits light and the objective lens moves smoothly from the lowest point to the highest point. 0 Press the STOP key.
...
Service Manual - Page 24
....DGT TR.DGT.CHP TRANS TRANS.PULS TRANS.PWR TUNER.AM TUNER.FM TUNER.PK VR VR.MTR VR.SW VR.SLIDE VR.TRIM
LIGHT EMITTING MODULE LED DISPLAY LED, INFRARED MODULATOR, RF PHOTO COUPLER PHOTO INTERRUPTER PHOTO REFLECTOR PIN, TEST POINT PLASTIC RIVET RESISTOR ARRAY CARBON RESISTOR CHIP RESISTOR FLAME PROOF...
Similar Questions

No Display Otherwise Works Fine
yamaha CRX 300 has no display, otherwise works OK
yamaha CRX 300 has no display, otherwise works OK
(Posted by apel403 2 years ago)


I Have Yamaha Rx-v440, Recently These Unit Dsp Program Not Working. Only Stereo
(Posted by renukaart76 4 years ago)

Red Light Comes On But Nothing Else Will Work
No response at all from unit, Red light is on, but thats it.
No response at all from unit, Red light is on, but thats it.
(Posted by boatflipper42 11 years ago)

Cable Connections For Yamaha Mcr-e500 Stereo System
is there a diagram or a picture of how all the cables are to be hooked up ?
is there a diagram or a picture of how all the cables are to be hooked up ?
(Posted by tonyprofumo 12 years ago)