
Owner's Manual
Page 1
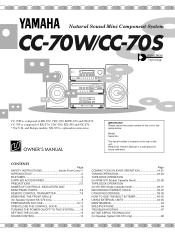
... Europe models, NX-S70 is composed of the unit. CONTENTS Page SAFETY INSTRUCTIONS Inside Front Cover-1 INTRODUCTION 2 FEATURES 2 SUPPLIED ACCESSORIES 2 PRECAUTIONS 2-3 NAMES OF CONTROLS, INDICATORS AND REAR PANEL PARTS 4-6 REMOTE CONTROL TRANSMITTER 7-9 REMOVING THE FRONT GRILLE (for Speaker System NX-S70 only 9 PREPARATION FOR USE 10-11 OPEN/CLOSE THE CONTROL DOOR 12 TURNING THE POWER ON/OFF TO THIS SYSTEM .........12 SETTING THE CLOCK 13 SOUND CONTROL 14 Page COMPACT DISC PLAYER OPERATION 14-21 TUNING OPERATION...
... Europe models, NX-S70 is composed of the unit. CONTENTS Page SAFETY INSTRUCTIONS Inside Front Cover-1 INTRODUCTION 2 FEATURES 2 SUPPLIED ACCESSORIES 2 PRECAUTIONS 2-3 NAMES OF CONTROLS, INDICATORS AND REAR PANEL PARTS 4-6 REMOTE CONTROL TRANSMITTER 7-9 REMOVING THE FRONT GRILLE (for Speaker System NX-S70 only 9 PREPARATION FOR USE 10-11 OPEN/CLOSE THE CONTROL DOOR 12 TURNING THE POWER ON/OFF TO THIS SYSTEM .........12 SETTING THE CLOCK 13 SOUND CONTROL 14 Page COMPACT DISC PLAYER OPERATION 14-21 TUNING OPERATION...
Owner's Manual
Page 2
..., within the product's enclosure that may impede the flow of antenna discharge unit, connection to persons. The unit does not appear to cords at plugs, convenience receptacles, and the point where they are not spilled into the unit; or E. The power cord of important operating and maintenance (servicing) instructions in a wet basement, or near water - The power-supply cord or the plug has been...
..., within the product's enclosure that may impede the flow of antenna discharge unit, connection to persons. The unit does not appear to cords at plugs, convenience receptacles, and the point where they are not spilled into the unit; or E. The power cord of important operating and maintenance (servicing) instructions in a wet basement, or near water - The power-supply cord or the plug has been...
Owner's Manual
Page 3
.../or another product use the product. 2. Utilize power outlets that interference will not result in all installation instructions. If these requirements provides a reasonable level of assurance that is being affected by playing it is a composite system. IMPORTANT : When connecting this type of radio or TV interference, relocate/reorient the antenna. SPECIAL NOTES FOR FCC COMPOSITE DEVICE This device is too late, YAMAHA and the...
.../or another product use the product. 2. Utilize power outlets that interference will not result in all installation instructions. If these requirements provides a reasonable level of assurance that is being affected by playing it is a composite system. IMPORTANT : When connecting this type of radio or TV interference, relocate/reorient the antenna. SPECIAL NOTES FOR FCC COMPOSITE DEVICE This device is too late, YAMAHA and the...
Owner's Manual
Page 4
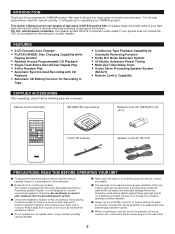
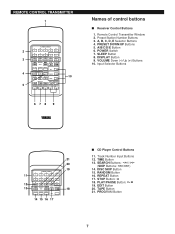
... excessive dust, heat, cold or moisture. Remote control transmitter AM (MW/LW) loop antenna Batteries (size AA, UM/SUM-3, R6, HP-7) TUNER DIRECT 1 2 3 4 5 1 2 3 4 5 6 7 8 6 7 8 9 0 A TIME B PROG C TAPE D EDIT E +I0 SEARCH SKIP STOP PLAY/PAUSE DISC SKIP RANDOM REPEAT CD PRESET DOWN UP A/B/C/D/E TUNER PLAY STOP PLAY TAPE REC/PAUSE DECK A/B PHONO/AUX POWER SLEEP DISPLAY VOLUME - + Indoor FM antenna Speaker cords (for purchasing this YAMAHA product. Keep it in operating your system does not include NXS70, its information...
... excessive dust, heat, cold or moisture. Remote control transmitter AM (MW/LW) loop antenna Batteries (size AA, UM/SUM-3, R6, HP-7) TUNER DIRECT 1 2 3 4 5 1 2 3 4 5 6 7 8 6 7 8 9 0 A TIME B PROG C TAPE D EDIT E +I0 SEARCH SKIP STOP PLAY/PAUSE DISC SKIP RANDOM REPEAT CD PRESET DOWN UP A/B/C/D/E TUNER PLAY STOP PLAY TAPE REC/PAUSE DECK A/B PHONO/AUX POWER SLEEP DISPLAY VOLUME - + Indoor FM antenna Speaker cords (for purchasing this YAMAHA product. Keep it in operating your system does not include NXS70, its information...
Owner's Manual
Page 5
... product with bared flexible cord is marked with chemical solvents; s The sound level at a distance of this unit. The wire which is coloured BROWN must be held responsible for the plug supplied with no disc in the unit until normal playback is the value measured at a given volume setting depends on the Optical Pick-up Block. CAUTION FOR CARRYING THE CD PLAYER...
... product with bared flexible cord is marked with chemical solvents; s The sound level at a distance of this unit. The wire which is coloured BROWN must be held responsible for the plug supplied with no disc in the unit until normal playback is the value measured at a given volume setting depends on the Optical Pick-up Block. CAUTION FOR CARRYING THE CD PLAYER...
Owner's Manual
Page 6
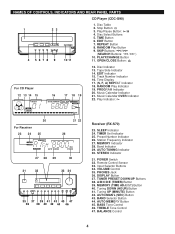
... 46 Receiver (RX-S70) 23. Station Frequency Indicator 27. Band Indicator 29. VOLUME Control 35. Play/Pause Button: / 4. SLEEP Indicator 24. Time Display 17. (S, F, A) REPEAT Indicator 18. Remote Control Sensor 33. DISPLAY Button 37. RANDOM Play Indicator 19. Tuning UP (MINUTE) Button 42. BASS Tone Control 46. Stop Button: 3. Input Selector Buttons 34. PHONES Jack 36. EDIT Button 7. SKIP Buttons: / (SEARCH Buttons: / ) 10. BALANCE Control 4 EDIT Indicator 15. BAND Selector Button 44. NAMES OF CONTROLS, INDICATORS AND REAR PANEL PARTS CD Player (CDC...
... 46 Receiver (RX-S70) 23. Station Frequency Indicator 27. Band Indicator 29. VOLUME Control 35. Play/Pause Button: / 4. SLEEP Indicator 24. Time Display 17. (S, F, A) REPEAT Indicator 18. Remote Control Sensor 33. DISPLAY Button 37. RANDOM Play Indicator 19. Tuning UP (MINUTE) Button 42. BASS Tone Control 46. Stop Button: 3. Input Selector Buttons 34. PHONES Jack 36. EDIT Button 7. SKIP Buttons: / (SEARCH Buttons: / ) 10. BALANCE Control 4 EDIT Indicator 15. BAND Selector Button 44. NAMES OF CONTROLS, INDICATORS AND REAR PANEL PARTS CD Player (CDC...
Owner's Manual
Page 8
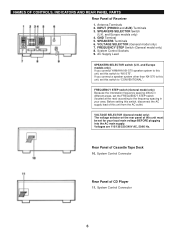
.... Rear Panel of CD Player 11. VOLTAGE SELECTOR (General model only) 7. System Control Sockets 9. and Europe models only) If you connect a speaker system other than NX-S70 to this unit, set this switch to "NX-S70". System Control Connector Rear Panel of Cassette Tape Deck 10. and Europe models only) 4. FREQUENCY STEP Switch (General model only) 8. If you connect YAMAHA NX-S70 speaker system to this unit, set this switch to "CONVENTIONAL". GND Terminal 5. NAMES OF CONTROLS, INDICATORS AND REAR PANEL PARTS Rear Panel...
.... Rear Panel of CD Player 11. VOLTAGE SELECTOR (General model only) 7. System Control Sockets 9. and Europe models only) If you connect a speaker system other than NX-S70 to this unit, set this switch to "NX-S70". System Control Connector Rear Panel of Cassette Tape Deck 10. and Europe models only) 4. FREQUENCY STEP Switch (General model only) 8. If you connect YAMAHA NX-S70 speaker system to this unit, set this switch to "CONVENTIONAL". GND Terminal 5. NAMES OF CONTROLS, INDICATORS AND REAR PANEL PARTS Rear Panel...
Owner's Manual
Page 9
... SKIP STOP PLAY/PAUSE DISC SKIP RANDOM REPEAT CD 14 15 16 17 21 20 19 18 s CD Player Control Buttons 11. REPEAT Button 17. Preset Station Number Buttons 3. POWER Switch 7. SLEEP Button 8. VOLUME Down (-)/Up (+) Buttons 10. RANDOM Button 16. SEARCH Buttons: / (SKIP Buttons: / ) 14. EDIT Button 20. Remote Control Transmitter Window 2. TAPE Button 21. DISC SKIP Button 15. PLAY/PAUSE Button: 19. A, B, C, D, E Selector Buttons 4. TIME Button 13. DISPLAY Button 9. PROGRAM Button 7 Track Number Input Buttons 12. REMOTE CONTROL TRANSMITTER 1 TUNER DIRECT...
... SKIP STOP PLAY/PAUSE DISC SKIP RANDOM REPEAT CD 14 15 16 17 21 20 19 18 s CD Player Control Buttons 11. REPEAT Button 17. Preset Station Number Buttons 3. POWER Switch 7. SLEEP Button 8. VOLUME Down (-)/Up (+) Buttons 10. RANDOM Button 16. SEARCH Buttons: / (SKIP Buttons: / ) 14. EDIT Button 20. Remote Control Transmitter Window 2. TAPE Button 21. DISC SKIP Button 15. PLAY/PAUSE Button: 19. A, B, C, D, E Selector Buttons 4. TIME Button 13. DISPLAY Button 9. PROGRAM Button 7 Track Number Input Buttons 12. REMOTE CONTROL TRANSMITTER 1 TUNER DIRECT...
Owner's Manual
Page 17
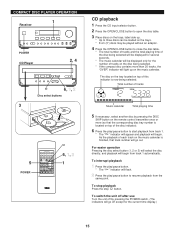
... resume playback from the same point. COMPACT DISC PLAYER OPERATION 1 Receiver POWER CD Player 2, 4 6, 1, 2 Disc select buttons 3 5 POWER TUNER DIRECT 1 2 3 4 5 1 2 3 4 5 6 7 8 6 7 8 9 0 A TIME B PROG C TAPE D EDIT E +I0 SEARCH SKIP STOP PLAY/PAUSE DISC SKIP RANDOM REPEAT CD PRESET DOWN UP A/B/C/D/E TUNER PLAY STOP PLAY TAPE REC/PAUSE DECK PHONO/AUX A/B POWER SLEEP DISPLAY VOLUME - + 6, 1, 2 1 CD playback 1 Press the CD input selector button. 2 Press the OPEN/CLOSE button to open the disc table. 3 Place discs on the trays, label side up on the...
... resume playback from the same point. COMPACT DISC PLAYER OPERATION 1 Receiver POWER CD Player 2, 4 6, 1, 2 Disc select buttons 3 5 POWER TUNER DIRECT 1 2 3 4 5 1 2 3 4 5 6 7 8 6 7 8 9 0 A TIME B PROG C TAPE D EDIT E +I0 SEARCH SKIP STOP PLAY/PAUSE DISC SKIP RANDOM REPEAT CD PRESET DOWN UP A/B/C/D/E TUNER PLAY STOP PLAY TAPE REC/PAUSE DECK PHONO/AUX A/B POWER SLEEP DISPLAY VOLUME - + 6, 1, 2 1 CD playback 1 Press the CD input selector button. 2 Press the OPEN/CLOSE button to open the disc table. 3 Place discs on the trays, label side up on the...
Owner's Manual
Page 18
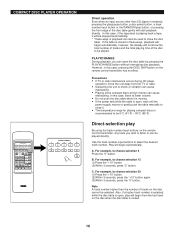
..., press the "0" button. C. COMPACT DISC PLAYER OPERATION TUNER DIRECT 1 2 3 4 5 1 2 3 4 5 6 7 8 6 7 8 9 0 A TIME B PROG C TAPE D EDIT E +I0 SEARCH SKIP STOP PLAY/PAUSE DISC SKIP RANDOM REPEAT CD PRESET DOWN UP A/B/C/D/E TUNER PLAY STOP PLAY TAPE REC/PAUSE DECK PHONO/AUX A/B POWER SLEEP DISPLAY VOLUME - + TUNER DIRECT 1 2 3 4 5 1 2 3 4 5 6 7 8 6 7 8 9 0 E +I0 Direct operation Even when an input source other than the number of tracks on the remote control transmitter has no effect. Use the track number input buttons to choose...
..., press the "0" button. C. COMPACT DISC PLAYER OPERATION TUNER DIRECT 1 2 3 4 5 1 2 3 4 5 6 7 8 6 7 8 9 0 A TIME B PROG C TAPE D EDIT E +I0 SEARCH SKIP STOP PLAY/PAUSE DISC SKIP RANDOM REPEAT CD PRESET DOWN UP A/B/C/D/E TUNER PLAY STOP PLAY TAPE REC/PAUSE DECK PHONO/AUX A/B POWER SLEEP DISPLAY VOLUME - + TUNER DIRECT 1 2 3 4 5 1 2 3 4 5 6 7 8 6 7 8 9 0 E +I0 Direct operation Even when an input source other than the number of tracks on the remote control transmitter has no effect. Use the track number input buttons to choose...

Owner's Manual
Page 20
... track number higher than one disc, pressing the PLAYXCHANGE button is programmed. • Skip search can be performed during playing back, but only within the range of the programmed tracks. • Manual search can be performed during program play. 18 COMPACT DISC PLAYER OPERATION CD Player 6 1 2 3 TUNER DIRECT 1 2 3 4 5 1 2 3 4 5 6 7 8 6 7 8 9 0 A TIME B PROG C TAPE D EDIT E +I0 SEARCH SKIP STOP PLAY/PAUSE DISC SKIP RANDOM REPEAT CD PRESET DOWN UP A/B/C/D/E TUNER PLAY STOP PLAY TAPE REC/PAUSE DECK A/B PHONO/AUX POWER SLEEP DISPLAY VOLUME...
... track number higher than one disc, pressing the PLAYXCHANGE button is programmed. • Skip search can be performed during playing back, but only within the range of the programmed tracks. • Manual search can be performed during program play. 18 COMPACT DISC PLAYER OPERATION CD Player 6 1 2 3 TUNER DIRECT 1 2 3 4 5 1 2 3 4 5 6 7 8 6 7 8 9 0 A TIME B PROG C TAPE D EDIT E +I0 SEARCH SKIP STOP PLAY/PAUSE DISC SKIP RANDOM REPEAT CD PRESET DOWN UP A/B/C/D/E TUNER PLAY STOP PLAY TAPE REC/PAUSE DECK A/B PHONO/AUX POWER SLEEP DISPLAY VOLUME...
Owner's Manual
Page 21
...button is stopped. • Open the disc table • Switch off the power. To correct program data 1. If during playing back, press the stop button. Press a track number input button to select a track to be programmed. 4. COMPACT DISC PLAYER OPERATION CD Player / PROG TUNER DIRECT 1 2 3 4 5 1 2 3 4 5 6 7 8 6 7 8 9 0 A TIME B PROG C TAPE D EDIT E +I0 SEARCH STOP PLAY/PAUSE SKIP / DISC SKIP RANDOM REPEAT CD PRESET DOWN UP A/B/C/D/E TUNER PLAY STOP PLAY TAPE REC/PAUSE DECK PHONO/AUX A/B POWER SLEEP DISPLAY VOLUME - + To stop program play...
...button is stopped. • Open the disc table • Switch off the power. To correct program data 1. If during playing back, press the stop button. Press a track number input button to select a track to be programmed. 4. COMPACT DISC PLAYER OPERATION CD Player / PROG TUNER DIRECT 1 2 3 4 5 1 2 3 4 5 6 7 8 6 7 8 9 0 A TIME B PROG C TAPE D EDIT E +I0 SEARCH STOP PLAY/PAUSE SKIP / DISC SKIP RANDOM REPEAT CD PRESET DOWN UP A/B/C/D/E TUNER PLAY STOP PLAY TAPE REC/PAUSE DECK PHONO/AUX A/B POWER SLEEP DISPLAY VOLUME - + To stop program play...
Owner's Manual
Page 25
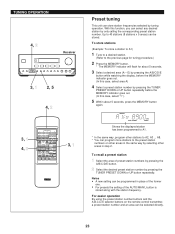
...the area of the AUTO/MAN'L button is stored along with the station frequency. For easier operation By using the preset station number buttons and the A,B,C,D,E selector buttons on other areas in step 2. TUNING OPERATION 4, 2 Receiver 3, 1 2, 5 4, 2 3, 1 4, 2 TUNER DIRECT 1 2 3 4 5 1 2 3 4 5 6 7 8 6 7 8 9 0 A TIME B PROG C TAPE D EDIT E +I0 SEARCH SKIP STOP PLAY/PAUSE DISC SKIP RANDOM REPEAT CD PRESET DOWN UP A/B/C/D/E TUNER PLAY STOP PLAY TAPE REC/PAUSE DECK PHONO/AUX A/B POWER SLEEP DISPLAY VOLUME - + 3, 1 Preset tuning This unit can select...
...the area of the AUTO/MAN'L button is stored along with the station frequency. For easier operation By using the preset station number buttons and the A,B,C,D,E selector buttons on other areas in step 2. TUNING OPERATION 4, 2 Receiver 3, 1 2, 5 4, 2 3, 1 4, 2 TUNER DIRECT 1 2 3 4 5 1 2 3 4 5 6 7 8 6 7 8 9 0 A TIME B PROG C TAPE D EDIT E +I0 SEARCH SKIP STOP PLAY/PAUSE DISC SKIP RANDOM REPEAT CD PRESET DOWN UP A/B/C/D/E TUNER PLAY STOP PLAY TAPE REC/PAUSE DECK PHONO/AUX A/B POWER SLEEP DISPLAY VOLUME - + 3, 1 Preset tuning This unit can select...

Owner's Manual
Page 26
... in monaural manually and program it can be erased. By this function, this function, only stations with no station, and AM (MW) stations are from the AC outlet or the power is completed The display shows the frequencies of the section "To recall a preset station" on the previous page. 1 Press the TUNER input selector button. 2 Press and hold the AUTO MEMORY button for more...
... in monaural manually and program it can be erased. By this function, this function, only stations with no station, and AM (MW) stations are from the AC outlet or the power is completed The display shows the frequencies of the section "To recall a preset station" on the previous page. 1 Press the TUNER input selector button. 2 Press and hold the AUTO MEMORY button for more...
Owner's Manual
Page 34
...) EMPTY 3 4 52 5 TUNER DIRECT 1 2 3 4 5 1 2 3 4 5 6 7 8 6 7 8 9 0 A TIME B PROG C TAPE D EDIT E +I0 SEARCH SKIP STOP PLAY/PAUSE DISC SKIP RANDOM REPEAT CD PRESET DOWN UP A/B/C/D/E TUNER PLAY STOP PLAY TAPE REC/PAUSE DECK PHONO/AUX A/B POWER SLEEP DISPLAY VOLUME - + 6 1 • When recording important selections, be sure to make a preliminary test to ensure that side A faces you, recording will light up and the play direction indicators flash. 6 Start CD playback by pressing the corresponding disc select button, or by...
...) EMPTY 3 4 52 5 TUNER DIRECT 1 2 3 4 5 1 2 3 4 5 6 7 8 6 7 8 9 0 A TIME B PROG C TAPE D EDIT E +I0 SEARCH SKIP STOP PLAY/PAUSE DISC SKIP RANDOM REPEAT CD PRESET DOWN UP A/B/C/D/E TUNER PLAY STOP PLAY TAPE REC/PAUSE DECK PHONO/AUX A/B POWER SLEEP DISPLAY VOLUME - + 6 1 • When recording important selections, be sure to make a preliminary test to ensure that side A faces you, recording will light up and the play direction indicators flash. 6 Start CD playback by pressing the corresponding disc select button, or by...

Owner's Manual
Page 37
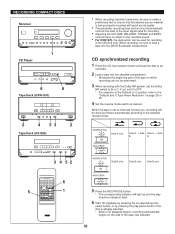
...is finished, this unit adjusts the recording level properly on the remote control transmitter (Examples) C-62: Press "6" and then "2". RECORDING COMPACT DISCS Receiver 1 CD Player 7 1 Tape Deck (KXW-S70) 5 4 3 Tape Deck (KX-S90) EMPTY 45 3 6 2 7 TUNER DIRECT 1 2 3 4 5 1 2 3 4 5 6 7 8 6 7 8 9 0 A TIME B PROG C TAPE D EDIT E +I0 SEARCH SKIP STOP PLAY/PAUSE DISC SKIP RANDOM REPEAT CD PRESET DOWN UP A/B/C/D/E TUNER PLAY STOP PLAY TAPE REC/PAUSE DECK PHONO/AUX A/B POWER SLEEP DISPLAY VOLUME - + 6 1 Automatic tape-editing This convenient feature...
...is finished, this unit adjusts the recording level properly on the remote control transmitter (Examples) C-62: Press "6" and then "2". RECORDING COMPACT DISCS Receiver 1 CD Player 7 1 Tape Deck (KXW-S70) 5 4 3 Tape Deck (KX-S90) EMPTY 45 3 6 2 7 TUNER DIRECT 1 2 3 4 5 1 2 3 4 5 6 7 8 6 7 8 9 0 A TIME B PROG C TAPE D EDIT E +I0 SEARCH SKIP STOP PLAY/PAUSE DISC SKIP RANDOM REPEAT CD PRESET DOWN UP A/B/C/D/E TUNER PLAY STOP PLAY TAPE REC/PAUSE DECK PHONO/AUX A/B POWER SLEEP DISPLAY VOLUME - + 6 1 Automatic tape-editing This convenient feature...
Owner's Manual
Page 43
... OFF TIME/time setting mode ["OFF TIME" appears on the display, and soon it is not canceled, the system will be turned on the timer will be retained until it is a power failure for the timer play will not use this unit off by using the HOUR button and the MINUTE button. How to make time setting in the same way as an alarm. For the minute: Use the MINUTE button and operate...
... OFF TIME/time setting mode ["OFF TIME" appears on the display, and soon it is not canceled, the system will be turned on the timer will be retained until it is a power failure for the timer play will not use this unit off by using the HOUR button and the MINUTE button. How to make time setting in the same way as an alarm. For the minute: Use the MINUTE button and operate...

Owner's Manual
Page 45
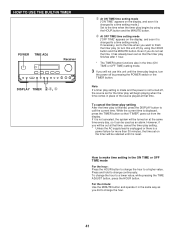
... POWER Receiver DISPLAY AUTO MEMO POWER TUNER DIRECT 1 2 3 4 5 1 2 3 4 5 6 7 8 6 7 8 9 0 A TIME B PROG C TAPE D EDIT E +I0 SEARCH SKIP STOP PLAY/PAUSE DISC SKIP RANDOM REPEAT CD PRESET DOWN UP A/B/C/D/E TUNER PLAY STOP PLAY TAPE REC/PAUSE DECK PHONO/AUX A/B POWER SLEEP DISPLAY VOLUME - + SLEEP Sleep timer operation This unit can be turned off automatically when the preset sleep time has passed. Whenever the AUTO MEMO button is replaced by "120". 3 Press the SLEEP button repeatedly until the desired sleep time appears in the display. Using...
... POWER Receiver DISPLAY AUTO MEMO POWER TUNER DIRECT 1 2 3 4 5 1 2 3 4 5 6 7 8 6 7 8 9 0 A TIME B PROG C TAPE D EDIT E +I0 SEARCH SKIP STOP PLAY/PAUSE DISC SKIP RANDOM REPEAT CD PRESET DOWN UP A/B/C/D/E TUNER PLAY STOP PLAY TAPE REC/PAUSE DECK PHONO/AUX A/B POWER SLEEP DISPLAY VOLUME - + SLEEP Sleep timer operation This unit can be turned off automatically when the preset sleep time has passed. Whenever the AUTO MEMO button is replaced by "120". 3 Press the SLEEP button repeatedly until the desired sleep time appears in the display. Using...
Owner's Manual
Page 49
... new tape. REMEDY Plug in FM broadcasts. Connect properly. Problem is used when tape was recorded. Move away from broadcasting station. Select the CD input selector button. Clean heads. No sound. Disc is distorted or fades out. Sound is dirty. Batteries are noisy and STEREO indicator blinks on tape. Install a multi-element type FM antenna if possible. Take up slack with head eraser. Demagnetize heads with a pencil before using a coaxial cable. Replace tape. Set...
... new tape. REMEDY Plug in FM broadcasts. Connect properly. Problem is used when tape was recorded. Move away from broadcasting station. Select the CD input selector button. Clean heads. No sound. Disc is distorted or fades out. Sound is dirty. Batteries are noisy and STEREO indicator blinks on tape. Install a multi-element type FM antenna if possible. Take up slack with head eraser. Demagnetize heads with a pencil before using a coaxial cable. Replace tape. Set...
Service Manual
Page 1
... (heavy gauge black wires connect to improve YAMAHA products. Recheck all YAMAHA product owners that basic service procedures inherent to exist, please contact the distributor's Service Division. IMPORTANT: The presentation or sale of this manual to the unit. ■ CONTENTS TO SERVICE PERSONNEL REAR PANEL SPECIFICATIONS INTERNAL VIEW BLOCK DIAGRAM DISASSEMBLY PROCEDURES TEST MODE ERROR MESSAGES 1-2 ADJUSTMENTS 3 SYSTEM CONNECTOR CHECK 3 STANDARD OPERATION CHART 3 IC DATA 4-5 IC BLOCK 6-7 PRINTED CIRCUIT BOARD 8 SCHEMATIC DIAGRAM 8 PARTS LIST 9-13 14...
... (heavy gauge black wires connect to improve YAMAHA products. Recheck all YAMAHA product owners that basic service procedures inherent to exist, please contact the distributor's Service Division. IMPORTANT: The presentation or sale of this manual to the unit. ■ CONTENTS TO SERVICE PERSONNEL REAR PANEL SPECIFICATIONS INTERNAL VIEW BLOCK DIAGRAM DISASSEMBLY PROCEDURES TEST MODE ERROR MESSAGES 1-2 ADJUSTMENTS 3 SYSTEM CONNECTOR CHECK 3 STANDARD OPERATION CHART 3 IC DATA 4-5 IC BLOCK 6-7 PRINTED CIRCUIT BOARD 8 SCHEMATIC DIAGRAM 8 PARTS LIST 9-13 14...


