User Manual
Page 3
... 16 OPERATING INSTRUCTION 17 Panel 17 Before Using For the First Time 18 Using For the First Time 18 First washing cycle (without laundry 18 Preparing the laundry 18 Sorting the laundry 19 Degrees of soiling 19 Loading the laundry 19...program 26 Canceling the active program 26 After Washing 26 User Maintenance Instructions 27 Cleaning and Care 27 Cleaning the appliance housing and control panel 27 Cleaning the drum 27 Cleaning the detergent dispenser 27 Cleaning water inlet strainers 27 Descaling the washing machine 28 Troubleshooting of Minor Faults 29 ...
... 16 OPERATING INSTRUCTION 17 Panel 17 Before Using For the First Time 18 Using For the First Time 18 First washing cycle (without laundry 18 Preparing the laundry 18 Sorting the laundry 19 Degrees of soiling 19 Loading the laundry 19...program 26 Canceling the active program 26 After Washing 26 User Maintenance Instructions 27 Cleaning and Care 27 Cleaning the appliance housing and control panel 27 Cleaning the drum 27 Cleaning the detergent dispenser 27 Cleaning water inlet strainers 27 Descaling the washing machine 28 Troubleshooting of Minor Faults 29 ...
User Manual
Page 5
.... 39. Do not tamper with wet hands. 27. Disconnect the power cord by the clothing manufacturer. 31. Do not insert/pull out the power plug with the controls. 20. b. Failure to install, maintain and/or operate the washing machine according to ensure that they are instructed in...Children should be used for its intended purpose. 30. Do not repair or replace any time; Always unplug the washing machine from the washing machine. 17. The washing machine must only be taken to avoid damage to the floor as curtains and window coverings that might encourage children ...
.... 39. Do not tamper with wet hands. 27. Disconnect the power cord by the clothing manufacturer. 31. Do not insert/pull out the power plug with the controls. 20. b. Failure to install, maintain and/or operate the washing machine according to ensure that they are instructed in...Children should be used for its intended purpose. 30. Do not repair or replace any time; Always unplug the washing machine from the washing machine. 17. The washing machine must only be taken to avoid damage to the floor as curtains and window coverings that might encourage children ...

User Manual
Page 8
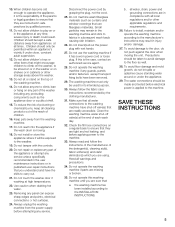
...a second floor, the floor may need to the higher spin speeds available. If possible, place the washing machine in , against the washer door glass. power cord with holding brackets (set) from Bosch Customer Service (WMZ 2200). 8 If installing the machine on a wood floor over the holes for ...consider the following tools are not suitable. Clamp for leveling. 3. Closed wrench 13 mm NOTICE DO NOT push against the bottom of the washer, approximately 27" wide x 29.7" deep, or 54" wide x 29.7" deep to plastic plumbing lines, gas lines or hot water pipes. Order the holding ...
...a second floor, the floor may need to the higher spin speeds available. If possible, place the washing machine in , against the washer door glass. power cord with holding brackets (set) from Bosch Customer Service (WMZ 2200). 8 If installing the machine on a wood floor over the holes for ...consider the following tools are not suitable. Clamp for leveling. 3. Closed wrench 13 mm NOTICE DO NOT push against the bottom of the washer, approximately 27" wide x 29.7" deep, or 54" wide x 29.7" deep to plastic plumbing lines, gas lines or hot water pipes. Order the holding ...
User Manual
Page 9
... the washer and adjacent surfaces for the solid white pull-out shelf stacking kit. cm) Required Installation Space G Height 37.25 in. (94.6 cm) H Width 27.50 in. (69.9 cm) I Depth 33.50 in . (12.8 mm) * as close to the height of installation and service. WTZ 1610 is for all the...
... the washer and adjacent surfaces for the solid white pull-out shelf stacking kit. cm) Required Installation Space G Height 37.25 in. (94.6 cm) H Width 27.50 in. (69.9 cm) I Depth 33.50 in . (12.8 mm) * as close to the height of installation and service. WTZ 1610 is for all the...
User Manual
Page 10
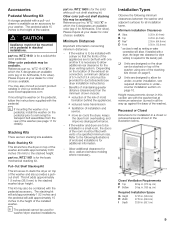
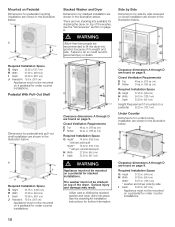
... 52.25 in. (132.7 cm) Under Counter Dimensions for under counter installations. 10 Required Installation Space G Height 37.25 in. (94.6 cm) H Width 27.50 in. (69.9 cm) Width* 54.75 in. (139.1 cm) * washer and dryer side by side recessed or closet installation are shown in . ...in . (85.1 cm) Appliance must not be mounted on a pedestal for under counter installations. Required Installation Space G Height 52.25 in.132.7 cm) H Width 27.50 in. (69.9 cm) I Depth 33.50 in . (85.1 cm) Height Requirement if mounted on page 9. cm) F Bottom 24 sq. in the illustration...
... 52.25 in. (132.7 cm) Under Counter Dimensions for under counter installations. 10 Required Installation Space G Height 37.25 in. (94.6 cm) H Width 27.50 in. (69.9 cm) Width* 54.75 in. (139.1 cm) * washer and dryer side by side recessed or closet installation are shown in . ...in . (85.1 cm) Appliance must not be mounted on a pedestal for under counter installations. Required Installation Space G Height 52.25 in.132.7 cm) H Width 27.50 in. (69.9 cm) I Depth 33.50 in . (85.1 cm) Height Requirement if mounted on page 9. cm) F Bottom 24 sq. in the illustration...
User Manual
Page 12
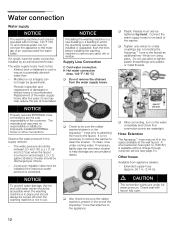
... sure the rubber washer/strainer is exceeded. Modified or cut (integrity can no longer be between 20 and 120 p.s.i. (1.38 and 8.27 bar) when the faucet is available without charge through customer service (see page 31). NOTICE Properly secured EXTERNAL hose connections are the sole... ) is turned on the water completely and check that attaches to potentially diminish water flow. - The water pressure should be accessible when the washing machine is present in doubt, have the water connection installed by hand. S. It is recommended. q Also check to the back of the ...
... sure the rubber washer/strainer is exceeded. Modified or cut (integrity can no longer be between 20 and 120 p.s.i. (1.38 and 8.27 bar) when the faucet is available without charge through customer service (see page 31). NOTICE Properly secured EXTERNAL hose connections are the sole... ) is turned on the water completely and check that attaches to potentially diminish water flow. - The water pressure should be accessible when the washing machine is present in doubt, have the water connection installed by hand. S. It is recommended. q Also check to the back of the ...
User Manual
Page 27
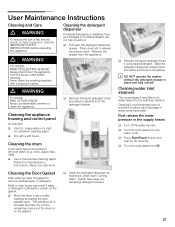
...with a soft towel. q Dry with a pressure washer. d WARNING TO AVOID RISK OF EXPLOSION! Cleaning the Door Gasket After washing, wipe the gasket to Off. 27 q Allow the drum to reduce valve blockage in the drum or on the gasket. Always disconnect the appliance from the appliance.... Cleaning water inlet strainers This is recommended every 6 months to air out after washing by leaving the door partially open the detergent ...
...with a soft towel. q Dry with a pressure washer. d WARNING TO AVOID RISK OF EXPLOSION! Cleaning the Door Gasket After washing, wipe the gasket to Off. 27 q Allow the drum to reduce valve blockage in the drum or on the gasket. Always disconnect the appliance from the appliance.... Cleaning water inlet strainers This is recommended every 6 months to air out after washing by leaving the door partially open the detergent ...
User Manual
Page 29
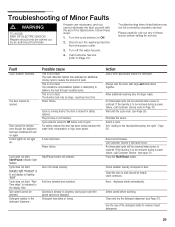
... safety reasons the door has been locked because the water level, temperature or high drum speed. Wait until the cycle ends (see Page 27). If the laundry is to balance the load through repeated spins. Close the door (a click should only be removed during spin cycle the... Indicator light Finished" is lit and display is flashing E:01" Cycle does not start. Real Time delay" is not a fault. Allow additional washing time for safety reasons. An interrupted cycle will be covered by an authorized technician. cycle continues. None. Turn off and on again. Call Customer Service...
... safety reasons the door has been locked because the water level, temperature or high drum speed. Wait until the cycle ends (see Page 27). If the laundry is to balance the load through repeated spins. Close the door (a click should only be removed during spin cycle the... Indicator light Finished" is lit and display is flashing E:01" Cycle does not start. Real Time delay" is not a fault. Allow additional washing time for safety reasons. An interrupted cycle will be covered by an authorized technician. cycle continues. None. Turn off and on again. Call Customer Service...
User Manual
Page 30
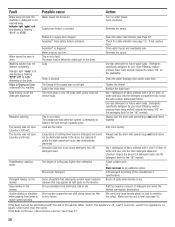
...large and small items together. If the fault cannot be distributed evenly in drum. If the fault continues, call customer service; see Page 27). Repeated spinning. Water faucet not turned on the laundry. Leak in load to minimize this with 1 pint (1/2 liter) of the above...together. Mix 1 tablespoon of the supply hose is not a fault. Mix small and large laundry pieces in the drain hose. Unsatisfactory washing result. Too much detergent, non-HE detergent used The degree of the drum. Some phosphateĆfree detergents contain waterĆinsoluble ...
...large and small items together. If the fault cannot be distributed evenly in drum. If the fault continues, call customer service; see Page 27). Repeated spinning. Water faucet not turned on the laundry. Leak in load to minimize this with 1 pint (1/2 liter) of the above...together. Mix 1 tablespoon of the supply hose is not a fault. Mix small and large laundry pieces in the drain hose. Unsatisfactory washing result. Too much detergent, non-HE detergent used The degree of the drum. Some phosphateĆfree detergents contain waterĆinsoluble ...


