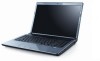
Setup Guide
Page 5
... AC Adapter 6 Connect the Network Cable (Optional 7 Press the Power Button 8 Set Up Microsoft Windows 9 Create System Recovery Media (Recommended 10 Install the SIM Card (Optional 12 Enable or Disable Wireless (Optional 14 Connect to the Internet (Optional 16 Using Your Studio Laptop 20 Right Side Features 20 Left Side Features 24 Computer Base Features 28 Touch Pad Gestures 30 Multimedia Control Keys 32 Display Features 34 Using the Touch Screen (Optional 36 Using the Optical Drive 40 Removing and Replacing the Battery 42 Software Features 44 Free Fall Sensor 45 Dell...
... AC Adapter 6 Connect the Network Cable (Optional 7 Press the Power Button 8 Set Up Microsoft Windows 9 Create System Recovery Media (Recommended 10 Install the SIM Card (Optional 12 Enable or Disable Wireless (Optional 14 Connect to the Internet (Optional 16 Using Your Studio Laptop 20 Right Side Features 20 Left Side Features 24 Computer Base Features 28 Touch Pad Gestures 30 Multimedia Control Keys 32 Display Features 34 Using the Touch Screen (Optional 36 Using the Optical Drive 40 Removing and Replacing the Battery 42 Software Features 44 Free Fall Sensor 45 Dell...

Setup Guide
Page 11
... available at support.dell.com. Setting Up Your Studio Laptop Set Up Microsoft Windows Your Dell computer is recommended that you download and install the latest BIOS and drivers for the first time, follow the instructions on the operating system and features, see support.dell.com/MyNewDell. 9 Doing so may take you will take some time to reinstall the operating system. To set up an Internet connection. The Windows setup screens will need to...
... available at support.dell.com. Setting Up Your Studio Laptop Set Up Microsoft Windows Your Dell computer is recommended that you download and install the latest BIOS and drivers for the first time, follow the instructions on the operating system and features, see support.dell.com/MyNewDell. 9 Doing so may take you will take some time to reinstall the operating system. To set up an Internet connection. The Windows setup screens will need to...

Setup Guide
Page 12
... system recovery media can use the system recovery media if changes to the hardware, software, drivers, or other system settings have left the computer in when you set up Microsoft Windows. You can be used to restore your computer to create the system recovery media: • Dell DataSafe Local Backup • USB key with a minimum capacity of the Operating System disc). Setting Up Your Studio Laptop Create System Recovery Media (Recommended) NOTE: It is recommended that you create a system recovery media as...
... system recovery media can use the system recovery media if changes to the hardware, software, drivers, or other system settings have left the computer in when you set up Microsoft Windows. You can be used to restore your computer to create the system recovery media: • Dell DataSafe Local Backup • USB key with a minimum capacity of the Operating System disc). Setting Up Your Studio Laptop Create System Recovery Media (Recommended) NOTE: It is recommended that you create a system recovery media as...
Setup Guide
Page 13
Follow the instructions on page 67. 11 NOTE: For information on using the system recovery media, see "Connect the AC Adapter" on page 6). 2. Click Start → Programs→ Dell DataSafe Local Backup. 4. Setting Up Your Studio Laptop To create a system recovery media: 1. Insert the disc or USB key in the computer. 3. Click Create Recovery Media. 5. Ensure that the AC adapter is connected (see "System Recovery Media" on the screen.
Follow the instructions on page 67. 11 NOTE: For information on using the system recovery media, see "Connect the AC Adapter" on page 6). 2. Click Start → Programs→ Dell DataSafe Local Backup. 4. Setting Up Your Studio Laptop To create a system recovery media: 1. Insert the disc or USB key in the computer. 3. Click Create Recovery Media. 5. Ensure that the AC adapter is connected (see "System Recovery Media" on the screen.
Setup Guide
Page 14
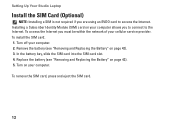
... cellular service provider. Turn on your computer. Setting Up Your Studio Laptop Install the SIM Card (Optional) NOTE: Installing a SIM is not required if you are using an EVDO card to the Internet. To access the Internet you to connect to access the Internet. To install the SIM card: 1. Replace the battery (see "Removing and Replacing the Battery" on page 42). 5. To remove the SIM card, press and eject the SIM card. 12 Installing a Subscriber Identity Module (SIM) card on...
... cellular service provider. Turn on your computer. Setting Up Your Studio Laptop Install the SIM Card (Optional) NOTE: Installing a SIM is not required if you are using an EVDO card to the Internet. To access the Internet you to connect to access the Internet. To install the SIM card: 1. Replace the battery (see "Removing and Replacing the Battery" on page 42). 5. To remove the SIM card, press and eject the SIM card. 12 Installing a Subscriber Identity Module (SIM) card on...
Setup Guide
Page 16
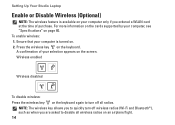
... your computer, see "Specifications" on page 80. For more information on the cards supported by your computer is available on your computer only if you are asked to turn off all wireless radios on an airplane flight. 14 A confirmation of purchase. Setting Up Your Studio Laptop Enable or Disable Wireless (Optional) NOTE: The wireless feature is turned on. 2. Wireless enabled Wireless disabled To disable wireless: Press the wireless key on the keyboard. To enable wireless: 1.
... your computer, see "Specifications" on page 80. For more information on the cards supported by your computer is available on your computer only if you are asked to turn off all wireless radios on an airplane flight. 14 A confirmation of purchase. Setting Up Your Studio Laptop Enable or Disable Wireless (Optional) NOTE: The wireless feature is turned on. 2. Wireless enabled Wireless disabled To disable wireless: Press the wireless key on the keyboard. To enable wireless: 1.

Setup Guide
Page 18
... set up your wired Internet connection, follow the instructions in "Setting Up Your Internet Connection" on page 18. 16 To complete setting up your Internet connection. • If you are using a DSL or cable/satellite modem connection, contact your original order, you can purchase one at www.dell.com. Setting Up Your Studio Laptop Connect to the Internet (Optional) To connect to the telephone wall connector before you need an external modem or network connection and an Internet Service...
... set up your wired Internet connection, follow the instructions in "Setting Up Your Internet Connection" on page 18. 16 To complete setting up your Internet connection. • If you are using a DSL or cable/satellite modem connection, contact your original order, you can purchase one at www.dell.com. Setting Up Your Studio Laptop Connect to the Internet (Optional) To connect to the telephone wall connector before you need an external modem or network connection and an Internet Service...

Setup Guide
Page 20
... to the Internet window appears. Click Start → Control Panel. 3. To set up a new connection or network→ Connect to select, click Help me choose or contact your country. NOTE: If you get one. Have your Internet connection: Windows 7 1. The Connect to check the service status, or try connecting again later. Save and close any open files, and exit any open programs. 2. Setting Up Your Studio Laptop Setting Up Your Internet Connection ISPs and...
... to the Internet window appears. Click Start → Control Panel. 3. To set up a new connection or network→ Connect to select, click Help me choose or contact your country. NOTE: If you get one. Have your Internet connection: Windows 7 1. The Connect to check the service status, or try connecting again later. Save and close any open files, and exit any open programs. 2. Setting Up Your Studio Laptop Setting Up Your Internet Connection ISPs and...

Setup Guide
Page 27
... - Connects to video devices, such as external hard-disk drives or optical drives. Connects to eSATA compatible storage devices, such as a monitor or a projector. 4 Network connector - NOTE: Before you are using a wired network. 5 USB 2.0 connector - Connects to USB devices, such as a USB connector. 25 Using Your Studio Laptop 1 Security cable slot - The eSATA connector also functions as a mouse, keyboard, printer, external drive, or MP3 player. 6 eSATA connector - Connects your computer. 2 HDMI connector - Connects to a TV for both 5.1 audio and video...
... - Connects to video devices, such as external hard-disk drives or optical drives. Connects to eSATA compatible storage devices, such as a monitor or a projector. 4 Network connector - NOTE: Before you are using a wired network. 5 USB 2.0 connector - Connects to USB devices, such as a USB connector. 25 Using Your Studio Laptop 1 Security cable slot - The eSATA connector also functions as a mouse, keyboard, printer, external drive, or MP3 player. 6 eSATA connector - Connects your computer. 2 HDMI connector - Connects to a TV for both 5.1 audio and video...
Setup Guide
Page 31
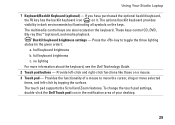
...Backlit keyboard brightness settings - no lighting For more information about the keyboard, see the Dell Technology Guide. 2 Touch pad buttons - The touch pad supports the Scroll and Zoom features. Using Your Studio Laptop 1 Keyboard/Backlit Keyboard (optional) - The multimedia control keys are also located on a mouse. 3 Touch pad - Provide left -click by illuminating all symbols on it. half keyboard brightness b. full keyboard brightness c. If you have purchased the optional backlit keyboard, the F6 key has the backlit keyboard icon on the keys. Press the key to...
...Backlit keyboard brightness settings - no lighting For more information about the keyboard, see the Dell Technology Guide. 2 Touch pad buttons - The touch pad supports the Scroll and Zoom features. Using Your Studio Laptop 1 Keyboard/Backlit Keyboard (optional) - The multimedia control keys are also located on a mouse. 3 Touch pad - Provide left -click by illuminating all symbols on it. half keyboard brightness b. full keyboard brightness c. If you have purchased the optional backlit keyboard, the F6 key has the backlit keyboard icon on the keys. Press the key to...
Setup Guide
Page 46
After connecting to the Internet, you would normally enter manually, such as a user ID and password for software installed on your computer to create presentations, brochures, greeting cards, fliers, and spreadsheets. Productivity and Communication You can use your hard drive or at support.dell.com/manuals. Check your computer. This feature helps keep your Dell computer secure by using the unique appearance of your face to verify your identity...
After connecting to the Internet, you would normally enter manually, such as a user ID and password for software installed on your computer to create presentations, brochures, greeting cards, fliers, and spreadsheets. Productivity and Communication You can use your hard drive or at support.dell.com/manuals. Check your computer. This feature helps keep your Dell computer secure by using the unique appearance of your face to verify your identity...
Setup Guide
Page 49
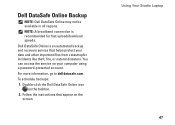
....com. Using Your Studio Laptop 47 Dell DataSafe Online Backup NOTE: Dell DataSafe Online may not be available in all regions. NOTE: A broadband connection is an automated backup and recovery service that appear on the taskbar. 2. Dell DataSafe Online is recommended for fast upload/download speeds. Double-click the Dell DataSafe Online icon on the screen. Follow the instructions that helps protect your computer using a password‑...
....com. Using Your Studio Laptop 47 Dell DataSafe Online Backup NOTE: Dell DataSafe Online may not be available in all regions. NOTE: A broadband connection is an automated backup and recovery service that appear on the taskbar. 2. Dell DataSafe Online is recommended for fast upload/download speeds. Double-click the Dell DataSafe Online icon on the screen. Follow the instructions that helps protect your computer using a password‑...

Setup Guide
Page 50
... working - • Certain touch screen features may not be disabled. To enable the touch screen features, click Start → Control Panel→ Hardware and Sound→ Pen and Touch. • The multi-touch feature may be supported by the application. 48 WARNING: Only trained service personnel should remove the computer cover. Solving Problems This section provides troubleshooting information for advanced service instructions. See the Service Manual at support.dell.com/manuals for your problem using the following guidelines, see "Using Support...
... working - • Certain touch screen features may not be disabled. To enable the touch screen features, click Start → Control Panel→ Hardware and Sound→ Pen and Touch. • The multi-touch feature may be supported by the application. 48 WARNING: Only trained service personnel should remove the computer cover. Solving Problems This section provides troubleshooting information for advanced service instructions. See the Service Manual at support.dell.com/manuals for your problem using the following guidelines, see "Using Support...
Setup Guide
Page 51
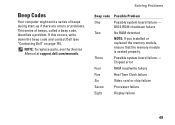
BIOS ROM checksum failure Two No RAM detected NOTE: If you installed or replaced the memory module, ensure that the memory module is seated properly. If this occurs, write down the beep code and contact Dell (see the Service Manual at support.dell.com/manuals. Beep Codes Your computer might emit a series of beeps during start-up if there are errors or problems. This series of beeps, called a beep code, identifies a problem. Chipset error Four RAM read...
BIOS ROM checksum failure Two No RAM detected NOTE: If you installed or replaced the memory module, ensure that the memory module is seated properly. If this occurs, write down the beep code and contact Dell (see the Service Manual at support.dell.com/manuals. Beep Codes Your computer might emit a series of beeps during start-up if there are errors or problems. This series of beeps, called a beep code, identifies a problem. Chipset error Four RAM read...
Setup Guide
Page 54
... state or the display may not be responding. • Press a key on the keyboard, move the connected mouse or a finger on the touch pad, or press the power button to resume normal operation. • If the display is not responding, press the power button until the computer turns off and then turn it back on. • If the problem persists, contact Dell (see "Contacting Dell" on your computer...
... state or the display may not be responding. • Press a key on the keyboard, move the connected mouse or a finger on the touch pad, or press the power button to resume normal operation. • If the display is not responding, press the power button until the computer turns off and then turn it back on. • If the problem persists, contact Dell (see "Contacting Dell" on your computer...

Setup Guide
Page 59
... HDD boot test. Replace the battery (see the Service Manual at support.dell.com/manuals). 57 Contact Dell (see the Dell Technology Guide available on page 76). Keyboard failure or loose cable. Possible system board failure or RTC battery low. Using Support Tools Keyboard failure - Replace the CPU fan (see the Service Manual at support.dell.com/manuals) or contact Dell (see "Contacting Dell" on your boot device, ensure that the cables are connected and that the drive is installed properly and partitioned as a boot device. • Enter system setup...
... HDD boot test. Replace the battery (see the Service Manual at support.dell.com/manuals). 57 Contact Dell (see the Dell Technology Guide available on page 76). Keyboard failure or loose cable. Possible system board failure or RTC battery low. Using Support Tools Keyboard failure - Replace the CPU fan (see the Service Manual at support.dell.com/manuals) or contact Dell (see "Contacting Dell" on your boot device, ensure that the cables are connected and that the drive is installed properly and partitioned as a boot device. • Enter system setup...

Setup Guide
Page 60
.... S.M.A.R.T error, possible hard drive failure. To start the search. 3. Click Start → Help and Support. 2. Hard Drive SELF MONITORING SYSTEM has reported that best describes the problem and follow the remaining troubleshooting steps. 58 In the search results, select the option that a parameter has exceeded its normal operating range. Your USB device needs more power for it to start the Hardware Troubleshooter: 1. Dell recommends that you can use the Hardware Troubleshooter to connect the USB device, or...
.... S.M.A.R.T error, possible hard drive failure. To start the search. 3. Click Start → Help and Support. 2. Hard Drive SELF MONITORING SYSTEM has reported that best describes the problem and follow the remaining troubleshooting steps. 58 In the search results, select the option that a parameter has exceeded its normal operating range. Your USB device needs more power for it to start the Hardware Troubleshooter: 1. Dell recommends that you can use the Hardware Troubleshooter to connect the USB device, or...
Setup Guide
Page 61
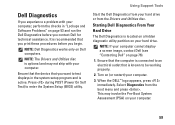
... the system setup program and is active. Dell Diagnostics If you experience a problem with your computer. Using Support Tools Start the Dell Diagnostics from your hard drive or from the boot menu and press . Turn on page 76). 1. Ensure that the device that you contact Dell for technical assistance. Select Diagnostics from the Drivers and Utilities disc. NOTE: If your computer cannot display a screen image, contact Dell (see "Contacting Dell" on (or...
... the system setup program and is active. Dell Diagnostics If you experience a problem with your computer. Using Support Tools Start the Dell Diagnostics from your hard drive or from the boot menu and press . Turn on page 76). 1. Ensure that the device that you contact Dell for technical assistance. Select Diagnostics from the Drivers and Utilities disc. NOTE: If your computer cannot display a screen image, contact Dell (see "Contacting Dell" on (or...
Setup Guide
Page 82
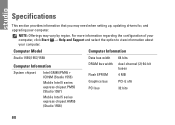
NOTE: Offerings may need when setting up, updating drivers for, and upgrading your computer. Computer Model Computer Information Studio 1555/1557/1558 Data bus width 64 bits Computer Information System chipset Intel GM45/PM45 + ICH9M (Studio 1555) Mobile Intel 5 series express chipset PM55 (Studio 1557) Mobile Intel 5 series express chipset HM55 (Studio 1558) DRAM bus width Flash EPROM Graphics bus PCI bus dual-channel (2) 64‑...
NOTE: Offerings may need when setting up, updating drivers for, and upgrading your computer. Computer Model Computer Information Studio 1555/1557/1558 Data bus width 64 bits Computer Information System chipset Intel GM45/PM45 + ICH9M (Studio 1555) Mobile Intel 5 series express chipset PM55 (Studio 1557) Mobile Intel 5 series express chipset HM55 (Studio 1558) DRAM bus width Flash EPROM Graphics bus PCI bus dual-channel (2) 64‑...
Setup Guide
Page 97
Index A AC adapter size and weight 91 airflow, allowing 5 C calling Dell 75 CDs, playing and creating 45 chipset 80 computer capabilities 44 computer, setting up 5 Contacting Dell online 76 customer service 71 D damage, avoiding 5 DellConnect 71 Dell Diagnostics 59 Dell Factory Image Restore 68 Dell Support Center 55 Dell Touch Zone 36 Diagnostic Checklist 75 discs using 40 drivers and downloads 79 DVDs, playing and creating 45 95
Index A AC adapter size and weight 91 airflow, allowing 5 C calling Dell 75 CDs, playing and creating 45 chipset 80 computer capabilities 44 computer, setting up 5 Contacting Dell online 76 customer service 71 D damage, avoiding 5 DellConnect 71 Dell Diagnostics 59 Dell Factory Image Restore 68 Dell Support Center 55 Dell Touch Zone 36 Diagnostic Checklist 75 discs using 40 drivers and downloads 79 DVDs, playing and creating 45 95


