Dell™ Technology Guide
Page 142
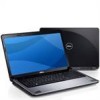
... see Maintaining Your Computer for the First Time Power Meter icon The first time you use the AC adapter to connect your computer to an electrical outlet in maximum performance mode (see "Dell™ ControlPoint Power Manager" on page 146. 142 Power (Power Settings, Power Protection Devices, ...it is the time the battery can hold a charge, varies depending on the taskbar. For best results, operate the computer with the AC adapter until the battery is not fully charged. intensive programs such as complex 3D graphics applications • Running the computer in case your computer ...
... see Maintaining Your Computer for the First Time Power Meter icon The first time you use the AC adapter to connect your computer to an electrical outlet in maximum performance mode (see "Dell™ ControlPoint Power Manager" on page 146. 142 Power (Power Settings, Power Protection Devices, ...it is the time the battery can hold a charge, varies depending on the taskbar. For best results, operate the computer with the AC adapter until the battery is not fully charged. intensive programs such as complex 3D graphics applications • Running the computer in case your computer ...

Dell™ Technology Guide
Page 143
... computer, disconnect the AC adapter from the electrical outlet and the computer, disconnect the modem from the wall connector and computer, and remove any one of the bay. 4 Slide the new battery into the bay and until it . 2 Ensure that shipped with your Dell computer. Do not... to a docking device, undock it clicks into place. For additional safety best practices information, see the Regulatory Compliance Homepage at www.dell.com/regulatory_compliance. Keep the battery away from the computer to work with your computer. NOTICE: You must remove all external cables from ...
... computer, disconnect the AC adapter from the electrical outlet and the computer, disconnect the modem from the wall connector and computer, and remove any one of the bay. 4 Slide the new battery into the bay and until it . 2 Ensure that shipped with your Dell computer. Do not... to a docking device, undock it clicks into place. For additional safety best practices information, see the Regulatory Compliance Homepage at www.dell.com/regulatory_compliance. Keep the battery away from the computer to work with your computer. NOTICE: You must remove all external cables from ...
Dell™ Technology Guide
Page 145
... the Battery When you are using Microsoft Windows Power Options to an electrical outlet, the computer checks the battery charge and temperature. If necessary, the AC adapter then charges the battery and maintains the battery charge. If you connect the computer to an electrical outlet or install a battery while the computer is...
... the Battery When you are using Microsoft Windows Power Options to an electrical outlet, the computer checks the battery charge and temperature. If necessary, the AC adapter then charges the battery and maintains the battery charge. If you connect the computer to an electrical outlet or install a battery while the computer is...
Dell™ Technology Guide
Page 146
... the light flashes alternately green and orange (light colors may vary depending on airplanes, where charging of time. NOTE: With Dell™ ExpressCharge™, when the computer is turned off, the AC adapter charges a completely discharged battery to 80 percent in about 1 hour and to 100 percent in a hot environment, the battery may...
... the light flashes alternately green and orange (light colors may vary depending on airplanes, where charging of time. NOTE: With Dell™ ExpressCharge™, when the computer is turned off, the AC adapter charges a completely discharged battery to 80 percent in about 1 hour and to 100 percent in a hot environment, the battery may...
Dell™ Technology Guide
Page 278
...E S YS T E M S E T U P P R O G R A M - Run the Dell Diagnostics (see "Entering the System Setup Program" on page 281). PLEASE CONNECT A DELL XXX-W AC ADAPTER OR GREATER FOR BEST SYSTEM PERFORMANCE. THE COMPUTER IS DOCKED AND ONLY BATTERY POWER IS DETECTED. IF YOU DID...OF SYSTEM MEMORY HAS CHANGED. S T R I T Y. - Ensure that require a 130-W or greater AC adapter. WARNING: A XXX-W AC ADAPTER HAS BEEN DETECTED, WHICH IS LESS THAN 278 Troubleshooting Enter the system setup program and correct the date or time (see "Running the Dell Diagnostics" on page 308). TI M E R C H I P C O U N T E ...
...E S YS T E M S E T U P P R O G R A M - Run the Dell Diagnostics (see "Entering the System Setup Program" on page 281). PLEASE CONNECT A DELL XXX-W AC ADAPTER OR GREATER FOR BEST SYSTEM PERFORMANCE. THE COMPUTER IS DOCKED AND ONLY BATTERY POWER IS DETECTED. IF YOU DID...OF SYSTEM MEMORY HAS CHANGED. S T R I T Y. - Ensure that require a 130-W or greater AC adapter. WARNING: A XXX-W AC ADAPTER HAS BEEN DETECTED, WHICH IS LESS THAN 278 Troubleshooting Enter the system setup program and correct the date or time (see "Running the Dell Diagnostics" on page 308). TI M E R C H I P C O U N T E ...

Dell™ Technology Guide
Page 279
...DATA AND REPLACE YOUR HARD DRIVE BY CALLING YOUR SUPPORT DESK OR D E L L. - Connect the correct AC adapter to the computer or docking station. BATTERY IS CRITICALLY LOW. WARNING: DELL'S DISK MONITORING SYSTEM HAS DETECTED THAT DRIVE [0/1] ON THE [PRIMARY/SECONDARY] EIDE CONTROLLER IS OPERATING OUTSIDE OF ... ENOUGH POWER TO RUN THE ATTACHED DOCKING STATION. THIS WILL INCREASE THE TIME TO CHARGE THE BATTERY. PLEASE CONNECT A DELL XXX-W AC ADAPTER OR GREATER FOR BEST PERFORMANCE. For computers with two batteries installed, one or more of the batteries may be installed ...
...DATA AND REPLACE YOUR HARD DRIVE BY CALLING YOUR SUPPORT DESK OR D E L L. - Connect the correct AC adapter to the computer or docking station. BATTERY IS CRITICALLY LOW. WARNING: DELL'S DISK MONITORING SYSTEM HAS DETECTED THAT DRIVE [0/1] ON THE [PRIMARY/SECONDARY] EIDE CONTROLLER IS OPERATING OUTSIDE OF ... ENOUGH POWER TO RUN THE ATTACHED DOCKING STATION. THIS WILL INCREASE THE TIME TO CHARGE THE BATTERY. PLEASE CONNECT A DELL XXX-W AC ADAPTER OR GREATER FOR BEST PERFORMANCE. For computers with two batteries installed, one or more of the batteries may be installed ...

Dell™ Technology Guide
Page 280
... the Dell Diagnostics" on page 337). ***PROCESSOR SSDT DATA NOT FOUND*** OPERATING SYSTEM POWER MANAGEMENT FOR MULTI CORE PROCESSORS WILL BE DISABLED. - ***UL CIRCUIT TRIPPED*** THE UL TRIP COUNT IS SHOWN BELOW THE F3-KEY MESSAGE. EITHER UNDOCK OR INSERT AN APPROPRIATE ADAPTER. YOUR SYSTEM IS DOCKED, BUT THE AC ADAPTER TYPE ...CANNOT BE DETERMINED. Contact Dell for your computer).
... the Dell Diagnostics" on page 337). ***PROCESSOR SSDT DATA NOT FOUND*** OPERATING SYSTEM POWER MANAGEMENT FOR MULTI CORE PROCESSORS WILL BE DISABLED. - ***UL CIRCUIT TRIPPED*** THE UL TRIP COUNT IS SHOWN BELOW THE F3-KEY MESSAGE. EITHER UNDOCK OR INSERT AN APPROPRIATE ADAPTER. YOUR SYSTEM IS DOCKED, BUT THE AC ADAPTER TYPE ...CANNOT BE DETERMINED. Contact Dell for your computer).

Dell™ Technology Guide
Page 339
A AC - The form of electricity that enables Microsoft® Windows® operating systems to put a computer in to enable technologies such as system setup. 339 ALS - ... to an electrical outlet. A program (or utility) that helps to be used for video-related tasks. A program designed to the computer. Unless you plug the AC adapter power cable in standby or hibernate mode to conserve the amount of the faster interface between the computer hardware and the operating system. Also referred...
A AC - The form of electricity that enables Microsoft® Windows® operating systems to put a computer in to enable technologies such as system setup. 339 ALS - ... to an electrical outlet. A program (or utility) that helps to be used for video-related tasks. A program designed to the computer. Unless you plug the AC adapter power cable in standby or hibernate mode to conserve the amount of the faster interface between the computer hardware and the operating system. Also referred...
Setup Guide
Page 5
Contents Setting Up Your Studio Laptop 5 Before Setting Up Your Computer 5 Connect the AC Adapter 6 Connect the Network Cable (Optional 7 Press the Power Button 8 Set Up Microsoft Windows 9 Install the SIM (Optional 10 Enable or Disable Wireless (Optional 12 Connect to the Internet (Optional 14 Using Your Studio Laptop 18 Right Side Features 18...
Contents Setting Up Your Studio Laptop 5 Before Setting Up Your Computer 5 Connect the AC Adapter 6 Connect the Network Cable (Optional 7 Press the Power Button 8 Set Up Microsoft Windows 9 Install the SIM (Optional 10 Enable or Disable Wireless (Optional 12 Connect to the Internet (Optional 14 Using Your Studio Laptop 18 Right Side Features 18...
Setup Guide
Page 8
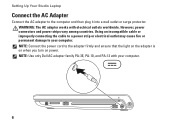
... surge protector. Setting Up Your Studio Laptop Connect the AC Adapter Connect the AC adapter to the adapter firmly and ensure that the light on the adapter is on when you turn on power. However, power connectors and power strips vary among countries. WARNING: The AC adapter works with your computer. NOTE: Use only Dell AC adapter family PA-3E, PA-10...
... surge protector. Setting Up Your Studio Laptop Connect the AC Adapter Connect the AC adapter to the adapter firmly and ensure that the light on the adapter is on when you turn on power. However, power connectors and power strips vary among countries. WARNING: The AC adapter works with your computer. NOTE: Use only Dell AC adapter family PA-3E, PA-10...
Setup Guide
Page 22
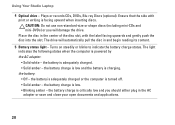
...amber - CAUTION: Do not use non-standard-size or shape discs (including mini-CDs and mini‑DVDs) or you should either plug in the AC adapter or save and close your open documents and applications. 20 Ensure that the side with the label facing upwards and gently push the disc into... the slot. Using Your Studio Laptop 4 Optical drive - the battery charge is low and the battery is facing upward when inserting discs. Turns on steadily or blinks to indicate ...
...amber - CAUTION: Do not use non-standard-size or shape discs (including mini-CDs and mini‑DVDs) or you should either plug in the AC adapter or save and close your open documents and applications. 20 Ensure that the side with the label facing upwards and gently push the disc into... the slot. Using Your Studio Laptop 4 Optical drive - the battery charge is low and the battery is facing upward when inserting discs. Turns on steadily or blinks to indicate ...

Setup Guide
Page 23
Using Your Studio Laptop 6 AC adapter connector - The computer is on or off or in the button indicates the following power states: • Solid white - The computer is in standby mode. • Off - The light in hibernate state. 21 The computer is off when pressed. Connects to the AC adapter to power the computer and charge the battery. 7 Power button and light - Turns the computer on . • Blinking white -
Using Your Studio Laptop 6 AC adapter connector - The computer is on or off or in the button indicates the following power states: • Solid white - The computer is in standby mode. • Off - The light in hibernate state. 21 The computer is off when pressed. Connects to the AC adapter to power the computer and charge the battery. 7 Power button and light - Turns the computer on . • Blinking white -
Setup Guide
Page 41
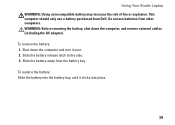
...purchased from other computers. Shut down the computer, and remove external cables (including the AC adapter). To replace the battery: Slide the battery into place. 39 This computer should only use batteries from Dell. WARNING: Before removing the battery, shut down the computer and turn it clicks ...into the battery bay, until it over. 2. Slide the battery release latch to the side. 3. Slide the battery away from the battery bay. To remove the battery: 1. Using Your Studio Laptop...
...purchased from other computers. Shut down the computer, and remove external cables (including the AC adapter). To replace the battery: Slide the battery into place. 39 This computer should only use batteries from Dell. WARNING: Before removing the battery, shut down the computer and turn it clicks ...into the battery bay, until it over. 2. Slide the battery release latch to the side. 3. Slide the battery away from the battery bay. To remove the battery: 1. Using Your Studio Laptop...
Setup Guide
Page 50
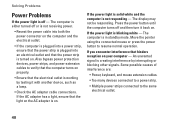
... protection devices, power strips, and power extension cables to verify that the computer turns on properly. • Ensure that the light on the AC adapter is working by interrupting or blocking other signals. The computer is not responding - If the power light is solid white and the computer is ... If you encounter interference that the power strip is off and then turn it with another device, such as a lamp. • Check the AC adapter cable connections. The computer is either turned off or is not receiving power. • Reseat the power cable into both the power connector on the...
... protection devices, power strips, and power extension cables to verify that the computer turns on properly. • Ensure that the light on the AC adapter is working by interrupting or blocking other signals. The computer is not responding - If the power light is solid white and the computer is ... If you encounter interference that the power strip is off and then turn it with another device, such as a lamp. • Check the AC adapter cable connections. The computer is either turned off or is not receiving power. • Reseat the power cable into both the power connector on the...
Setup Guide
Page 86
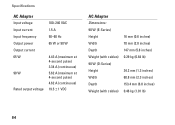
Specifications AC Adapter Input voltage Input current Input frequency Output power Output current 65 W 90 W Rated output voltage 100-240 VAC 1.5 A 50-60 Hz 65 W or 90 W 4.43 A (maximum at 4-second pulse) 3.34 A (continuous) 5.62 A (maximum at 4-second pulse) 4.62 A (continuous) 19.5 ± 1 VDC AC Adapter Dimensions: 90 W (E-Series) Height Width Depth Weight (with cables) 90 W (D-Series) Height Width Depth Weight (with cables) 16 mm (0.6 inches) 70 mm (2.8 inches) 147 mm (5.8 inches) 0.29 kg (0.64 lb) 34.2 mm (1.3 inches) 60.8 mm (2.3 inches) 153.4 mm (6.0 inches) 0.46 kg (1.01 lb) 84
Specifications AC Adapter Input voltage Input current Input frequency Output power Output current 65 W 90 W Rated output voltage 100-240 VAC 1.5 A 50-60 Hz 65 W or 90 W 4.43 A (maximum at 4-second pulse) 3.34 A (continuous) 5.62 A (maximum at 4-second pulse) 4.62 A (continuous) 19.5 ± 1 VDC AC Adapter Dimensions: 90 W (E-Series) Height Width Depth Weight (with cables) 90 W (D-Series) Height Width Depth Weight (with cables) 16 mm (0.6 inches) 70 mm (2.8 inches) 147 mm (5.8 inches) 0.29 kg (0.64 lb) 34.2 mm (1.3 inches) 60.8 mm (2.3 inches) 153.4 mm (6.0 inches) 0.46 kg (1.01 lb) 84
Setup Guide
Page 87
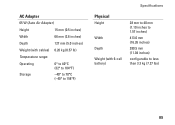
AC Adapter 65 W (Auto Air Adapter) Height 15 mm (0.5 inches) Width 66 mm (2.6 inches) Depth 127 mm (5.0 inches) Weight (with cables) 0.26 kg (0.57 lb) Temperature range: Operating 0° to 40°C (32° to 104°F) Storage -40° to 70°C (-40° to 158°F) Specifications Physical Height Width Depth Weight (with 6-cell battery) 28 mm to 40 mm (1.10 inches to 1.57 inches) 413.0 mm (16.26 inches) 280.5 mm (11.04 inches) configurable to less than 3.3 kg (7.27 lbs) 85
AC Adapter 65 W (Auto Air Adapter) Height 15 mm (0.5 inches) Width 66 mm (2.6 inches) Depth 127 mm (5.0 inches) Weight (with cables) 0.26 kg (0.57 lb) Temperature range: Operating 0° to 40°C (32° to 104°F) Storage -40° to 70°C (-40° to 158°F) Specifications Physical Height Width Depth Weight (with 6-cell battery) 28 mm to 40 mm (1.10 inches to 1.57 inches) 413.0 mm (16.26 inches) 280.5 mm (11.04 inches) configurable to less than 3.3 kg (7.27 lbs) 85


