
HH-OT53P Manual
Page 1
HH-OT53P Cooker Hood Instruction Manual 1
HH-OT53P Cooker Hood Instruction Manual 1
HH-OT53P Manual
Page 2
Content 1 Safety instructions 2 Technical Specifications 3 Installation 4 Start using your cooker hood 5 Troubleshooting 6 Maintenance and cleaning 7 Environment protection 2
Content 1 Safety instructions 2 Technical Specifications 3 Installation 4 Start using your cooker hood 5 Troubleshooting 6 Maintenance and cleaning 7 Environment protection 2
HH-OT53P Manual
Page 3
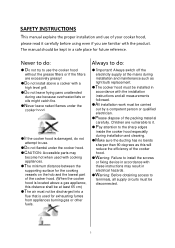
... the lowest part of the packing material carefully. The manual should be discharged into a flue that is located above a gas appliance, this distance shall be at the mains during installation and cleaning. ●Make sure the ducting has no bends sharper than 90 degrees as light bulb replacement. ●The cooker hood must be installed in accordance with the installation instructions and all supply circuits must be...
... the lowest part of the packing material carefully. The manual should be discharged into a flue that is located above a gas appliance, this distance shall be at the mains during installation and cleaning. ●Make sure the ducting has no bends sharper than 90 degrees as light bulb replacement. ●The cooker hood must be installed in accordance with the installation instructions and all supply circuits must be...
HH-OT53P Manual
Page 4
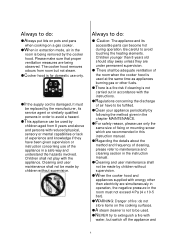
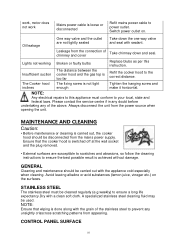
... gas or other than electricity are simultaneously in operation, the negative pressure in the room must be replaced by the manufacturer, its accessible parts can be used by children aged from 8 years and above and persons with reduced physical, sensory or mental capabilities or lack of cleaning, please refer to maintenance and cleaning section in the instruction manual. ●Cleaning and user...
... gas or other than electricity are simultaneously in operation, the negative pressure in the room must be replaced by the manufacturer, its accessible parts can be used by children aged from 8 years and above and persons with reduced physical, sensory or mental capabilities or lack of cleaning, please refer to maintenance and cleaning section in the instruction manual. ●Cleaning and user...

HH-OT53P Manual
Page 5
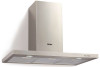
TECHNICAL SPECIFICATIONS Model No. HH-OT53P Width 900mm Depth 500mm Height 450-830mm Supply voltage 220 - 240 V, 50 Hz Control Suction power Push button 700 m3/h Motor power 190 W Lamp power 2×2W LED Total power 194W Net weight 15kgs Gross weight 17kgs 5 with a lid or a fire blanket. then cover flame e.g.
TECHNICAL SPECIFICATIONS Model No. HH-OT53P Width 900mm Depth 500mm Height 450-830mm Supply voltage 220 - 240 V, 50 Hz Control Suction power Push button 700 m3/h Motor power 190 W Lamp power 2×2W LED Total power 194W Net weight 15kgs Gross weight 17kgs 5 with a lid or a fire blanket. then cover flame e.g.
HH-OT53P Manual
Page 6
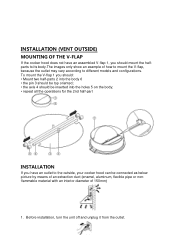
... installation, turn the unit off and unplug it from the outlet. 6 INSTALLATION (VENT OUTSIDE) MOUNTING OF THE V-FLAP If the cooker hood does not have an assembled V-flap 1, you have an outlet to different models and configurations. To mount the V-flap 1 you should: • Mount two half-parts 2 into the body 6 • the pin 3 should be top oriented; • the axis 4 should be inserted...
... installation, turn the unit off and unplug it from the outlet. 6 INSTALLATION (VENT OUTSIDE) MOUNTING OF THE V-FLAP If the cooker hood does not have an assembled V-flap 1, you have an outlet to different models and configurations. To mount the V-flap 1 you should: • Mount two half-parts 2 into the body 6 • the pin 3 should be top oriented; • the axis 4 should be inserted...
HH-OT53P Manual
Page 7
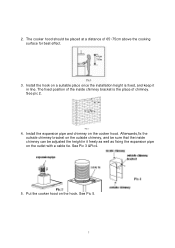
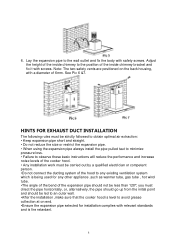
... of chimney. Afterwards,fix the outside chimney bracket on the outlet with a cable tie. See pic 2. 4. Install the expansion pipe and chimney on the hook. See Pic 5. 7 The cooker hood should be adjusted the height in line. Install the hook on a suitable place once the installation height is the place of 65~75cm above the cooking surface for best effect. 3. Put the cooker hood on...
... of chimney. Afterwards,fix the outside chimney bracket on the outlet with a cable tie. See pic 2. 4. Install the expansion pipe and chimney on the hook. See Pic 5. 7 The cooker hood should be adjusted the height in line. Install the hook on a suitable place once the installation height is the place of 65~75cm above the cooking surface for best effect. 3. Put the cooker hood on...
HH-OT53P Manual
Page 8
... hood is level to the wall outlet and fix the body with a diameter of 6mm. 6. Adjust the height of the inside chimney to any other appliance ,such as warmer tube, gas tube , hot wind tube. •The angle of the bend of the inside chimney bracket and fix it with relevant standards and is being used for installation complies with screws...
... hood is level to the wall outlet and fix the body with a diameter of 6mm. 6. Adjust the height of the inside chimney to any other appliance ,such as warmer tube, gas tube , hot wind tube. •The angle of the bend of the inside chimney bracket and fix it with relevant standards and is being used for installation complies with screws...
HH-OT53P Manual
Page 9
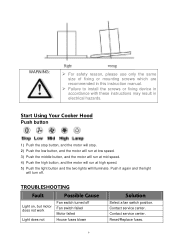
... the low button, and the motor will run at low speed. 3) Push the middle button, and the motor will run at mid speed. 4) Push the high button, and the motor will run at high speed. 5) Push the light button and the two lights will turn off Fan switch failed Motor failed House fuses blown Solution Select a fan switch position. Reset/Replace fuses. 9 TROUBLESHOOTING Fault Possible Cause Light on, but motor does not work Light does not Fan switch turned off . Contact service center.
... the low button, and the motor will run at low speed. 3) Push the middle button, and the motor will run at mid speed. 4) Push the high button, and the motor will run at high speed. 5) Push the light button and the two lights will turn off Fan switch failed Motor failed House fuses blown Solution Select a fan switch position. Reset/Replace fuses. 9 TROUBLESHOOTING Fault Possible Cause Light on, but motor does not work Light does not Fan switch turned off . Contact service center.
HH-OT53P Manual
Page 10
... Cooker hood The fixing screw is done along with the appliance cold especially when cleaning. Ensure that wiping is not tight inclines enough Tighten the hanging screw and make it horizontal. A specialized stainless steel cleaning fluid may be disconnected from the connection of chimney and cover Take chimney down the one way valve and seal with a clean soft cloth. work, motor does not work Mains power cable is...
... Cooker hood The fixing screw is done along with the appliance cold especially when cleaning. Ensure that wiping is not tight inclines enough Tighten the hanging screw and make it horizontal. A specialized stainless steel cleaning fluid may be disconnected from the connection of chimney and cover Take chimney down the one way valve and seal with a clean soft cloth. work, motor does not work Mains power cable is...
HH-OT53P Manual
Page 11
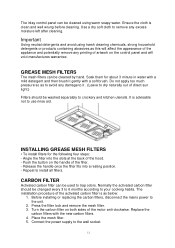
... before cleaning. Place the mesh filter. 5. CARBON FILTER Activated carbon filter can be used to your cooking habits. Angle the filter into a resting position. - Normally the activated carbon filter should be changed every 3 to 6 months according to trap odors. Before installing or replacing the carbon filters, disconnect the mains power to the wall socket. 11 Connect the power supply to the unit. 2. Repeat to crockery and kitchen utensils. Turn...
... before cleaning. Place the mesh filter. 5. CARBON FILTER Activated carbon filter can be used to your cooking habits. Angle the filter into a resting position. - Normally the activated carbon filter should be changed every 3 to 6 months according to trap odors. Before installing or replacing the carbon filters, disconnect the mains power to the wall socket. 11 Connect the power supply to the unit. 2. Repeat to crockery and kitchen utensils. Turn...
HH-OT53P Manual
Page 12
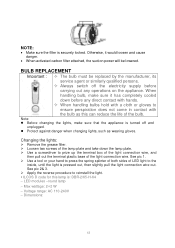
... this lamp is turned off the electricity supply before any operations on the appliance. See pic 2& 3. Apply the reverse procedure to the inside, until the light is securely locked. Voltage range: AC 110-240V - Changing the lights: Remove the grease filter. Loosen two screws of the lamp plate and take down before carrying out any direct contact with hands. When handling bulbs...
... this lamp is turned off the electricity supply before any operations on the appliance. See pic 2& 3. Apply the reverse procedure to the inside, until the light is securely locked. Voltage range: AC 110-240V - Changing the lights: Remove the grease filter. Loosen two screws of the lamp plate and take down before carrying out any direct contact with hands. When handling bulbs...
HH-OT53P Manual
Page 13
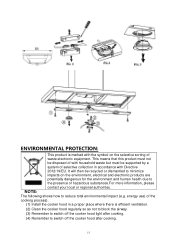
... PROTECTION: This product is efficient ventilation. (2) Clean the cooker hood regularly so as not to block the airway. (3) Remember to switch off the cooker hood after cooking. (4) Remember to reduce total environmental impact (e.g. NOTE: The following shows how to switch off the cooker hood light after cooking. 13 This means that this product...sorting of hazardous substances.For more information, please contact your local or regional authorities. It will then be supported by a system of selective collection in a proper place where there is marked with Directive 2012/19/EU.
... PROTECTION: This product is efficient ventilation. (2) Clean the cooker hood regularly so as not to block the airway. (3) Remember to switch off the cooker hood after cooking. (4) Remember to reduce total environmental impact (e.g. NOTE: The following shows how to switch off the cooker hood light after cooking. 13 This means that this product...sorting of hazardous substances.For more information, please contact your local or regional authorities. It will then be supported by a system of selective collection in a proper place where there is marked with Directive 2012/19/EU.
HH-OT53P Manual
Page 14
INFORMATION FOR DISMANTLING Do not dismantle the appliance in a way which is not shown in the user manual. At the end of life, the appliance should not be dismantled by user. The appliance could not be disposed of with your Local Authority or retainer for recycling advice. 14 Check with household waste.
INFORMATION FOR DISMANTLING Do not dismantle the appliance in a way which is not shown in the user manual. At the end of life, the appliance should not be dismantled by user. The appliance could not be disposed of with your Local Authority or retainer for recycling advice. 14 Check with household waste.
