
Model: GL-235
Page 1
..., NJ 07207 092007G RevH Copyright © 2010 Hayward Inc. Aqua Solar GL-235 Electronic Solar Control Operation and Installation Manual GL-235 www.haywardnet.com IN NO EVENT SHALL HAYWARD BE RESPONSIBLE OR ANY CONSEQUENTIAL OR INCIDENTAL DAMAGES OF ANY NATURE WHATSOEVER. Years 1-3: Years 4-5 Charges no faults or problems are not eligible for more information, please contact the Hayward Technical Service Support Center or visit us on the web...
..., NJ 07207 092007G RevH Copyright © 2010 Hayward Inc. Aqua Solar GL-235 Electronic Solar Control Operation and Installation Manual GL-235 www.haywardnet.com IN NO EVENT SHALL HAYWARD BE RESPONSIBLE OR ANY CONSEQUENTIAL OR INCIDENTAL DAMAGES OF ANY NATURE WHATSOEVER. Years 1-3: Years 4-5 Charges no faults or problems are not eligible for more information, please contact the Hayward Technical Service Support Center or visit us on the web...

Model: GL-235
Page 2
Input power can be replaced. For safety, the GL-235 must be run to the ground terminal on next page. Power input Turn off power at back of 5 feet (horizontally) from the pool or spa. For other temperatures. Voltage measurements should be moved to select 12VAC output operation. Ohm measurements made with an adjustable, calibrated water temperature high limit. The GL-235 also has a high voltage output for specific grounding requirements. Enabled...
Input power can be replaced. For safety, the GL-235 must be run to the ground terminal on next page. Power input Turn off power at back of 5 feet (horizontally) from the pool or spa. For other temperatures. Voltage measurements should be moved to select 12VAC output operation. Ohm measurements made with an adjustable, calibrated water temperature high limit. The GL-235 also has a high voltage output for specific grounding requirements. Enabled...

Model: GL-235
Page 3
... voltage across the solar terminals again. Tighten hose clamp over the sensor to short the valve output wiring. Next, disconnect the "solar" sensor from the unit, measure the resistance of the main circuit board. Sensor Mounting and Wiring Most installations use and ensure that the booster pump can be used . Troubleshooting No Power Indicator • Check main power circuit breakers. • Check fuse Fuse Replacement The GL-235 is always on Disable recirculate freeze protection if enabled. If "Heating...
... voltage across the solar terminals again. Tighten hose clamp over the sensor to short the valve output wiring. Next, disconnect the "solar" sensor from the unit, measure the resistance of the main circuit board. Sensor Mounting and Wiring Most installations use and ensure that the booster pump can be used . Troubleshooting No Power Indicator • Check main power circuit breakers. • Check fuse Fuse Replacement The GL-235 is always on Disable recirculate freeze protection if enabled. If "Heating...
Model: GL-235
Page 4
... the pool temperature OR the pool temperature is cooler than the high limit setting. Hayward strongly recommends the use a non-positive seal valve or drill a hole (1/8"--1/4") in series with recirculate freeze protection disabled (the jumper is present but installed on the main circuit board. If recirculate freeze protection is to be wired for Timer Override function. 4 Measuring Voltage of Pool Sensor (Use the same method to measure the Solar Sensor) Figure 5 9 The GL-235 will...
... the pool temperature OR the pool temperature is cooler than the high limit setting. Hayward strongly recommends the use a non-positive seal valve or drill a hole (1/8"--1/4") in series with recirculate freeze protection disabled (the jumper is present but installed on the main circuit board. If recirculate freeze protection is to be wired for Timer Override function. 4 Measuring Voltage of Pool Sensor (Use the same method to measure the Solar Sensor) Figure 5 9 The GL-235 will...

Model: GL-235
Page 5
... collecting solar heat. If the valve(s) positions are working in reverse, follow the instructions in the "AUTO" position and adjust the desired pool/spa temperature setting. Operation For normal operation place the switch in section marked "Low Voltage (LV) : Solar Valve" to correct. Move the switch to "MANUAL OFF" and verify that the valve(s) are off to "MANUAL TEST" and verify that both the "Heating" and "Cooling" indicators light and that all indicators except "Power...
... collecting solar heat. If the valve(s) positions are working in reverse, follow the instructions in the "AUTO" position and adjust the desired pool/spa temperature setting. Operation For normal operation place the switch in section marked "Low Voltage (LV) : Solar Valve" to correct. Move the switch to "MANUAL OFF" and verify that the valve(s) are off to "MANUAL TEST" and verify that both the "Heating" and "Cooling" indicators light and that all indicators except "Power...

Model: GL-235
Page 6
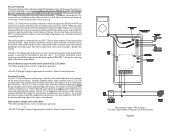
Basic Installation of GL-235 Figure 2 6 GL-235 high voltage output used for Timer Override Figure 3 7
Basic Installation of GL-235 Figure 2 6 GL-235 high voltage output used for Timer Override Figure 3 7


