Modem and Local Area Network - Windows Vista and Windows XP
Page 11
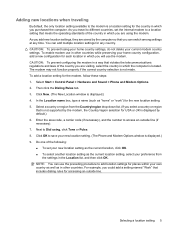
... USA or UK is displayed by the computer so that you can add multiple location settings for any time. Select Start > Control Panel > Hardware and Sound > Phone and Modem Options. 2. In the Location name box, type a name (such as in which the computer is located. Select a country or region from the...
... USA or UK is displayed by the computer so that you can add multiple location settings for any time. Select Start > Control Panel > Hardware and Sound > Phone and Modem Options. 2. In the Location name box, type a name (such as in which the computer is located. Select a country or region from the...

Modem and Local Area Network - Windows Vista and Windows XP
Page 12
...dialing mode supported by the telephone line in your current modem location setting, follow these steps: 1. Select Start > Control Panel > Hardware and Sound > Phone and Modem Options. 2. Then click the Dialing Rules tab. 3. Click OK twice. ● Check the telephone number you purchased ...settings. Clicks indicate that the telephone line supports tone dialing. To set the modem to ignore dial tones. Select Start > Control Panel > Hardware and Sound > Phone and Modem Options. 2. Dial a telephone number, make sure there is usually a digital line. Click OK twice. 6 Chapter 1 Using ...
...dialing mode supported by the telephone line in your current modem location setting, follow these steps: 1. Select Start > Control Panel > Hardware and Sound > Phone and Modem Options. 2. Then click the Dialing Rules tab. 3. Click OK twice. ● Check the telephone number you purchased ...settings. Clicks indicate that the telephone line supports tone dialing. To set the modem to ignore dial tones. Select Start > Control Panel > Hardware and Sound > Phone and Modem Options. 2. Dial a telephone number, make sure there is usually a digital line. Click OK twice. 6 Chapter 1 Using ...
Drives - Linux
Page 11
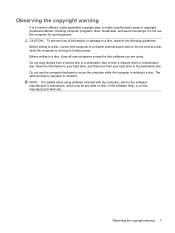
... a disc, observe the following guidelines: Before writing to a disc, connect the computer to make unauthorized copies of copyrightprotected material, including computer programs, films, broadcasts, and sound recordings. Before writing to a disc. Do not use this computer for such purposes. Do not copy directly from a source disc to a destination disc or from...
... a disc, observe the following guidelines: Before writing to a disc, connect the computer to make unauthorized copies of copyrightprotected material, including computer programs, films, broadcasts, and sound recordings. Before writing to a disc. Do not use this computer for such purposes. Do not copy directly from a source disc to a destination disc or from...
Drives - Windows Vista
Page 13
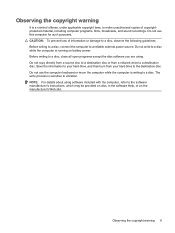
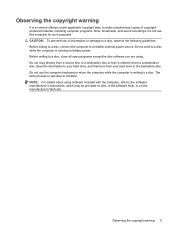
CAUTION: To prevent loss of copyrightprotected material, including computer programs, films, broadcasts, and sound recordings. Do not copy directly from a source disc to a destination disc or from your hard drive, and then burn from a network drive to a reliable external ...
CAUTION: To prevent loss of copyrightprotected material, including computer programs, films, broadcasts, and sound recordings. Do not copy directly from a source disc to a destination disc or from your hard drive, and then burn from a network drive to a reliable external ...

Drives - Windows Vista
Page 15
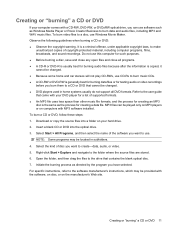
... a CD or DVD, follow these steps: 1. Select Start > All Programs, and then select the name of copyright-protected material, including computer programs, films, broadcasts, and sound recordings. Initiate the burning process as directed by the program you burn them to the software manufacturer's instructions, which may be changed . ● Because some...
... a CD or DVD, follow these steps: 1. Select Start > All Programs, and then select the name of copyright-protected material, including computer programs, films, broadcasts, and sound recordings. Initiate the burning process as directed by the program you burn them to the software manufacturer's instructions, which may be changed . ● Because some...
Drives - Windows Vista
Page 20
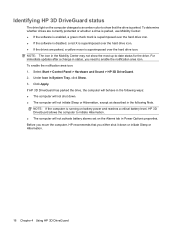
...drive is parked. Select Start > Control Panel > Hardware and Sound > HP 3D DriveGuard. 2. NOTE: The icon in the following ways: ● The computer will not shut down or initiate Sleep or Hibernation. 16 Chapter 4 Using HP 3D DriveGuard NOTE: If the computer is superimposed over the hard...1. Click Apply. To determine whether drives are parked, a yellow moon is running on battery power and reaches a critical battery level, HP 3D DriveGuard allows the computer to initiate Hibernation. ● The computer will not initiate Sleep or Hibernation, except as described in the ...
...drive is parked. Select Start > Control Panel > Hardware and Sound > HP 3D DriveGuard. 2. NOTE: The icon in the following ways: ● The computer will not shut down or initiate Sleep or Hibernation. 16 Chapter 4 Using HP 3D DriveGuard NOTE: If the computer is superimposed over the hard...1. Click Apply. To determine whether drives are parked, a yellow moon is running on battery power and reaches a critical battery level, HP 3D DriveGuard allows the computer to initiate Hibernation. ● The computer will not initiate Sleep or Hibernation, except as described in the ...
Drives - Windows Vista
Page 21
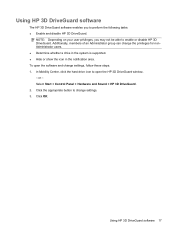
... nonAdministrator users. ● Determine whether a drive in the system is supported. ● Hide or show the icon in the notification area. Using HP 3D DriveGuard software 17 Select Start > Control Panel > Hardware and Sound > HP 3D DriveGuard. 2. NOTE: Depending on your user privileges, you to perform the following tasks: ● Enable and disable...
... nonAdministrator users. ● Determine whether a drive in the system is supported. ● Hide or show the icon in the notification area. Using HP 3D DriveGuard software 17 Select Start > Control Panel > Hardware and Sound > HP 3D DriveGuard. 2. NOTE: Depending on your user privileges, you to perform the following tasks: ● Enable and disable...
Drives - Windows XP
Page 13
... to a disc while the computer is running on the manufacturer's Web site. CAUTION: To prevent loss of copyrightprotected material, including computer programs, films, broadcasts, and sound recordings. Save the information to your hard drive, and then burn from a network drive to make unauthorized copies of information or damage to a disc, observe...
... to a disc while the computer is running on the manufacturer's Web site. CAUTION: To prevent loss of copyrightprotected material, including computer programs, films, broadcasts, and sound recordings. Save the information to your hard drive, and then burn from a network drive to make unauthorized copies of information or damage to a disc, observe...
Drives - Windows XP
Page 15
... programs may be played only on MP3 players or on your DVD player for a list of copyright-protected material, including computer programs, films, broadcasts, and sound recordings. To burn video files to a disc, use CD-Rs to burn music CDs. ● A CD-RW or DVD-RW is a criminal offense, under applicable...
... programs may be played only on MP3 players or on your DVD player for a list of copyright-protected material, including computer programs, films, broadcasts, and sound recordings. To burn video files to a disc, use CD-Rs to burn music CDs. ● A CD-RW or DVD-RW is a criminal offense, under applicable...
External Devices - Linux
Page 6
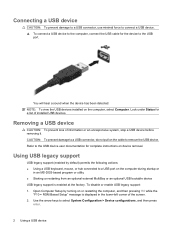
... device. NOTE: To view the USB devices installed on the cable to a USB connector, do not pull on the computer, select Computer. You will hear a sound when the device has been detected. To disable or enable USB legacy support: 1. Refer to a USB port on or restarting the computer, and then pressing...
... device. NOTE: To view the USB devices installed on the cable to a USB connector, do not pull on the computer, select Computer. You will hear a sound when the device has been detected. To disable or enable USB legacy support: 1. Refer to a USB port on or restarting the computer, and then pressing...
External Devices - Windows Vista & Windows XP
Page 6
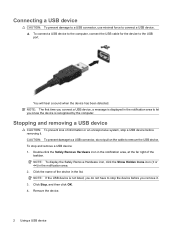
... not pull on the cable to remove the USB device. Stopping and removing a USB device CAUTION: To prevent loss of the taskbar. You will hear a sound when the device has been detected. To stop a USB device before removing it. Double-click the Safely Remove Hardware icon in the notification area to...
... not pull on the cable to remove the USB device. Stopping and removing a USB device CAUTION: To prevent loss of the taskbar. You will hear a sound when the device has been detected. To stop a USB device before removing it. Double-click the Safely Remove Hardware icon in the notification area to...
External Media Cards - Linux
Page 6
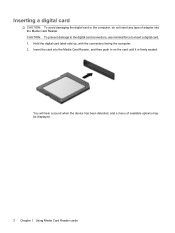
Insert the card into the Media Card Reader. Inserting a digital card CAUTION: To avoid damaging the digital card or the computer, do not insert any type of available options may be displayed. 2 Chapter 1 Using Media Card Reader cards CAUTION: To prevent damage to the digital card connectors, use minimal force to insert a digital card. 1. You will hear a sound when the device has been detected, and a menu of adapter into the Media Card Reader, and then push in on the card until it is firmly seated. Hold the digital card label-side up, with the connectors facing the computer. 2.
Insert the card into the Media Card Reader. Inserting a digital card CAUTION: To avoid damaging the digital card or the computer, do not insert any type of available options may be displayed. 2 Chapter 1 Using Media Card Reader cards CAUTION: To prevent damage to the digital card connectors, use minimal force to insert a digital card. 1. You will hear a sound when the device has been detected, and a menu of adapter into the Media Card Reader, and then push in on the card until it is firmly seated. Hold the digital card label-side up, with the connectors facing the computer. 2.

External Media Cards - Linux
Page 9
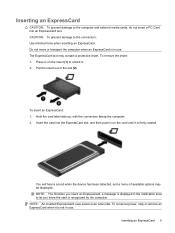
... ExpressCard when it is recognized by the computer. Pull the insert out of available options may contain a protective insert. Inserting an ExpressCard 5 You will hear a sound when the device has been detected, and a menu of the slot (2). Press in use . NOTE: The first time you know the card is firmly seated...
... ExpressCard when it is recognized by the computer. Pull the insert out of available options may contain a protective insert. Inserting an ExpressCard 5 You will hear a sound when the device has been detected, and a menu of the slot (2). Press in use . NOTE: The first time you know the card is firmly seated...

External Media Cards - Windows Vista
Page 6
Inserting a digital card CAUTION: To avoid damaging the digital card or the computer, do not insert any type of available options may be displayed. 2 Chapter 1 Using Media Card Reader cards Hold the digital card label-side up, with the connectors facing the computer. 2. Insert the card into the Media Card Reader. You will hear a sound when the device has been detected, and a menu of adapter into the Media Card Reader, and then push in on the card until it is firmly seated. CAUTION: To prevent damage to the digital card connectors, use minimal force to insert a digital card. 1.
Inserting a digital card CAUTION: To avoid damaging the digital card or the computer, do not insert any type of available options may be displayed. 2 Chapter 1 Using Media Card Reader cards Hold the digital card label-side up, with the connectors facing the computer. 2. Insert the card into the Media Card Reader. You will hear a sound when the device has been detected, and a menu of adapter into the Media Card Reader, and then push in on the card until it is firmly seated. CAUTION: To prevent damage to the digital card connectors, use minimal force to insert a digital card. 1.
External Media Cards - Windows Vista
Page 9
... transport the computer when an ExpressCard is in use . To insert an ExpressCard: 1. Inserting an ExpressCard 5 The ExpressCard slot may be displayed. You will hear a sound when the device has been detected, and a menu of the slot (2). To conserve power, stop or remove an ExpressCard when it is not in use...
... transport the computer when an ExpressCard is in use . To insert an ExpressCard: 1. Inserting an ExpressCard 5 The ExpressCard slot may be displayed. You will hear a sound when the device has been detected, and a menu of the slot (2). To conserve power, stop or remove an ExpressCard when it is not in use...

Notebook Tour - Linux
Page 8
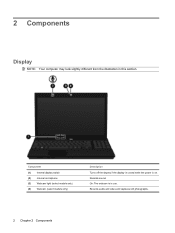
2 Components Display NOTE: Your computer may look slightly different from the illustration in use. Records audio and video and captures still photographs. 2 Chapter 2 Components Records sound. Component (1) Internal display switch (2) Internal microphone (3) Webcam light (select models only) (4) Webcam (select models only) Description Turns off the display if the display is closed while the power is in this section. On: The webcam is on.
2 Components Display NOTE: Your computer may look slightly different from the illustration in use. Records audio and video and captures still photographs. 2 Chapter 2 Components Records sound. Component (1) Internal display switch (2) Internal microphone (3) Webcam light (select models only) (4) Webcam (select models only) Description Turns off the display if the display is closed while the power is in this section. On: The webcam is on.

Notebook Tour - Linux
Page 11
... if the display is closed while the power is in this section. Component (1) Speakers (2) (2) Internal display switch (3) Info Center/QuickLook button (4) Power button Description Produce sound.
... if the display is closed while the power is in this section. Component (1) Speakers (2) (2) Internal display switch (3) Info Center/QuickLook button (4) Power button Description Produce sound.

Notebook Tour - Linux
Page 14
...; Secure Digital High Speed (SDHS) Memory Card ● xD-Picture Card (XD) ● xD-Picture Card (XD) Type H ● xD-Picture Card (XD) Type M Produces sound when connected to optional powered stereo speakers, headphones, ear buds, a headset, or television audio. NOTE: You must set up or access a wireless network to establish...
...; Secure Digital High Speed (SDHS) Memory Card ● xD-Picture Card (XD) ● xD-Picture Card (XD) Type H ● xD-Picture Card (XD) Type M Produces sound when connected to optional powered stereo speakers, headphones, ear buds, a headset, or television audio. NOTE: You must set up or access a wireless network to establish...
Notebook Tour - Windows Vista
Page 8
Records sound. Records audio and video and captures still photographs. 2 Chapter 2 Components On: The webcam is on. 2 Components Display NOTE: Your computer may look slightly different from the illustration in use. Component (1) Internal display switch (2) Internal microphone (3) Webcam light (select models only) (4) Webcam (select models only) Description Turns off the display if the display is closed while the power is in this section.
Records sound. Records audio and video and captures still photographs. 2 Chapter 2 Components On: The webcam is on. 2 Components Display NOTE: Your computer may look slightly different from the illustration in use. Component (1) Internal display switch (2) Internal microphone (3) Webcam light (select models only) (4) Webcam (select models only) Description Turns off the display if the display is closed while the power is in this section.
Notebook Tour - Windows Vista
Page 9
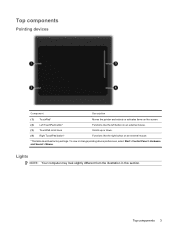
To view or change pointing device preferences, select Start > Control Panel > Hardware and Sound > Mouse. Top components Pointing devices Component Description (1) TouchPad* (2) Left TouchPad button* Moves the pointer and selects or activates items on an external mouse. *This table ...
To view or change pointing device preferences, select Start > Control Panel > Hardware and Sound > Mouse. Top components Pointing devices Component Description (1) TouchPad* (2) Left TouchPad button* Moves the pointer and selects or activates items on an external mouse. *This table ...


