Computer Setup - Windows Vista and Windows XP
Page 9
... and restart the computer. Save any changes entered during the current session. Then exit and restart the computer. Replace the configuration settings in the system. ● View specification information for the computer and the batteries in Computer Setup with the original factory settings. (Hard drive mode, password settings, and security settings are...
... and restart the computer. Save any changes entered during the current session. Then exit and restart the computer. Replace the configuration settings in the system. ● View specification information for the computer and the batteries in Computer Setup with the original factory settings. (Hard drive mode, password settings, and security settings are...
Drives - Linux
Page 17
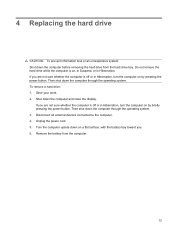
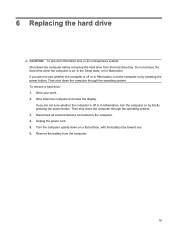
...hard drive: 1. If you are not sure whether the computer is off or in Hibernation, turn the computer on a flat surface, with the battery bay toward you are not sure whether the computer is on, in Suspend, or in Hibernation, turn the computer on by briefly pressing the power...the computer upside down on by pressing the power button. Unplug the power cord. 5. Then shut down the computer through the operating system. 4 Replacing the hard drive CAUTION: To prevent information loss or an unresponsive system: Shut down the computer before removing the hard drive from the computer. 13
...hard drive: 1. If you are not sure whether the computer is off or in Hibernation, turn the computer on a flat surface, with the battery bay toward you are not sure whether the computer is on, in Suspend, or in Hibernation, turn the computer on by briefly pressing the power...the computer upside down on by pressing the power button. Unplug the power cord. 5. Then shut down the computer through the operating system. 4 Replacing the hard drive CAUTION: To prevent information loss or an unresponsive system: Shut down the computer before removing the hard drive from the computer. 13

Drives - Linux
Page 18
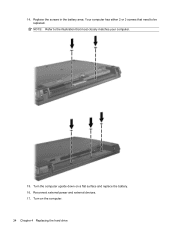
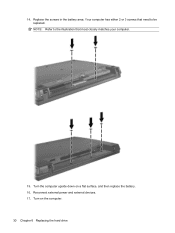
NOTE: Refer to the illustration that need to be removed. Remove the screws from the battery area. 7. Your computer has either 2 or 3 screws that most closely matches your computer. 14 Chapter 4 Replacing the hard drive
NOTE: Refer to the illustration that need to be removed. Remove the screws from the battery area. 7. Your computer has either 2 or 3 screws that most closely matches your computer. 14 Chapter 4 Replacing the hard drive
Drives - Linux
Page 28
Your computer has either 2 or 3 screws that need to the illustration that most closely matches your computer. 15. Turn on a flat surface and replace the battery. 16. Turn the computer upside down on the computer. 24 Chapter 4 Replacing the hard drive Reconnect external power and external devices. 17. 14. Replace the screws in the battery area. NOTE: Refer to be replaced.
Your computer has either 2 or 3 screws that need to the illustration that most closely matches your computer. 15. Turn on a flat surface and replace the battery. 16. Turn the computer upside down on the computer. 24 Chapter 4 Replacing the hard drive Reconnect external power and external devices. 17. 14. Replace the screws in the battery area. NOTE: Refer to be replaced.
Drives - Windows Vista
Page 23
... toward you are not sure whether the computer is on by briefly pressing the power button. Remove the battery from the hard drive bay. If you . 6. Shut down the computer through the operating system. Disconnect all external devices connected to the computer. 4. If ...remove the hard drive while the computer is off or in Hibernation. To remove a hard drive: 1. Then shut down the computer and close the display. 6 Replacing the hard drive CAUTION: To prevent information loss or an unresponsive system: Shut down the computer before removing the hard drive from the computer. 19...
... toward you are not sure whether the computer is on by briefly pressing the power button. Remove the battery from the hard drive bay. If you . 6. Shut down the computer through the operating system. Disconnect all external devices connected to the computer. 4. If ...remove the hard drive while the computer is off or in Hibernation. To remove a hard drive: 1. Then shut down the computer and close the display. 6 Replacing the hard drive CAUTION: To prevent information loss or an unresponsive system: Shut down the computer before removing the hard drive from the computer. 19...

Drives - Windows Vista
Page 24
7. NOTE: Refer to the illustration that need to be removed. Your computer has either 2 or 3 screws that most closely matches your computer. 20 Chapter 6 Replacing the hard drive Remove the screws from the battery area.
7. NOTE: Refer to the illustration that need to be removed. Your computer has either 2 or 3 screws that most closely matches your computer. 20 Chapter 6 Replacing the hard drive Remove the screws from the battery area.
Drives - Windows Vista
Page 34
NOTE: Refer to the illustration that need to be replaced. Reconnect external power and external devices. 17. Turn the computer upside down on the computer. 30 Chapter 6 Replacing the hard drive Turn on a flat surface, and then replace the battery. 16. Your computer has either 2 or 3 screws that most closely matches your computer. 15. Replace the screws in the battery area. 14.
NOTE: Refer to the illustration that need to be replaced. Reconnect external power and external devices. 17. Turn the computer upside down on the computer. 30 Chapter 6 Replacing the hard drive Turn on a flat surface, and then replace the battery. 16. Your computer has either 2 or 3 screws that most closely matches your computer. 15. Replace the screws in the battery area. 14.

Drives - Windows XP
Page 23
6 Replacing the hard drive CAUTION: To prevent information loss or an unresponsive system: Shut down the computer before removing the hard drive from the computer. 19 Save your work. 2. Shut down on a flat surface, with the battery bay toward you are not sure whether the computer is off or in Hibernation, turn the... computer upside down the computer and close the display. Do not remove the hard drive while the computer is off or in Hibernation. Remove the battery from the hard drive bay.
6 Replacing the hard drive CAUTION: To prevent information loss or an unresponsive system: Shut down the computer before removing the hard drive from the computer. 19 Save your work. 2. Shut down on a flat surface, with the battery bay toward you are not sure whether the computer is off or in Hibernation, turn the... computer upside down the computer and close the display. Do not remove the hard drive while the computer is off or in Hibernation. Remove the battery from the hard drive bay.

Drives - Windows XP
Page 24
Your computer has either 2 or 3 screws that need to the illustration that most closely matches your computer. 20 Chapter 6 Replacing the hard drive 7. Remove the screws from the battery area. NOTE: Refer to be removed.
Your computer has either 2 or 3 screws that need to the illustration that most closely matches your computer. 20 Chapter 6 Replacing the hard drive 7. Remove the screws from the battery area. NOTE: Refer to be removed.

Drives - Windows XP
Page 34
Replace the screws in the battery area. Turn the computer upside down on the computer. 30 Chapter 6 Replacing the hard drive Reconnect external power and external devices. 17. 14. Your computer has either 2 or 3 screws that most closely matches your computer. 15. Turn on a flat surface and replace the battery. 16. NOTE: Refer to the illustration that need to be replaced.
Replace the screws in the battery area. Turn the computer upside down on the computer. 30 Chapter 6 Replacing the hard drive Reconnect external power and external devices. 17. 14. Your computer has either 2 or 3 screws that most closely matches your computer. 15. Turn on a flat surface and replace the battery. 16. NOTE: Refer to the illustration that need to be replaced.

Memory Modules - Linux
Page 5
... upside down on by upgrading the existing memory module in Hibernation, turn the computer on a flat surface, with the battery bay toward you are discharged of static electricity. WARNING! Adding or replacing memory modules The computer has one memory module compartment, which is off or in the primary memory module slot. The...
... upside down on by upgrading the existing memory module in Hibernation, turn the computer on a flat surface, with the battery bay toward you are discharged of static electricity. WARNING! Adding or replacing memory modules The computer has one memory module compartment, which is off or in the primary memory module slot. The...

Memory Modules - Linux
Page 6
Remove the screws from the battery area. Your computer has either 2 or 3 screws that most closely matches your computer. 2 Adding or replacing memory modules NOTE: Refer to the illustration that need to be removed. 7.
Remove the screws from the battery area. Your computer has either 2 or 3 screws that most closely matches your computer. 2 Adding or replacing memory modules NOTE: Refer to the illustration that need to be removed. 7.

Memory Modules - Linux
Page 13
NOTE: Refer to the illustration that need to be replaced. Replace the screws in the battery area. Turn on a flat surface, and then replace the battery. 22. 20. Your computer has either 2 or 3 screws that most closely matches your computer. 21. Turn the computer upside down on the computer. 9 Reconnect external power and external devices. 23.
NOTE: Refer to the illustration that need to be replaced. Replace the screws in the battery area. Turn on a flat surface, and then replace the battery. 22. 20. Your computer has either 2 or 3 screws that most closely matches your computer. 21. Turn the computer upside down on the computer. 9 Reconnect external power and external devices. 23.

Memory Modules - Windows Vista
Page 5
Save your work. 2. Disconnect all batteries before installing a memory module. Adding or replacing memory modules The computer has one memory module compartment, which is off or in Hibernation, turn the computer on by upgrading the existing memory...is located under the keyboard. WARNING! Shut down the computer through the operating system. 3. Then shut down the computer and close the display. Remove the battery from the computer. 1 If you . 6. The memory capacity of the computer can damage electronic components. To reduce the risk of static electricity. Before ...
Save your work. 2. Disconnect all batteries before installing a memory module. Adding or replacing memory modules The computer has one memory module compartment, which is off or in Hibernation, turn the computer on by upgrading the existing memory...is located under the keyboard. WARNING! Shut down the computer through the operating system. 3. Then shut down the computer and close the display. Remove the battery from the computer. 1 If you . 6. The memory capacity of the computer can damage electronic components. To reduce the risk of static electricity. Before ...

Memory Modules - Windows Vista
Page 6
Your computer has either 2 or 3 screws that need to the illustration that most closely matches your computer. 2 Adding or replacing memory modules 7. NOTE: Refer to be removed. Remove the screws from the battery area.
Your computer has either 2 or 3 screws that need to the illustration that most closely matches your computer. 2 Adding or replacing memory modules 7. NOTE: Refer to be removed. Remove the screws from the battery area.

Memory Modules - Windows Vista
Page 13
Your computer has either 2 or 3 screws that need to the illustration that most closely matches your computer. 21. Turn the computer upside down on the computer. 9 Replace the screws in the battery area. NOTE: Refer to be replaced. Turn on a flat surface, and then replace the battery. 22. Reconnect external power and external devices. 23. 20.
Your computer has either 2 or 3 screws that need to the illustration that most closely matches your computer. 21. Turn the computer upside down on the computer. 9 Replace the screws in the battery area. NOTE: Refer to be replaced. Turn on a flat surface, and then replace the battery. 22. Reconnect external power and external devices. 23. 20.

Memory Modules - Windows XP
Page 5
... computer and close the display. Then shut down the computer through the operating system. 3. Unplug the power cord. 5. 1 Adding or replacing memory modules The computer has one memory module compartment, which is off or in the primary memory module slot. Before beginning any procedure, ... a grounded metal object to the vacant expansion memory module slot or by briefly press the power button. Save your work. 2. Disconnect all batteries before installing a memory module. WARNING! NOTE: To use a dual-channel configuration when adding a second memory module, be sure that both ...
... computer and close the display. Then shut down the computer through the operating system. 3. Unplug the power cord. 5. 1 Adding or replacing memory modules The computer has one memory module compartment, which is off or in the primary memory module slot. Before beginning any procedure, ... a grounded metal object to the vacant expansion memory module slot or by briefly press the power button. Save your work. 2. Disconnect all batteries before installing a memory module. WARNING! NOTE: To use a dual-channel configuration when adding a second memory module, be sure that both ...

Memory Modules - Windows XP
Page 6
7. Your computer has either 2 or 3 screws that most closely matches your computer. 2 Chapter 1 Adding or replacing memory modules NOTE: Refer to the illustration that need to be removed. Remove the screws from the battery area.
7. Your computer has either 2 or 3 screws that most closely matches your computer. 2 Chapter 1 Adding or replacing memory modules NOTE: Refer to the illustration that need to be removed. Remove the screws from the battery area.

Memory Modules - Windows XP
Page 13
Turn the computer upside down on the computer. 9 Replace the screws in the battery area. Reconnect external power and external devices. 23. NOTE: Refer to the illustration that need to be replaced. Turn on a flat surface, and then replace the battery. 22. 20. Your computer has either 2 or 3 screws that most closely matches your computer. 21.
Turn the computer upside down on the computer. 9 Replace the screws in the battery area. Reconnect external power and external devices. 23. NOTE: Refer to the illustration that need to be replaced. Turn on a flat surface, and then replace the battery. 22. 20. Your computer has either 2 or 3 screws that most closely matches your computer. 21.


