HP Business Notebook PC - Getting Started Guide - Enhanced for Accessibility - Windows Vista
Page 2
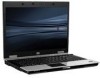
... that is an important safety feature. Basic Setup 2 Insert the battery Å WARNING: To reduce potential safety issues, use only the AC adapter or battery provided with the computer, or a replacement AC adapter or battery provided by HP. 3 Connect the computer to external power Å WARNING: To... reduce the risk of electric shock or damage to external power until the battery light turns off. 2 Getting Started...
... that is an important safety feature. Basic Setup 2 Insert the battery Å WARNING: To reduce potential safety issues, use only the AC adapter or battery provided with the computer, or a replacement AC adapter or battery provided by HP. 3 Connect the computer to external power Å WARNING: To... reduce the risk of electric shock or damage to external power until the battery light turns off. 2 Getting Started...

Computer Setup - Windows Vista and Windows XP
Page 10
... and restart the computer. Your changes go into effect when the computer restarts. 6 Chapter 3 Computer Setup menus Replace the configuration settings in the system. ● View specification information for the computer and the batteries in Computer Setup with the original factory settings. (Hard drive mode, password settings, and security settings are not...
... and restart the computer. Your changes go into effect when the computer restarts. 6 Chapter 3 Computer Setup menus Replace the configuration settings in the system. ● View specification information for the computer and the batteries in Computer Setup with the original factory settings. (Hard drive mode, password settings, and security settings are not...
Computer Setup - Windows Vista, Windows XP, and Windows 7
Page 10
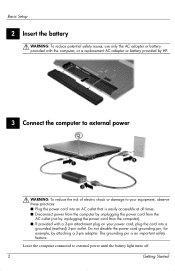
Replace the configuration settings in the system. ● View specification information for the processor, cache and memory size, system ROM, video revision, and keyboard controller version. ... Date and Time Restore defaults Ignore changes and exit Save changes and exit To do this ● View identification information for the computer and the batteries in Computer Setup with the original factory settings. (Hard drive mode, password settings, and security settings are not changed when you restore the factory settings...
Replace the configuration settings in the system. ● View specification information for the processor, cache and memory size, system ROM, video revision, and keyboard controller version. ... Date and Time Restore defaults Ignore changes and exit Save changes and exit To do this ● View identification information for the computer and the batteries in Computer Setup with the original factory settings. (Hard drive mode, password settings, and security settings are not changed when you restore the factory settings...

Wireless (Select Models Only) - Windows Vista and Windows XP
Page 16
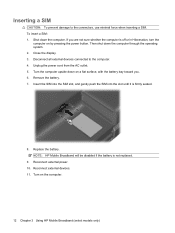
... to the computer. 4. To insert a SIM: 1. Replace the battery. Reconnect external power. 10. Turn on by pressing the power button. Then shut down the computer. Turn the computer upside down on a flat surface, with the battery bay toward you are not sure whether the computer is ... is off or in Hibernation, turn the computer on the computer. 12 Chapter 3 Using HP Mobile Broadband (select models only) NOTE: HP Mobile Broadband will be disabled if the battery is not replaced. 9. Disconnect all external devices connected to the connectors, use minimal force when inserting a ...
... to the computer. 4. To insert a SIM: 1. Replace the battery. Reconnect external power. 10. Turn on by pressing the power button. Then shut down the computer. Turn the computer upside down on a flat surface, with the battery bay toward you are not sure whether the computer is ... is off or in Hibernation, turn the computer on the computer. 12 Chapter 3 Using HP Mobile Broadband (select models only) NOTE: HP Mobile Broadband will be disabled if the battery is not replaced. 9. Disconnect all external devices connected to the connectors, use minimal force when inserting a ...
Wireless (Select Models Only) - Windows Vista and Windows XP
Page 17
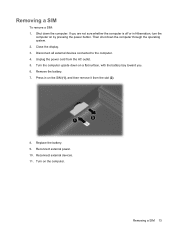
... a SIM To remove a SIM: 1. Press in Hibernation, turn the computer on the SIM (1), and then remove it from the AC outlet. 5. Replace the battery. 9. Turn on a flat surface, with the battery bay toward you are not sure whether the computer is off or in on by pressing the power button. Shut down the...
... a SIM To remove a SIM: 1. Press in Hibernation, turn the computer on the SIM (1), and then remove it from the AC outlet. 5. Replace the battery. 9. Turn on a flat surface, with the battery bay toward you are not sure whether the computer is off or in on by pressing the power button. Shut down the...
Wireless (Select Models Only) - Windows XP
Page 16
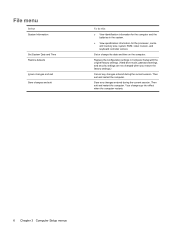
...the AC outlet. 5. Turn the computer upside down on the computer. 12 Chapter 3 Using HP Mobile Broadband (select models only) To insert a SIM: 1. NOTE: HP Mobile Broadband will be disabled if the battery is off or in Hibernation, turn the computer on by pressing the power button. Reconnect ... SIM. Reconnect external power. 10. Close the display. 3. Turn on a flat surface, with the battery bay toward you are not sure whether the computer is not replaced. 9. If you . 6. Remove the battery. 7. Insert the SIM into the SIM slot, and gently push the SIM into the slot until it ...
...the AC outlet. 5. Turn the computer upside down on the computer. 12 Chapter 3 Using HP Mobile Broadband (select models only) To insert a SIM: 1. NOTE: HP Mobile Broadband will be disabled if the battery is off or in Hibernation, turn the computer on by pressing the power button. Reconnect ... SIM. Reconnect external power. 10. Close the display. 3. Turn on a flat surface, with the battery bay toward you are not sure whether the computer is not replaced. 9. If you . 6. Remove the battery. 7. Insert the SIM into the SIM slot, and gently push the SIM into the slot until it ...

Wireless (Select Models Only) - Windows XP
Page 17
If you . 6. Replace the battery. 9. Close the display. 3. Reconnect external devices. 11. Unplug the power cord from the slot (2). 8. Press in Hibernation, turn the computer on the SIM (1), and then remove it from the AC outlet. 5. Remove the battery. 7. Then shut down the computer. Disconnect all external... devices connected to the computer. 4. Reconnect external power. 10. Removing a SIM 13 Turn on a flat surface, with the battery bay toward you are not sure whether the computer is off or in on by pressing the power button. Removing a SIM To remove a...
If you . 6. Replace the battery. 9. Close the display. 3. Reconnect external devices. 11. Unplug the power cord from the slot (2). 8. Press in Hibernation, turn the computer on the SIM (1), and then remove it from the AC outlet. 5. Remove the battery. 7. Then shut down the computer. Disconnect all external... devices connected to the computer. 4. Reconnect external power. 10. Removing a SIM 13 Turn on a flat surface, with the battery bay toward you are not sure whether the computer is off or in on by pressing the power button. Removing a SIM To remove a...

Wireless (Select Models Only) - Windows 7
Page 16
... cord from the AC outlet. 5. Replace the battery. Remove the battery. 7. If you . 6. Reconnect external power. 10. Then shut down on a flat surface, with the battery bay toward you are not sure whether the computer is off or in Hibernation, turn the computer on the computer. 12 Chapter 3 Using HP Mobile Broadband (select models only...
... cord from the AC outlet. 5. Replace the battery. Remove the battery. 7. If you . 6. Reconnect external power. 10. Then shut down on a flat surface, with the battery bay toward you are not sure whether the computer is off or in Hibernation, turn the computer on the computer. 12 Chapter 3 Using HP Mobile Broadband (select models only...

Wireless (Select Models Only) - Windows 7
Page 17
Turn the computer upside down the computer. Close the display. 3. Removing a SIM 13 Unplug the power cord from the slot (2). 8. Replace the battery. 9. Reconnect external power. 10. If you . 6. Press in Hibernation, turn the computer on the SIM (1), and then remove it from the AC outlet. 5. ... SIM: 1. Then shut down the computer through the operating system. 2. Disconnect all external devices connected to the computer. 4. Turn on a flat surface, with the battery bay toward you are not sure whether the computer is off or in on by pressing the power button. Remove the...
Turn the computer upside down the computer. Close the display. 3. Removing a SIM 13 Unplug the power cord from the slot (2). 8. Replace the battery. 9. Reconnect external power. 10. If you . 6. Press in Hibernation, turn the computer on the SIM (1), and then remove it from the AC outlet. 5. ... SIM: 1. Then shut down the computer through the operating system. 2. Disconnect all external devices connected to the computer. 4. Turn on a flat surface, with the battery bay toward you are not sure whether the computer is off or in on by pressing the power button. Remove the...
Drives - Windows 7
Page 26
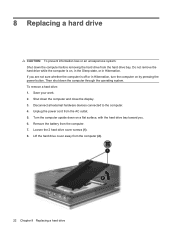
... external hardware devices connected to the computer. 4. Unplug the power cord from the computer (2). 22 Chapter 8 Replacing a hard drive Loosen the 2 hard drive cover screws (1). 8. Lift the hard drive cover away from the AC outlet. 5. 8 Replacing a hard drive CAUTION: To prevent information loss or an unresponsive system: Shut down the computer before.... Do not remove the hard drive while the computer is off or in Hibernation. Then shut down the computer and close the display. 3. Remove the battery from the hard drive bay.
... external hardware devices connected to the computer. 4. Unplug the power cord from the computer (2). 22 Chapter 8 Replacing a hard drive Loosen the 2 hard drive cover screws (1). 8. Lift the hard drive cover away from the AC outlet. 5. 8 Replacing a hard drive CAUTION: To prevent information loss or an unresponsive system: Shut down the computer before.... Do not remove the hard drive while the computer is off or in Hibernation. Then shut down the computer and close the display. 3. Remove the battery from the hard drive bay.

Drives - Windows 7
Page 29
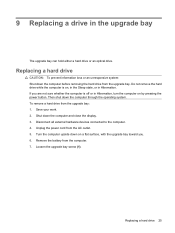
Replacing a hard drive CAUTION: To prevent information loss or an unresponsive system: Shut down the computer through the operating system. Then shut down the computer before ... remove a hard drive from the computer. 7. Turn the computer upside down the computer and close the display. 3. Remove the battery from the upgrade bay: 1. Loosen the upgrade bay screw (1). Replacing a hard drive 25 9 Replacing a drive in Hibernation. Do not remove the hard drive while the computer is off or in Hibernation, turn the...
Replacing a hard drive CAUTION: To prevent information loss or an unresponsive system: Shut down the computer through the operating system. Then shut down the computer before ... remove a hard drive from the computer. 7. Turn the computer upside down the computer and close the display. 3. Remove the battery from the upgrade bay: 1. Loosen the upgrade bay screw (1). Replacing a hard drive 25 9 Replacing a drive in Hibernation. Do not remove the hard drive while the computer is off or in Hibernation, turn the...
Drives - Windows 7
Page 32
... To remove an optical drive from the AC outlet. 5. Shut down the computer through the operating system. Unplug the power cord from the upgrade bay: 1. Replacing an optical drive CAUTION: To prevent information loss or an unresponsive system: Shut down the computer before removing the optical drive from the computer. 7. Do...while the computer is off or in Hibernation, turn the computer on , in the Sleep state, or in the upgrade bay Remove the battery from the upgrade bay. Save your work. 2. Using a flat-bladed screwdriver, gently push the tab to the computer. 4. If you . 6.
... To remove an optical drive from the AC outlet. 5. Shut down the computer through the operating system. Unplug the power cord from the upgrade bay: 1. Replacing an optical drive CAUTION: To prevent information loss or an unresponsive system: Shut down the computer before removing the optical drive from the computer. 7. Do...while the computer is off or in Hibernation, turn the computer on , in the Sleep state, or in the upgrade bay Remove the battery from the upgrade bay. Save your work. 2. Using a flat-bladed screwdriver, gently push the tab to the computer. 4. If you . 6.

Drives - Windows Vista
Page 26
... drive Lift the hard drive cover away from the AC outlet. 5. Then shut down the computer and close the display. 3. Remove the battery from the hard drive bay. Turn the computer upside down on a flat surface, with the hard drive bay toward you are not sure ... the Sleep state, or in Hibernation, turn the computer on by pressing the power button. Loosen the 2 hard drive cover screws (1). 8. Save your work. 2. 8 Replacing a hard drive CAUTION: To prevent information loss or an unresponsive system: Shut down the computer before removing the hard drive from the computer. 7.
... drive Lift the hard drive cover away from the AC outlet. 5. Then shut down the computer and close the display. 3. Remove the battery from the hard drive bay. Turn the computer upside down on a flat surface, with the hard drive bay toward you are not sure ... the Sleep state, or in Hibernation, turn the computer on by pressing the power button. Loosen the 2 hard drive cover screws (1). 8. Save your work. 2. 8 Replacing a hard drive CAUTION: To prevent information loss or an unresponsive system: Shut down the computer before removing the hard drive from the computer. 7.
Drives - Windows Vista
Page 29
... (1). Then shut down the computer before removing the hard drive from the computer. 7. Replacing a hard drive 25 Save your work. 2. 9 Replacing a drive in Hibernation. Unplug the power cord from the upgrade bay: 1. Remove the battery from the upgrade bay. Replacing a hard drive CAUTION: To prevent information loss or an unresponsive system: Shut down the...
... (1). Then shut down the computer before removing the hard drive from the computer. 7. Replacing a hard drive 25 Save your work. 2. 9 Replacing a drive in Hibernation. Unplug the power cord from the upgrade bay: 1. Remove the battery from the upgrade bay. Replacing a hard drive CAUTION: To prevent information loss or an unresponsive system: Shut down the...

Drives - Windows Vista
Page 32
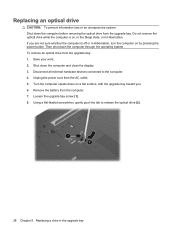
Save your work. 2. Unplug the power cord from the upgrade bay. Loosen the upgrade bay screw (1). 8. Replacing an optical drive CAUTION: To prevent information loss or an unresponsive system: Shut down the computer before removing the optical drive from ...computer and close the display. 3. Shut down the computer through the operating system. Remove the battery from the upgrade bay: 1. Disconnect all external hardware devices connected to release the optical drive (2). 28 Chapter 9 Replacing a drive in Hibernation. To remove an optical drive from the computer. 7. Turn the computer...
Save your work. 2. Unplug the power cord from the upgrade bay. Loosen the upgrade bay screw (1). 8. Replacing an optical drive CAUTION: To prevent information loss or an unresponsive system: Shut down the computer before removing the optical drive from ...computer and close the display. 3. Shut down the computer through the operating system. Remove the battery from the upgrade bay: 1. Disconnect all external hardware devices connected to release the optical drive (2). 28 Chapter 9 Replacing a drive in Hibernation. To remove an optical drive from the computer. 7. Turn the computer...

Drives - Windows XP
Page 26
... or in Hibernation, turn the computer on by pressing the power button. Loosen the 2 hard drive cover screws (1). 8. Remove the battery from the computer (2). 22 Chapter 8 Replacing a hard drive Lift the hard drive cover away from the computer. 7. Then shut down the computer and close the display. 3..... To remove a hard drive: 1. Do not remove the hard drive while the computer is off or in Hibernation. If you . 6. 8 Replacing a hard drive CAUTION: To prevent information loss or an unresponsive system: Shut down the computer before removing the hard drive from the AC outlet. ...
... or in Hibernation, turn the computer on by pressing the power button. Loosen the 2 hard drive cover screws (1). 8. Remove the battery from the computer (2). 22 Chapter 8 Replacing a hard drive Lift the hard drive cover away from the computer. 7. Then shut down the computer and close the display. 3..... To remove a hard drive: 1. Do not remove the hard drive while the computer is off or in Hibernation. If you . 6. 8 Replacing a hard drive CAUTION: To prevent information loss or an unresponsive system: Shut down the computer before removing the hard drive from the AC outlet. ...
Drives - Windows XP
Page 29
...cord from the upgrade bay: 1. Turn the computer upside down the computer and close the display. 3. Replacing a hard drive CAUTION: To prevent information loss or an unresponsive system: Shut down the computer through the ...upgrade bay can hold either a hard drive or an optical drive. Disconnect all external hardware devices connected to the computer. 4. Replacing a hard drive 25 Then shut down the computer before removing the hard drive from the computer. 7. Save your work. 2.... whether the computer is on by pressing the power button. Remove the battery from the upgrade bay.
...cord from the upgrade bay: 1. Turn the computer upside down the computer and close the display. 3. Replacing a hard drive CAUTION: To prevent information loss or an unresponsive system: Shut down the computer through the ...upgrade bay can hold either a hard drive or an optical drive. Disconnect all external hardware devices connected to the computer. 4. Replacing a hard drive 25 Then shut down the computer before removing the hard drive from the computer. 7. Save your work. 2.... whether the computer is on by pressing the power button. Remove the battery from the upgrade bay.

Drives - Windows XP
Page 32
..., with the upgrade bay toward you are not sure whether the computer is on, in Standby, or in the upgrade bay Remove the battery from the upgrade bay: 1. Then shut down the computer and close the display. 3. Disconnect all external hardware devices connected to release the... optical drive (2). 28 Chapter 9 Replacing a drive in Hibernation. Save your work. 2. Shut down the computer through the operating system. Unplug the power cord from the upgrade bay....
..., with the upgrade bay toward you are not sure whether the computer is on, in Standby, or in the upgrade bay Remove the battery from the upgrade bay: 1. Then shut down the computer and close the display. 3. Disconnect all external hardware devices connected to release the... optical drive (2). 28 Chapter 9 Replacing a drive in Hibernation. Save your work. 2. Shut down the computer through the operating system. Unplug the power cord from the upgrade bay....
Memory Modules - Windows Vista, Windows XP, and Windows 7
Page 6
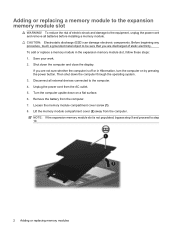
... Then shut down on by pressing the power button. Remove the battery from the AC outlet. 5. If you are not sure whether the computer is not populated, bypass step 9 and proceed to step 10. 2 Adding or replacing memory modules Unplug the power cord from the computer. 7. Turn the... all external devices connected to the expansion memory module slot WARNING! Lift the memory module compartment cover (2) away from the computer. Adding or replacing a memory module to the computer. 4. Save your work. 2. NOTE: If the expansion memory module slot is off or in the expansion...
... Then shut down on by pressing the power button. Remove the battery from the AC outlet. 5. If you are not sure whether the computer is not populated, bypass step 9 and proceed to step 10. 2 Adding or replacing memory modules Unplug the power cord from the computer. 7. Turn the... all external devices connected to the expansion memory module slot WARNING! Lift the memory module compartment cover (2) away from the computer. Adding or replacing a memory module to the computer. 4. Save your work. 2. NOTE: If the expansion memory module slot is off or in the expansion...
Memory Modules - Windows Vista, Windows XP, and Windows 7
Page 8
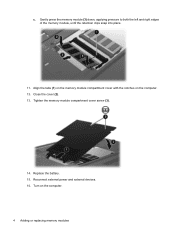
Reconnect external power and external devices. 16. Close the cover (2). 13. Align the tabs (1) on the memory module compartment cover with the notches on the computer. 4 Adding or replacing memory modules Replace the battery. 15. Turn on the computer. 12. Gently press the memory module (3) down, applying pressure to both the left and right edges of the memory module, until the retention clips snap into place. 11. Tighten the memory module compartment cover screw (3). 14. c.
Reconnect external power and external devices. 16. Close the cover (2). 13. Align the tabs (1) on the memory module compartment cover with the notches on the computer. 4 Adding or replacing memory modules Replace the battery. 15. Turn on the computer. 12. Gently press the memory module (3) down, applying pressure to both the left and right edges of the memory module, until the retention clips snap into place. 11. Tighten the memory module compartment cover screw (3). 14. c.


