
User Manual
Page 7
Table of Contents Chapter 1 - Getting Started About This Manual 1-1 Unpacking the Imager 1-1 3800g Models 1-1 Connecting the Imager with USB 1-2 USB PC or Macintosh Keyboard 1-2 IBM SurePos 1-3 USB HID 1-3 USB Com Port Emulation 1-3 Plug and ...
Table of Contents Chapter 1 - Getting Started About This Manual 1-1 Unpacking the Imager 1-1 3800g Models 1-1 Connecting the Imager with USB 1-2 USB PC or Macintosh Keyboard 1-2 IBM SurePos 1-3 USB HID 1-3 USB Com Port Emulation 1-3 Plug and ...

User Manual
Page 8
... - Good Read 3-2 Number of Beeps - Good Read 3-1 Beeper Volume - Good Read 3-1 Beeper Pitch - Good Read 3-2 Good Read Delay 3-3 User-Specified Good Read Delay 3-3 Trigger Modes 3-3 Manual/Serial Trigger 3-3 Automatic Trigger 3-4 Presentation Mode 3-4 Continuous Illumination Mode 3-4 Hands Free Time-Out 3-5 Reread Delay 3-5 User-Specified Reread Delay 3-6 Centering Window 3-6 Output Sequence Overview 3-8 Output...
... - Good Read 3-2 Number of Beeps - Good Read 3-1 Beeper Volume - Good Read 3-1 Beeper Pitch - Good Read 3-2 Good Read Delay 3-3 User-Specified Good Read Delay 3-3 Trigger Modes 3-3 Manual/Serial Trigger 3-3 Automatic Trigger 3-4 Presentation Mode 3-4 Continuous Illumination Mode 3-4 Hands Free Time-Out 3-5 Reread Delay 3-5 User-Specified Reread Delay 3-6 Centering Window 3-6 Output Sequence Overview 3-8 Output...

User Manual
Page 15
... bar code imagers are also included. Product specifications, dimensions, warranty, and customer support information are factory programmed for damage during shipment. 1 Getting Started About This Manual This User's Guide provides installation and programming instructions for programming information regarding Secondary Interfaces. Refer to an option indicates the default setting.
... bar code imagers are also included. Product specifications, dimensions, warranty, and customer support information are factory programmed for damage during shipment. 1 Getting Started About This Manual This User's Guide provides installation and programming instructions for programming information regarding Secondary Interfaces. Refer to an option indicates the default setting.

User Manual
Page 16
... Imager with USB Note: Hand Held Products recommends connecting the imager end of the following codes to program the 3800g. The imager beeps. 3. If this manual.
... Imager with USB Note: Hand Held Products recommends connecting the imager end of the following codes to program the 3800g. The imager beeps. 3. If this manual.

User Manual
Page 19
Turn off power to the terminal/ computer. 4. Disconnect the keyboard cable from the Sample Symbols in the back of this manual. Turn the terminal/computer power back on page 1-6 to an IBM PC AT with CR suffix bar code on . S. Note: You will not hear a power-...
Turn off power to the terminal/ computer. 4. Disconnect the keyboard cable from the Sample Symbols in the back of this manual. Turn the terminal/computer power back on page 1-6 to an IBM PC AT with CR suffix bar code on . S. Note: You will not hear a power-...

User Manual
Page 23
...), scan the Discard code on page 2-1 and locate the Terminal ID number for your terminal ID. Terminal ID Save Note: After scanning one of this manual to program the imager for your PC. Scan the Terminal ID bar code below, then scan the numeric bar code(s) from the Programming Chart inside..., scan the Terminal ID bar code, scan the digits, and the Save code again. For example, an IBM AT terminal has a Terminal ID of this manual, then Save. If you must power cycle your selection.
...), scan the Discard code on page 2-1 and locate the Terminal ID number for your terminal ID. Terminal ID Save Note: After scanning one of this manual to program the imager for your PC. Scan the Terminal ID bar code below, then scan the numeric bar code(s) from the Programming Chart inside..., scan the Terminal ID bar code, scan the digits, and the Save code again. For example, an IBM AT terminal has a Terminal ID of this manual, then Save. If you must power cycle your selection.
User Manual
Page 34
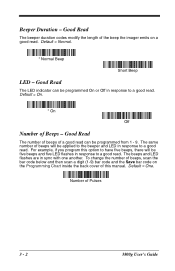
The same number of this option to have five beeps, there will be programmed from 1 - 9. For example, if you program this manual. Default = One. Good Read The LED indicator can be applied to the beeper and LED in sync with one another. To change the number of ...
The same number of this option to have five beeps, there will be programmed from 1 - 9. For example, if you program this manual. Default = One. Good Read The LED indicator can be applied to the beeper and LED in sync with one another. To change the number of ...

User Manual
Page 35
...set to turn itself off after a specified time has elapsed (see Trigger Commands on page 11-4). User-Specified Good Read Delay Trigger Modes Manual/Serial Trigger You can activate the imager either by scanning digits from 0-30,000 milliseconds) by pressing the trigger, or using a serial trigger... command (see Read Time-Out, which follows). * Manual/Serial Trigger 3800g User's Guide 3 - 3 When in manual trigger mode, the imager scans until the trigger is sent. In serial mode, the imager can read or until a bar...
...set to turn itself off after a specified time has elapsed (see Trigger Commands on page 11-4). User-Specified Good Read Delay Trigger Modes Manual/Serial Trigger You can activate the imager either by scanning digits from 0-30,000 milliseconds) by pressing the trigger, or using a serial trigger... command (see Read Time-Out, which follows). * Manual/Serial Trigger 3800g User's Guide 3 - 3 When in manual trigger mode, the imager scans until the trigger is sent. In serial mode, the imager can read or until a bar...

User Manual
Page 37
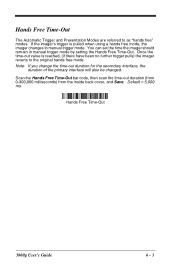
Once the time-out value is pulled when using a hands free mode, the imager changes to manual trigger mode. Longer delays are referred to the original hands free mode. Hands Free Time-Out The Automatic Trigger and Presentation Modes are effective in ... = 5,000 ms. Hands Free Time-Out Reread Delay This sets the time period before the imager can set the time the imager should remain in manual trigger mode by setting the Hands Free Time-Out.
Once the time-out value is pulled when using a hands free mode, the imager changes to manual trigger mode. Longer delays are referred to the original hands free mode. Hands Free Time-Out The Automatic Trigger and Presentation Modes are effective in ... = 5,000 ms. Hands Free Time-Out Reread Delay This sets the time period before the imager can set the time the imager should remain in manual trigger mode by setting the Hands Free Time-Out.

User Manual
Page 38
... Centering = 40% for Left, 60% for the reread delay, scan the bar code below, then set the delay (from the inside back cover of this manual. To change the left or right edge of the centering window, scan Centering On, then scan one of view so the imager reads only the...
... Centering = 40% for Left, 60% for the reread delay, scan the bar code below, then set the delay (from the inside back cover of this manual. To change the left or right edge of the centering window, scan Centering On, then scan one of view so the imager reads only the...

User Manual
Page 46
...the Symbology Chart (included in the Appendix A) for all symbologies. Scan the 2 digit hex value from the Programming Chart inside the back cover of this manual. To add a backslash (\), scan 5, C, 5, C. once to create the leading backslash and then to add a prefix or suffix for every prefix ... Save to exit and save, or scan Discard to enter. Determine the 2 digit Hex value from the Programming Chart inside the back cover of this manual. Step 5. To add AIM I .D., scan 5, C, 8, 0. Example: Add a Suffix to apply the prefix or suffix. Scan 6, 3 from the Symbology Chart (included ...
...the Symbology Chart (included in the Appendix A) for all symbologies. Scan the 2 digit hex value from the Programming Chart inside the back cover of this manual. To add a backslash (\), scan 5, C, 5, C. once to create the leading backslash and then to add a prefix or suffix for every prefix ... Save to exit and save, or scan Discard to enter. Determine the 2 digit Hex value from the Programming Chart inside the back cover of this manual. Step 5. To add AIM I .D., scan 5, C, 8, 0. Example: Add a Suffix to apply the prefix or suffix. Scan 6, 3 from the Symbology Chart (included ...

User Manual
Page 47
... the 2 digit Hex value from the Symbology Chart (included in the Appendix A) for the symbology from the Programming Chart inside the back cover of this manual or scan 9, 9 for all symbologies. To Clear One or All Prefixes or Suffixes: You can clear a single prefix or suffix, or clear all prefixes/suffixes...
... the 2 digit Hex value from the Symbology Chart (included in the Appendix A) for the symbology from the Programming Chart inside the back cover of this manual or scan 9, 9 for all symbologies. To Clear One or All Prefixes or Suffixes: You can clear a single prefix or suffix, or clear all prefixes/suffixes...

User Manual
Page 49
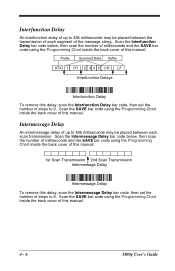
...and the SAVE bar code using the Programming Chart inside the back cover of this manual. 3800g User's Guide 4 - 5 Scan the SAVE bar code using the Programming Chart inside the back cover of this manual. Scan the Delay Length bar code below , then scan the number of milliseconds ...and the SAVE bar code using the Programming Chart inside the back cover of this manual. Scan the SAVE bar code using the Programming Chart inside the back cover of this manual. Prefix Scanned Data Suffix 1234 5 Intercharacter Delay Intercharacter Delay To remove this delay, scan ...
...and the SAVE bar code using the Programming Chart inside the back cover of this manual. 3800g User's Guide 4 - 5 Scan the SAVE bar code using the Programming Chart inside the back cover of this manual. Scan the Delay Length bar code below , then scan the number of milliseconds ...and the SAVE bar code using the Programming Chart inside the back cover of this manual. Scan the SAVE bar code using the Programming Chart inside the back cover of this manual. Prefix Scanned Data Suffix 1234 5 Intercharacter Delay Intercharacter Delay To remove this delay, scan ...
User Manual
Page 50
...code below , then scan the number of milliseconds and the SAVE bar code using the Programming Chart inside the back cover of this manual. 1st Scan Transmission 2nd Scan Transmission Intermessage Delay Intermessage Delay To remove this delay, scan the Interfunction Delay bar code, then set the... bar code below , then scan the number of milliseconds and the SAVE bar code using the Programming Chart inside the back cover of this manual. 4 - 6 3800g User's Guide Interfunction Delay An interfunction delay of up to 495 milliseconds may be placed between the transmission of each scan...
...code below , then scan the number of milliseconds and the SAVE bar code using the Programming Chart inside the back cover of this manual. 1st Scan Transmission 2nd Scan Transmission Intermessage Delay Intermessage Delay To remove this delay, scan the Interfunction Delay bar code, then set the... bar code below , then scan the number of milliseconds and the SAVE bar code using the Programming Chart inside the back cover of this manual. 4 - 6 3800g User's Guide Interfunction Delay An interfunction delay of up to 495 milliseconds may be placed between the transmission of each scan...
User Manual
Page 51
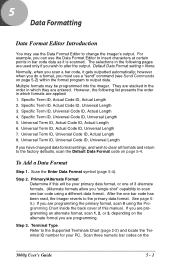
... to output data. Step 3. They are stacked in the order in bar code data as it gets outputted automatically; Primary/Alternate Format Determine if this manual. If you are programming an alternate format, scan 1, 2, or 3, depending on the alternate format you can use the Data Format Editor to the factory defaults...
... to output data. Step 3. They are stacked in the order in bar code data as it gets outputted automatically; Primary/Alternate Format Determine if this manual. If you are programming an alternate format, scan 1, 2, or 3, depending on the alternate format you can use the Data Format Editor to the factory defaults...
User Manual
Page 52
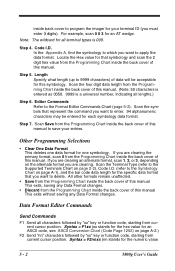
... want to apply the data format. Syntax = F2nnxx (nn stands for one symbology. Scan Save from the Programming Chart inside the back cover of this manual. Editor Commands Refer to save your terminal ID (you are clearing an alternate format, scan 1, 2, or 3, depending on page 2-2), Code I .D. ...cursor position. Data Format Editor Commands Send Commands F1 Send all lengths.) Step 6. Step 4. Length Specify what length (up to 9999 characters) of this manual. (Note: 50 characters is entered as 0050. 9999 is 099. Note: The wildcard for an AT wedge. For example, scan 0 0 3 ...
... want to apply the data format. Syntax = F2nnxx (nn stands for one symbology. Scan Save from the Programming Chart inside the back cover of this manual. Editor Commands Refer to save your terminal ID (you are clearing an alternate format, scan 1, 2, or 3, depending on page 2-2), Code I .D. ...cursor position. Data Format Editor Commands Send Commands F1 Send all lengths.) Step 6. Step 4. Length Specify what length (up to 9999 characters) of this manual. (Note: 50 characters is entered as 0050. 9999 is 099. Note: The wildcard for an AT wedge. For example, scan 0 0 3 ...

User Manual
Page 58
...: You must press the imager trigger to detect the bar codes. Default = Manual Trigger. * Manual Trigger Automatic Trigger: The imager scans continuously at full power. Presentation Mode uses ambient light to scan. If you want to change the RS-232 ...
...: You must press the imager trigger to detect the bar codes. Default = Manual Trigger. * Manual Trigger Automatic Trigger: The imager scans continuously at full power. Presentation Mode uses ambient light to scan. If you want to change the RS-232 ...
User Manual
Page 59
Hands Free Time-Out The Automatic Trigger and Presentation Modes are referred to manual trigger mode. Scan the Hands Free Time-Out bar code, then scan the time-out duration (from 0-300,000 milliseconds) from the inside back cover, ... interface will also be changed. Default = 5,000 ms. Hands Free Time-Out 3800g User's Guide 6 - 3 You can set the time the imager should remain in manual trigger mode by setting the Hands Free Time-Out.
Hands Free Time-Out The Automatic Trigger and Presentation Modes are referred to manual trigger mode. Scan the Hands Free Time-Out bar code, then scan the time-out duration (from 0-300,000 milliseconds) from the inside back cover, ... interface will also be changed. Default = 5,000 ms. Hands Free Time-Out 3800g User's Guide 6 - 3 You can set the time the imager should remain in manual trigger mode by setting the Hands Free Time-Out.

User Manual
Page 62
... doesn't match the valid reading length, the imager will issue an error beep. length = 20 EXAMPLE: Decode only those bar codes with a count of this manual. If the data length of a misread. Min. The minimum and maximum lengths and the defaults are able to set the same value for minimum and...
... doesn't match the valid reading length, the imager will issue an error beep. length = 20 EXAMPLE: Decode only those bar codes with a count of this manual. If the data length of a misread. Min. The minimum and maximum lengths and the defaults are able to set the same value for minimum and...

User Manual
Page 69
... because the bar code being scanned was created using a code page that is expecting. Code 39 Code Page Code pages define the mapping of this manual. The data characters should then appear properly. If the data received does not display with or without a check digit. 3800g User's Guide 7 - 9 If this is...
... because the bar code being scanned was created using a code page that is expecting. Code 39 Code Page Code pages define the mapping of this manual. The data characters should then appear properly. If the data received does not display with or without a check digit. 3800g User's Guide 7 - 9 If this is...