Owner Manual
Page 2
...Introduction 1.1 Support 3 1.2 Product description 3 1.3 Product overview 4 1.4 Symbols on the product 5 1.5 Symbols on the display 6 1.6 Symbols on the battery 6 1.7 Menu structure overview - 1 8 1.8 Menu structure overview - 2 9 1.9 Display 10 1.10 Keypad 10 2 Safety 2.1 Safety definitions 11 ... settings 23 4 Operation 4.1 Main switch 34 4.2 Start 34 4.3 Operating mode - maintenance 38 5.2 Clean the product 38 5.3 Replace the blades 39 5.4 Battery 39 5.5 Winter service 40 6 Troubleshooting 6.1 Introduction - Park 35 4.5 To stop the product 35 4.6 To switch off the ...
...Introduction 1.1 Support 3 1.2 Product description 3 1.3 Product overview 4 1.4 Symbols on the product 5 1.5 Symbols on the display 6 1.6 Symbols on the battery 6 1.7 Menu structure overview - 1 8 1.8 Menu structure overview - 2 9 1.9 Display 10 1.10 Keypad 10 2 Safety 2.1 Safety definitions 11 ... settings 23 4 Operation 4.1 Main switch 34 4.2 Start 34 4.3 Operating mode - maintenance 38 5.2 Clean the product 38 5.3 Replace the blades 39 5.4 Battery 39 5.5 Winter service 40 6 Troubleshooting 6.1 Introduction - Park 35 4.5 To stop the product 35 4.6 To switch off the ...
Owner Manual
Page 4
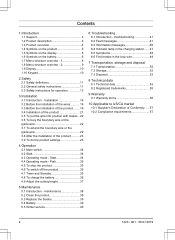
Headlights 9. Cutting system 17. Introduction 1220 - 001 - 08.07.2019 1.3 Product overview Automower® 310/315 Automower® 315X 34 2 1 5 11 10 6 7 16 8 13 14 15 23 24 26 25 22 17 18 19 27 28 29 12 9 20 32 21 30 ... of the charging station and boundary wire 12. Stop button 5. Charging station 13. Hatch to cutting height adjustment 3. Front wheels 8. Contact plates 11. Handle 19. Replaceable cover 6. Chassis box with electronics, battery and motors 18. Display 15. Body 2. product identification code) 14. Blade disc 21.
Headlights 9. Cutting system 17. Introduction 1220 - 001 - 08.07.2019 1.3 Product overview Automower® 310/315 Automower® 315X 34 2 1 5 11 10 6 7 16 8 13 14 15 23 24 26 25 22 17 18 19 27 28 29 12 9 20 32 21 30 ... of the charging station and boundary wire 12. Stop button 5. Charging station 13. Hatch to cutting height adjustment 3. Front wheels 8. Contact plates 11. Handle 19. Replaceable cover 6. Chassis box with electronics, battery and motors 18. Display 15. Body 2. product identification code) 14. Blade disc 21.
Owner Manual
Page 39
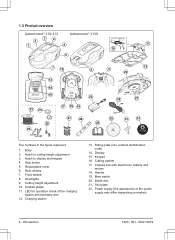
... can be damaged and in certain cases be replaced on , among other batteries. Use Husqvarna original blades embossed with the eyes etc. 5.3.1 To replace the blades 1. Husqvarna can result in a screw wearing during mowing. WARNING: Use only original batteries recommended by the manufacturer. Remove the 3 screws. CAUTION: The battery must be charged fully before winter storage. Set...
... can be damaged and in certain cases be replaced on , among other batteries. Use Husqvarna original blades embossed with the eyes etc. 5.3.1 To replace the blades 1. Husqvarna can result in a screw wearing during mowing. WARNING: Use only original batteries recommended by the manufacturer. Remove the 3 screws. CAUTION: The battery must be charged fully before winter storage. Set...
Owner Manual
Page 40
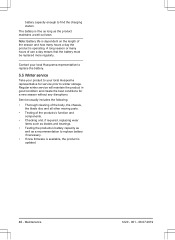
A long season or many hours a day the product is operating. Contact your local Husqvarna representative to replace the battery. 5.5 Winter service Take your product to replace battery if necessary. • If new firmware is available, the product is dependent on the length of the season and how many hours of the products's ...
A long season or many hours a day the product is operating. Contact your local Husqvarna representative to replace the battery. 5.5 Winter service Take your product to replace battery if necessary. • If new firmware is available, the product is dependent on the length of the season and how many hours of the products's ...
Owner Manual
Page 42
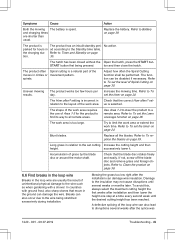
...the charging station. Troubleshooting 1220 - 001 - 08.07.2019 The work area slopes too much by . The battery is stuck behind a number of obstacles. Replace the battery. Message Cause Action No loop signal The boundary wire is crossed on page 21. Refer to To install the .... Check if the indicator lamp in accordance with the instructions. Disturbances from this location. nected correctly. tion close to To remove the battery on page 47. 42 - Check that the boundary wire is too close by the boundary loop. tion and generate a new loop ...
...the charging station. Troubleshooting 1220 - 001 - 08.07.2019 The work area slopes too much by . The battery is stuck behind a number of obstacles. Replace the battery. Message Cause Action No loop signal The boundary wire is crossed on page 21. Refer to To install the .... Check if the indicator lamp in accordance with the instructions. Disturbances from this location. nected correctly. tion close to To remove the battery on page 47. 42 - Check that the boundary wire is too close by the boundary loop. tion and generate a new loop ...
Owner Manual
Page 46
...wire on page 22. Check if the indicator lamp in the product display. Guide not found The guide wire is . Message Low battery Cause The product cannot find - Replace the damaged section of the boundary wire on a Secondary area with a new loop wire and splice using an original coupler. The ...- rectly. Refer to calibrate the guide wire. The guide wire is normal. accomplished the guide wire. Refer to the instructions. Contact your local Husqvarna representative if the same message appears often. Find out where the break is spent. The...
...wire on page 22. Check if the indicator lamp in the product display. Guide not found The guide wire is . Message Low battery Cause The product cannot find - Replace the damaged section of the boundary wire on a Secondary area with a new loop wire and splice using an original coupler. The ...- rectly. Refer to calibrate the guide wire. The guide wire is normal. accomplished the guide wire. Refer to the instructions. Contact your local Husqvarna representative if the same message appears often. Find out where the break is spent. The...
Owner Manual
Page 48
...time Place the charging station on www.husqvarna.com which provides more detailed answers to To set the timer on page 39. Refer to To install the guide wire on page 30. Different versions (thickness) of different ver- Replace the battery. The product searches for shorter periods ...wire is absolutely critical for mowing. The charging station is spent. 6.5 Symptoms If your local Husqvarna representative if you still cannot find the reason for the charging station. Refer to Battery on page 38. The product runs The clock needs to put the charging station on a slope...
...time Place the charging station on www.husqvarna.com which provides more detailed answers to To set the timer on page 39. Refer to To install the guide wire on page 30. Different versions (thickness) of different ver- Replace the battery. The product searches for shorter periods ...wire is absolutely critical for mowing. The charging station is spent. 6.5 Symptoms If your local Husqvarna representative if you still cannot find the reason for the charging station. Refer to Battery on page 38. The product runs The clock needs to put the charging station on a slope...
Owner Manual
Page 49
Symptoms Cause Action Both the mowing The battery is The product has an inbuilt standby peri- Replace the battery. The product is spent. the charging sta- The product often Spiral cutting is incorrect in the loop wire are shorter than usual. Uneven mowing results. .... A defective splicing of Spiral Cutting on page 39. and charging times are usually the result of the work time. successively lower it. Damage to To replace the blades on page 30. Refer to the set the level of the loop wire can damage wire insulation. Check that the blade disc rotates...
Symptoms Cause Action Both the mowing The battery is The product has an inbuilt standby peri- Replace the battery. The product is spent. the charging sta- The product often Spiral cutting is incorrect in the loop wire are shorter than usual. Uneven mowing results. .... A defective splicing of Spiral Cutting on page 39. and charging times are usually the result of the work time. successively lower it. Damage to To replace the blades on page 30. Refer to the set the level of the loop wire can damage wire insulation. Check that the blade disc rotates...

Owner Manual
Page 56
Within the warranty period, we will replace the product or repair it at hand when contacting Husqvarna customer service. 56 - If an error occurs with the instructions in the warranty: • Damage caused by water seepage from using a high...forms pools of water. • Damage caused by lightning. • Damage caused by improper battery storage or battery handling. • Damage caused by using a battery that is not a Husqvarna original battery. • Damage caused by not using Husqvarna original spare parts and accessories, such as blades and installation material. • Damage to ...
Within the warranty period, we will replace the product or repair it at hand when contacting Husqvarna customer service. 56 - If an error occurs with the instructions in the warranty: • Damage caused by water seepage from using a high...forms pools of water. • Damage caused by lightning. • Damage caused by improper battery storage or battery handling. • Damage caused by using a battery that is not a Husqvarna original battery. • Damage caused by not using Husqvarna original spare parts and accessories, such as blades and installation material. • Damage to ...


