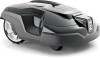
Owner Manual
Page 2
Start 34 4.4 Operating mode - troubleshooting 41 6.2 Fault messages 41 6.3 Information messages 46 6.4 Indicator lamp in the charging station.......47 6.5 Symptoms 48 6.6 Find breaks in the loop wire 49...Operation 4.1 Main switch 34 4.2 Start 34 4.3 Operating mode - maintenance 38 5.2 Clean the product 38 5.3 Replace the blades 39 5.4 Battery 39 5.5 Winter service 40 6 Troubleshooting 6.1 Introduction - Installation 16 3.2 Before the installation of the wires........... 16 3.3 Before the installation of the product........16 3.4 Installation of the product 21 3.5 To put the...
Start 34 4.4 Operating mode - troubleshooting 41 6.2 Fault messages 41 6.3 Information messages 46 6.4 Indicator lamp in the charging station.......47 6.5 Symptoms 48 6.6 Find breaks in the loop wire 49...Operation 4.1 Main switch 34 4.2 Start 34 4.3 Operating mode - maintenance 38 5.2 Clean the product 38 5.3 Replace the blades 39 5.4 Battery 39 5.5 Winter service 40 6 Troubleshooting 6.1 Introduction - Installation 16 3.2 Before the installation of the wires........... 16 3.3 Before the installation of the product........16 3.4 Installation of the product 21 3.5 To put the...
Owner Manual
Page 41
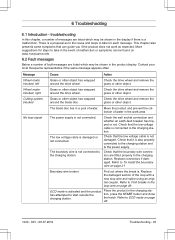
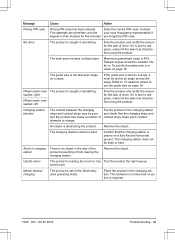
...to Find breaks in the work as to the cause and steps to take for steps to the charging station. Contact your local Husqvarna representative if the same message appears often. Check the drive wheel and remove the grass or other object. The low voltage cable ... break is not connected to the power supply. Refer to start outside the tion, press the START button and close charging station. 6 Troubleshooting 6.1 Introduction - troubleshooting In this chapter, a number of the loop with a new loop wire and splice using an original coupler. Cutting system blocked Grass or...
...to Find breaks in the work as to the cause and steps to take for steps to the charging station. Contact your local Husqvarna representative if the same message appears often. Check the drive wheel and remove the grass or other object. The low voltage cable ... break is not connected to the power supply. Refer to start outside the tion, press the START button and close charging station. 6 Troubleshooting 6.1 Introduction - troubleshooting In this chapter, a number of the loop with a new loop wire and splice using an original coupler. Cutting system blocked Grass or...
Owner Manual
Page 42
... the product in something. tion and generate a new loop signal. The product is spent. Refer to Indicator lamp in the right direction around an island. Troubleshooting 1220 - 001 - 08.07.2019 The guide wire is caught in the charging stathe signal from an island. Refer to To install the boundary wire...
... the product in something. tion and generate a new loop signal. The product is spent. Refer to Indicator lamp in the right direction around an island. Troubleshooting 1220 - 001 - 08.07.2019 The guide wire is caught in the charging stathe signal from an island. Refer to To install the boundary wire...
Owner Manual
Page 43
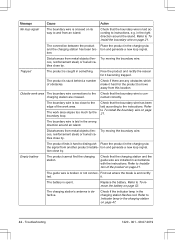
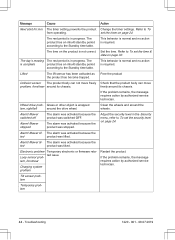
... from leaving the charging station. The charging station must be isolated. Upside down The product is required. 1220 - 001 - 08.07.2019 Troubleshooting - 43 No drive The product is 40%. Maximum guaranteed slope is caught in charging station There is set to charge. loaded, right Wheel ...object. Message Cause Action Wrong PIN code Wrong PIN code has been entered. Contact Five attempts are permitted, and the your local Husqvarna representative if keypad is due to wet grass, wait until the lawn has dried before using the product. If it is then ...
... from leaving the charging station. The charging station must be isolated. Upside down The product is required. 1220 - 001 - 08.07.2019 Troubleshooting - 43 No drive The product is 40%. Maximum guaranteed slope is caught in charging station There is set to charge. loaded, right Wheel ...object. Message Cause Action Wrong PIN code Wrong PIN code has been entered. Contact Five attempts are permitted, and the your local Husqvarna representative if keypad is due to wet grass, wait until the lawn has dried before using the product. If it is then ...
Owner Manual
Page 44
... activated as the product has become trapped. Collision sensor The product body can move freely problem, front/rear around its chassis. Alarm! Restart the product. Troubleshooting 1220 - 001 - 08.07.2019 The day's mowing The rest period is required. Wheel drive prob- Alarm! Mower stopped The alarm was activated because the...
... activated as the product has become trapped. Collision sensor The product body can move freely problem, front/rear around its chassis. Alarm! Restart the product. Troubleshooting 1220 - 001 - 08.07.2019 The day's mowing The rest period is required. Wheel drive prob- Alarm! Mower stopped The alarm was activated because the...
Owner Manual
Page 45
too high Connectivity prob- If the problem remains, the message requires action by authorized service technician. 1220 - 001 - 08.07.2019 Troubleshooting - 45 Verify the product is tilted or upside down or tilted. If not, the message requires action by authorized service technician. Disconnect and reconnect the ...
too high Connectivity prob- If the problem remains, the message requires action by authorized service technician. 1220 - 001 - 08.07.2019 Troubleshooting - 45 Verify the product is tilted or upside down or tilted. If not, the message requires action by authorized service technician. Disconnect and reconnect the ...
Owner Manual
Page 46
.... Guide calibration The product has succeeded to To set - Refer to calibrate No action required. Troubleshooting 1220 - 001 - 08.07.2019 No action required. boundary wire several laps without find the charging station. Contact your local Husqvarna representative if the same message appears often. The guide wire is . Wrong corridor width setting...
.... Guide calibration The product has succeeded to To set - Refer to calibrate No action required. Troubleshooting 1220 - 001 - 08.07.2019 No action required. boundary wire several laps without find the charging station. Contact your local Husqvarna representative if the same message appears often. The guide wire is . Wrong corridor width setting...
Owner Manual
Page 47
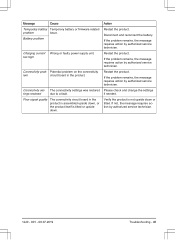
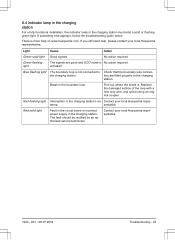
...loop with a new loop wire, and splice using an original coupler. Break in the charging station. Contact your local Husqvarna representative. 1220 - 001 - 08.07.2019 Troubleshooting - 47 Fault in the circuit board or incorrect power supply in the boundary loop. If something else appears, follow the... troubleshooting guide below. There is No action required. 6.4 Indicator lamp in the charging station For a fully functional installation, the indicator lamp in...
...loop with a new loop wire, and splice using an original coupler. Break in the charging station. Contact your local Husqvarna representative. 1220 - 001 - 08.07.2019 Troubleshooting - 47 Fault in the circuit board or incorrect power supply in the boundary loop. If something else appears, follow the... troubleshooting guide below. There is No action required. 6.4 Indicator lamp in the charging station For a fully functional installation, the indicator lamp in...
Owner Manual
Page 48
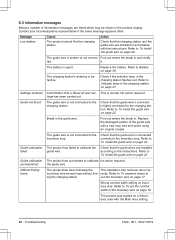
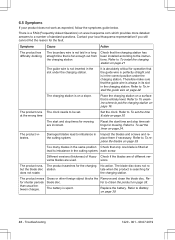
...) on a slope. Refer to the instructions. Check if the blades are incorrect. Remove and clean the blade disc. There is on www.husqvarna.com which provides more detailed answers to a number of standard questions. Check that is not laid in a long straight line that the charging ...product searches for the charging station. Refer to To install the guide wire on page 39. 48 - Refer to Battery on page 22. Troubleshooting 1220 - 001 - 08.07.2019 The boundary wire is far enough out from the charging station. It is absolutely critical for operation that ...
...) on a slope. Refer to the instructions. Check if the blades are incorrect. Remove and clean the blade disc. There is on www.husqvarna.com which provides more detailed answers to a number of standard questions. Check that is not laid in a long straight line that the charging ...product searches for the charging station. Refer to To install the guide wire on page 39. 48 - Refer to Battery on page 22. Troubleshooting 1220 - 001 - 08.07.2019 The boundary wire is far enough out from the charging station. It is absolutely critical for operation that ...
Owner Manual
Page 49
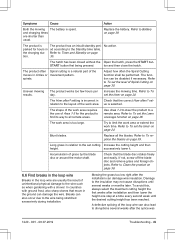
... off the blade disc and remove grass and foreign objects. Mowing the grass too low right after the splice was 1220 - 001 - 08.07.2019 Troubleshooting - 49 A defective splicing of the work area requires the use of unintentional physical damage to the layout of the loop wire can damage wire insulation...
... off the blade disc and remove grass and foreign objects. Mowing the grass too low right after the splice was 1220 - 001 - 08.07.2019 Troubleshooting - 49 A defective splicing of the work area requires the use of unintentional physical damage to the layout of the loop wire can damage wire insulation...

Owner Manual
Page 50
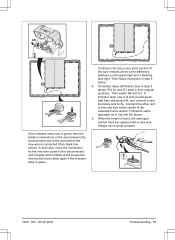
...wire break can , for example, be located by switching connection AL and G1. Refer to Indicator lamp in the charging station on page 29. 1. Troubleshooting 1220 - 001 - 08.07.2019 done. The following method does not work if ECO mode is done. boundary wire between AL and the point ...where the guide wire is connected to exchange all known splices before further troubleshooting is activated. Please first check all of lower quality than the original coupler has been used. Then disconnect AR. Check that a coupler ...
...wire break can , for example, be located by switching connection AL and G1. Refer to Indicator lamp in the charging station on page 29. 1. Troubleshooting 1220 - 001 - 08.07.2019 done. The following method does not work if ECO mode is done. boundary wire between AL and the point ...where the guide wire is connected to exchange all known splices before further troubleshooting is activated. Please first check all of lower quality than the original coupler has been used. Then disconnect AR. Check that a coupler ...
Owner Manual
Page 51
... this new wire at the middle of the suspected wire section) and check again if the indicator lamp is green. 1220 - 001 - 08.07.2019 Troubleshooting - 51 Then follow instruction in the wire between a solid green light and a flashing blue light. Always use original couplers. Then switch AR and G1. When...
... this new wire at the middle of the suspected wire section) and check again if the indicator lamp is green. 1220 - 001 - 08.07.2019 Troubleshooting - 51 Then follow instruction in the wire between a solid green light and a flashing blue light. Always use original couplers. Then switch AR and G1. When...