

Parts Manual
Page 19
... 03-51 WORKSHOP MANUAL 31 115820356 TBD 31 115820358 TBD 31 115820359 TBD 31 115820361 TBD 31 115820362 TBD AUTOMOWER 310, 2020- Automower Connect 1 Technical Handbook -310, 315, Sileno: Swedish 1 Technical Handbook -310, 315, Sileno: Danish 1 Technical Handbook -310, 315, Sileno: Finnish 1 Technical Handbook -310, 315, Sileno: Norwegian 1 Technical Handbook -310, 315, Sileno: English 1 Technical Handbook -310, 315, Sileno: French...
... 03-51 WORKSHOP MANUAL 31 115820356 TBD 31 115820358 TBD 31 115820359 TBD 31 115820361 TBD 31 115820362 TBD AUTOMOWER 310, 2020- Automower Connect 1 Technical Handbook -310, 315, Sileno: Swedish 1 Technical Handbook -310, 315, Sileno: Danish 1 Technical Handbook -310, 315, Sileno: Finnish 1 Technical Handbook -310, 315, Sileno: Norwegian 1 Technical Handbook -310, 315, Sileno: English 1 Technical Handbook -310, 315, Sileno: French...

Owner Manual
Page 1
EN, English Operator's manual HUSQVARNA AUTOMOWER® 310/315/315X Read the operator's manual carefully and make sure that you understand the instructions before you use the product.
EN, English Operator's manual HUSQVARNA AUTOMOWER® 310/315/315X Read the operator's manual carefully and make sure that you understand the instructions before you use the product.
Owner Manual
Page 5
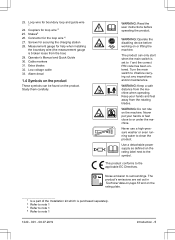
... feet away from the rotating blades. This product conforms to or under the machine. Loop wire for securing the charging station 28. Stakes3 26. Operator's Manual and Quick Guide 30. Low voltage cable 33. WARNING: Operate the disabling device before operating the product. Connector for loop wire 2 25. Cable markers 31...
... feet away from the rotating blades. This product conforms to or under the machine. Loop wire for securing the charging station 28. Stakes3 26. Operator's Manual and Quick Guide 30. Low voltage cable 33. WARNING: Operate the disabling device before operating the product. Connector for loop wire 2 25. Cable markers 31...
Owner Manual
Page 6
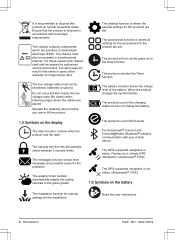
...or lift the product. The product will not cut the grass do not charge the battery. 1.5 Symbols on the battery The installation function for manual settings for the product are sensitive to electrostatic discharge (ESD). The GPS-supported navigation is active. Ensure that the product is recycled in the ...settings function is where the general settings for the problems. The weather timer function automatically adapts the cutting intervals to the grass growth. For Automower® Connect and Connect@Home. It is not permitted to dispose this product as it collects GPS information...
...or lift the product. The product will not cut the grass do not charge the battery. 1.5 Symbols on the battery The installation function for manual settings for the product are sensitive to electrostatic discharge (ESD). The GPS-supported navigation is active. Ensure that the product is recycled in the ...settings function is where the general settings for the problems. The weather timer function automatically adapts the cutting intervals to the grass growth. For Automower® Connect and Connect@Home. It is not permitted to dispose this product as it collects GPS information...
Owner Manual
Page 11
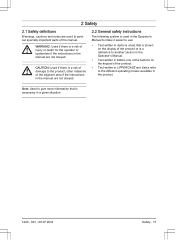
... make it easier to use: • Text written in italics is a text that is necessary in the manual are not obeyed. 2.2 General safety instructions The following system is used to the different operating modes available in the product. CAUTION: Used if there is a ...risk of damage to the product, other materials or the adjacent area if the instructions in the manual are not obeyed. Note: Used to give more information that is shown on the keypad of the product. • Text written in UPPERCASE and italics...
... make it easier to use: • Text written in italics is a text that is necessary in the manual are not obeyed. 2.2 General safety instructions The following system is used to the different operating modes available in the product. CAUTION: Used if there is a ...risk of damage to the product, other materials or the adjacent area if the instructions in the manual are not obeyed. Note: Used to give more information that is shown on the keypad of the product. • Text written in UPPERCASE and italics...
Owner Manual
Page 13
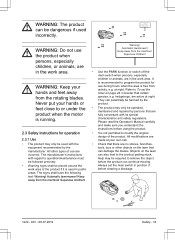
... potentially be harmed by the tools, toys or other types of the product. All other objects on the lawn that manufacturer. Please read the Operator's Manual carefully and make sure you understand the instructions before using the product. 2.3 Safety instructions for use the product when Warning! WARNING: Do not use during...
... potentially be harmed by the tools, toys or other types of the product. All other objects on the lawn that manufacturer. Please read the Operator's Manual carefully and make sure you understand the instructions before using the product. 2.3 Safety instructions for use the product when Warning! WARNING: Do not use during...
Owner Manual
Page 19
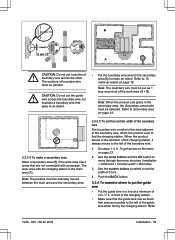
... mode must be selected. Refer to the left of boundary wire make an island on page 18. must be parallel. Note: The product must be manually moved between the main area and the secondary area. 3.3.3.5 To set the corridor width of the work area with a passage. Note: The boundary wire must...
... mode must be selected. Refer to the left of boundary wire make an island on page 18. must be parallel. Note: The product must be manually moved between the main area and the secondary area. 3.3.3.5 To set the corridor width of the work area with a passage. Note: The boundary wire must...
Owner Manual
Page 23
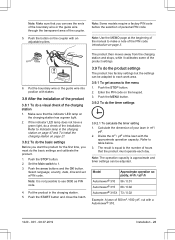
... to Indicator lamp in the charging station on page 47 and To install the charging station on page 21. 3.8.2 To do a visual check of the manual to use 0000 as PIN code. 4. Select language, country, date, time and set a PIN code. Push the MENU button. 3.9.2 To do a ...basic settings Before you start the product for the first time, you can be adjusted. Model Approximate operation capacity, m2/h / yd2 /h Automower® 310 56 / 0.01 Automower® 315 68 / 0.02 Automower® 315X 73 / 0.02 Example: A lawn of personal PIN code. Push the STOP button. 2. Push the button on the ...
... to Indicator lamp in the charging station on page 47 and To install the charging station on page 21. 3.8.2 To do a visual check of the manual to use 0000 as PIN code. 4. Select language, country, date, time and set a PIN code. Push the MENU button. 3.9.2 To do a ...basic settings Before you start the product for the first time, you can be adjusted. Model Approximate operation capacity, m2/h / yd2 /h Automower® 310 56 / 0.01 Automower® 315 68 / 0.02 Automower® 315X 73 / 0.02 Example: A lawn of personal PIN code. Push the STOP button. 2. Push the button on the ...

Owner Manual
Page 26
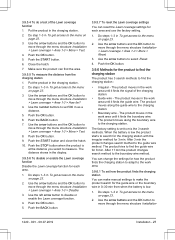
...- 08.07.2019 Disable the GPS Assisted Navigation to the % of the manual settings in Lawn coverage. Note: It is equal to make manual settings in the Lawn coverage menu. 3.9.5.1 To disable the GPS Assisted Navigation Only for Automower® 315X. 1. Push the OK button. 5. Push the OK button.... 3.9.5.2 To enable the GPS Assisted Navigation Only for Automower® 315X. Measure along the guide ...
...- 08.07.2019 Disable the GPS Assisted Navigation to the % of the manual settings in Lawn coverage. Note: It is equal to make manual settings in the Lawn coverage menu. 3.9.5.1 To disable the GPS Assisted Navigation Only for Automower® 315X. 1. Push the OK button. 5. Push the OK button.... 3.9.5.2 To enable the GPS Assisted Navigation Only for Automower® 315X. Measure along the guide ...
Owner Manual
Page 27
... 23. 2. After 3 min the product changes search method to move through the menu structure Installation 1220 - 001 - 08.07.2019 Installation - 27 You can make manual settings to the work area until it finds the signal of the Lawn coverage function 1. Use the arrow buttons and the OK button to the...
... 23. 2. After 3 min the product changes search method to move through the menu structure Installation 1220 - 001 - 08.07.2019 Installation - 27 You can make manual settings to the work area until it finds the signal of the Lawn coverage function 1. Use the arrow buttons and the OK button to the...
Owner Manual
Page 34
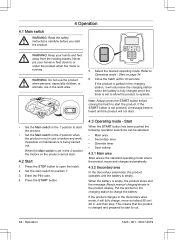
.... This means that the product is set to allow the product to operate. When the battery is empty, the product stops and the message Needs manual charging shows in the work , inspection or maintenance is empty. Operation 1220 - 001 - 08.07.2019 Close the hatch within 10 seconds. Press the STOP...
.... This means that the product is set to allow the product to operate. When the battery is empty, the product stops and the message Needs manual charging shows in the work , inspection or maintenance is empty. Operation 1220 - 001 - 08.07.2019 Close the hatch within 10 seconds. Press the STOP...
Owner Manual
Page 39
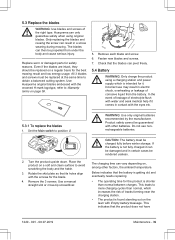
... page 56. 5. Rotate the skid plate so that the product does not have 1220 - 001 - 08.07.2019 Maintenance - 39 Use a manual straight slot or cross-tip screwdriver. This indicates that its holes align with the crowned H-mark logotype, refer to avoid scratching the body and the...and screws of electrolyte flush with water and seek medical help if it comes in contact with Empty battery message. This leads to position 0. Husqvarna can result in a screw wearing during mowing. Set the Main switch to more charging cycles than normal between charges. The charging time can...
... page 56. 5. Rotate the skid plate so that the product does not have 1220 - 001 - 08.07.2019 Maintenance - 39 Use a manual straight slot or cross-tip screwdriver. This indicates that its holes align with the crowned H-mark logotype, refer to avoid scratching the body and the...and screws of electrolyte flush with water and seek medical help if it comes in contact with Empty battery message. This leads to position 0. Husqvarna can result in a screw wearing during mowing. Set the Main switch to more charging cycles than normal between charges. The charging time can...
Owner Manual
Page 43
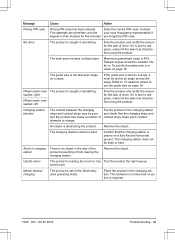
... be tilted or bent. Put the product in the charging station. The charging station is laid on a slope, it is placed on a slope. Needs manual charging The product is required. 1220 - 001 - 08.07.2019 Troubleshooting - 43 This behavior is normal and no action is set to wet grass, ...product preventing it is leaning too much or has Turn the product the right way up. Contact Five attempts are permitted, and the your local Husqvarna representative if keypad is 40%. Refer to To examine where to To put the guide wire on page 18. Stuck in charging station There ...
... be tilted or bent. Put the product in the charging station. The charging station is laid on a slope, it is placed on a slope. Needs manual charging The product is required. 1220 - 001 - 08.07.2019 Troubleshooting - 43 This behavior is normal and no action is set to wet grass, ...product preventing it is leaning too much or has Turn the product the right way up. Contact Five attempts are permitted, and the your local Husqvarna representative if keypad is 40%. Refer to To examine where to To put the guide wire on page 18. Stuck in charging station There ...

Owner Manual
Page 56
... under water, for further instructions. Within the warranty period, we will replace the product or repair it at hand when contacting Husqvarna customer service. 56 - The blades and wheels are not covered by non-authorized changing or tampering with the instructions in compliance ...with the product or its power supply. 9 Warranty 9.1 Warranty terms Husqvarna® warranty covers this Operator's Manual. Warranty 1220 - 001 - 08.07.2019 Examples of faults which are not included in the warranty: • Damage...
... under water, for further instructions. Within the warranty period, we will replace the product or repair it at hand when contacting Husqvarna customer service. 56 - The blades and wheels are not covered by non-authorized changing or tampering with the instructions in compliance ...with the product or its power supply. 9 Warranty 9.1 Warranty terms Husqvarna® warranty covers this Operator's Manual. Warranty 1220 - 001 - 08.07.2019 Examples of faults which are not included in the warranty: • Damage...


