Intermec Features Demo User Guide
Page 3
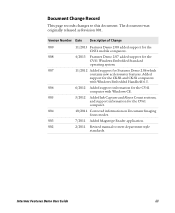
... Number Date Description of Change 009 11/2013 Features Demo 2.08 added support for the CN51 mobile computers. 008 4/2013 Features Demo 2.07 added support for the CV41 Windows Embedded Standard operating system. 007 11/2012 Added support for the CV61 computer. 004 10/2011 Corrected information on Document Imaging focus modes. 003 7/2011 Added Magstripe Reader application. 002 2/2011 Revised manual to this document. Added support...
... Number Date Description of Change 009 11/2013 Features Demo 2.08 added support for the CN51 mobile computers. 008 4/2013 Features Demo 2.07 added support for the CV41 Windows Embedded Standard operating system. 007 11/2012 Added support for the CV61 computer. 004 10/2011 Corrected information on Document Imaging focus modes. 003 7/2011 Added Magstripe Reader application. 002 2/2011 Revised manual to this document. Added support...
Intermec Features Demo User Guide
Page 12
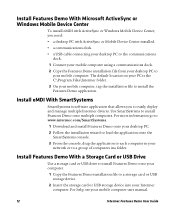
.... 2 Insert the storage card or USB storage device into your mobile computer. Install Features Demo With Microsoft ActiveSync or Windows Mobile Device Center To install eMDI with ActiveSync or Mobile Device Center installed. • a communications dock. • a USB cable connecting your desktop PC to the communications dock. 1 Connect your mobile computer using a communications dock. 2 Copy the Features Demo installation file from your desktop PC to your Intermec computer. Install eMDI With SmartSystems SmartSystems is the C:\Program Files\Intermec folder. 3 On your network or to...
.... 2 Insert the storage card or USB storage device into your mobile computer. Install Features Demo With Microsoft ActiveSync or Windows Mobile Device Center To install eMDI with ActiveSync or Mobile Device Center installed. • a communications dock. • a USB cable connecting your desktop PC to the communications dock. 1 Connect your mobile computer using a communications dock. 2 Copy the Features Demo installation file from your desktop PC to your Intermec computer. Install eMDI With SmartSystems SmartSystems is the C:\Program Files\Intermec folder. 3 On your network or to...

Intermec Features Demo User Guide
Page 15
... code symbologies. 5 To return to the bar code scanner display screen, tap Options > Discard Changes and Exit or Save Changes and Exit. 6 To return to edit. You can change the symbology settings to scan types of the most commonly supported bar code types. Intermec Features Demo User Guide 15 For the CV61, tap the 1D or 2D button (or the Postal button if your computer supports those symbologies by default) to select the bar code...
... code symbologies. 5 To return to the bar code scanner display screen, tap Options > Discard Changes and Exit or Save Changes and Exit. 6 To return to edit. You can change the symbology settings to scan types of the most commonly supported bar code types. Intermec Features Demo User Guide 15 For the CV61, tap the 1D or 2D button (or the Postal button if your computer supports those symbologies by default) to select the bar code...
Intermec Terminal Emulator (ITE) User Guide
Page 18
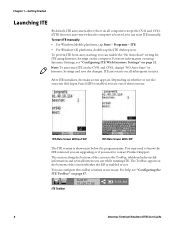
... CV61, change "NO Auto-Start" in Intermec Settings and save the changes. Note: To auto-start ITE on all computers except the CV41 and CV61. After ITE initializes, the main screen appears. Getting Started Launching ITE By default, ITE auto-starts after reboot on all subsequent restarts. To start ITE manually. You may need to contact Product Support. You can enable the "No Auto-Start" setting for ITE using Intermec Settings, see "Configuring ITE With Intermec Settings...
... CV61, change "NO Auto-Start" in Intermec Settings and save the changes. Note: To auto-start ITE on all computers except the CV41 and CV61. After ITE initializes, the main screen appears. Getting Started Launching ITE By default, ITE auto-starts after reboot on all subsequent restarts. To start ITE manually. You may need to contact Product Support. You can enable the "No Auto-Start" setting for ITE using Intermec Settings, see "Configuring ITE With Intermec Settings...
Intermec Terminal Emulator (ITE) User Guide
Page 43
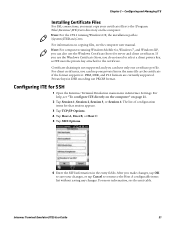
... the SSH information in Intermec Settings. Configuring and Managing ITE Installing Certificate Files For SSL connections, you make changes, tap OK to save your certificate files to the Host A configurable items list without saving any changes. Note: For the CV41 running Windows Mobile 6.x, Windows 7, and Windows XP, you do not need to select a client private key, as the certificate if the format supports it. After you must copy your changes, or tap Cancel...
... the SSH information in Intermec Settings. Configuring and Managing ITE Installing Certificate Files For SSL connections, you make changes, tap OK to save your certificate files to the Host A configurable items list without saving any changes. Note: For the CV41 running Windows Mobile 6.x, Windows 7, and Windows XP, you do not need to select a client private key, as the certificate if the format supports it. After you must copy your changes, or tap Cancel...
Intermec Terminal Emulator (ITE) User Guide
Page 57
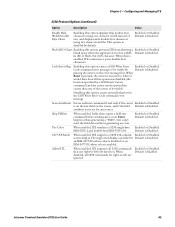
... 2 - Lock Error Msg Enabling this option prevents ITE from showing a Enabled or Disabled. attribute is Disabled. When disabled, all 5250 commands that use right-to be visible. Intermec Terminal Emulator (ITE) User Guide 45 Configuring and Managing ITE 5250 Protocol Options (continued) Option Description Value Enable HalfWidth Double Byte Chars Enabling this option was disabled (the location specified by default. Enabled or Disabled. blank space when the application receives a Shift- Scan...
... 2 - Lock Error Msg Enabling this option prevents ITE from showing a Enabled or Disabled. attribute is Disabled. When disabled, all 5250 commands that use right-to be visible. Intermec Terminal Emulator (ITE) User Guide 45 Configuring and Managing ITE 5250 Protocol Options (continued) Option Description Value Enable HalfWidth Double Byte Chars Enabling this option was disabled (the location specified by default. Enabled or Disabled. blank space when the application receives a Shift- Scan...
Intermec Terminal Emulator (ITE) User Guide
Page 85
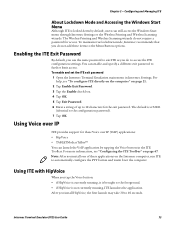
... password 1 Open the Intermec Terminal Emulation main menu in the ITE Toolbar. Using ITE with HipVoice When you do to automatically configure the PTT button and warm boot the computer. The Wireless Printing and Wireless Scanning wizards do not require a password for the exit password. For help, see "Configuring the ITE Toolbar" on page 67. Using Voice over IP ITE provides support for these applications on page 21. 2 Tap Enable Exit Password. 3 Tap...
... password 1 Open the Intermec Terminal Emulation main menu in the ITE Toolbar. Using ITE with HipVoice When you do to automatically configure the PTT button and warm boot the computer. The Wireless Printing and Wireless Scanning wizards do not require a password for the exit password. For help, see "Configuring the ITE Toolbar" on page 67. Using Voice over IP ITE provides support for these applications on page 21. 2 Tap Enable Exit Password. 3 Tap...
Intermec Terminal Emulator (ITE) User Guide
Page 86
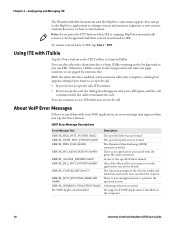
... specified file is installed on the computer. 74 Intermec Terminal Emulator (ITE) User Guide With the silent interface enabled, when someone or are in the ITE Toolbar to ITE, tap Start > ITE. The Dynamic Data Exchange (DDE) transaction failed. Access to accept the call. • If you do not accept the call . A sharing violation occurred. Configuring and Managing ITE The Windows Mobile Start menu and...
... specified file is installed on the computer. 74 Intermec Terminal Emulator (ITE) User Guide With the silent interface enabled, when someone or are in the ITE Toolbar to ITE, tap Start > ITE. The Dynamic Data Exchange (DDE) transaction failed. Access to accept the call. • If you do not accept the call . A sharing violation occurred. Configuring and Managing ITE The Windows Mobile Start menu and...
Intermec Terminal Emulator (ITE) User Guide
Page 115
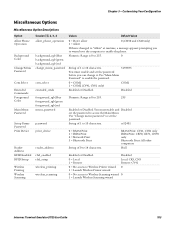
... = No access to set the password. Use "Main Menu Password" to enable the phone. Chapter 3 - Customizing Your Configuration Miscellaneous Options Miscellaneous Option Descriptions Option Allow Phone Operation Background Color Change Menu Password Com Select Extended Commands Foreground Color Main Menu Password Setup Parms Password Print Device Reader Address RFID Enabled RFID Setup Wireless Printing Wireless Scanning Session [1], 2, 3, 4 allow_phone_operation background_rgb|blue background_rgb|green background_rgb|red change_menu_password com_select extended_cmds foreground_rgb...
... = No access to set the password. Use "Main Menu Password" to enable the phone. Chapter 3 - Customizing Your Configuration Miscellaneous Options Miscellaneous Option Descriptions Option Allow Phone Operation Background Color Change Menu Password Com Select Extended Commands Foreground Color Main Menu Password Setup Parms Password Print Device Reader Address RFID Enabled RFID Setup Wireless Printing Wireless Scanning Session [1], 2, 3, 4 allow_phone_operation background_rgb|blue background_rgb|green background_rgb|red change_menu_password com_select extended_cmds foreground_rgb...

Intermec Terminal Emulator (ITE) User Guide
Page 118
... Numeric. IP address of the work area (in pixels). Customizing Your Configuration Non-Session Specific Parameter Descriptions (continued) Parameters SIP Height SIP Width Trusted app Session [1], 2, 3, 4 sip_height sip_width trusted_app Values Default Value Numeric. UDP Plus Parameters Note: These settings are supported only by other computers. wd_send_timeout Numeric. Camera and Imager Parameter Descriptions Option Image Folder Host IP or...
... Numeric. IP address of the work area (in pixels). Customizing Your Configuration Non-Session Specific Parameter Descriptions (continued) Parameters SIP Height SIP Width Trusted app Session [1], 2, 3, 4 sip_height sip_width trusted_app Values Default Value Numeric. UDP Plus Parameters Note: These settings are supported only by other computers. wd_send_timeout Numeric. Camera and Imager Parameter Descriptions Option Image Folder Host IP or...

Intermec Terminal Emulator (ITE) Programmer's Reference Manual
Page 81
... each scan). Scanner Lock Mode Mode Sequence* Action Set CSI = 4 h The host sends this mode, only one scan is cold-started. Intermec Terminal Emulator (ITE) Programmer's Reference Manual 69 About VT/ANSI Programming Private Sequences Private sequences enable or disable autosend. Only transmits when a terminating key is pressed. * The last character of the Line Edit sequence is then inhibited. After this command is similar to the data stream...
... each scan). Scanner Lock Mode Mode Sequence* Action Set CSI = 4 h The host sends this mode, only one scan is cold-started. Intermec Terminal Emulator (ITE) Programmer's Reference Manual 69 About VT/ANSI Programming Private Sequences Private sequences enable or disable autosend. Only transmits when a terminating key is pressed. * The last character of the Line Edit sequence is then inhibited. After this command is similar to the data stream...

Intermec Terminal Emulator (ITE) Programmer's Reference Manual
Page 120
... Disable Scanner X No Change From Current Setting X CC Byte 2 implementation differs among the computers. Options Supported by Characters - The tables below and on the next page show CC Byte 2 options. Auto Tab Scan (not for scanning....Scan (not for 5250). Chapter 3 - Line 1, Column 5 CC Byte 2 0 1 2 3 Scan Termination Character None Modulo 10 Check Digit X X 108 Intermec Terminal Emulator (ITE) Programmer's Reference Manual Options Supported by Characters CC Byte 2 0-3 4-7 8-F b Scan Termination Character None. No change from current setting. Options Supported...
... Disable Scanner X No Change From Current Setting X CC Byte 2 implementation differs among the computers. Options Supported by Characters - The tables below and on the next page show CC Byte 2 options. Auto Tab Scan (not for scanning....Scan (not for 5250). Chapter 3 - Line 1, Column 5 CC Byte 2 0 1 2 3 Scan Termination Character None Modulo 10 Check Digit X X 108 Intermec Terminal Emulator (ITE) Programmer's Reference Manual Options Supported by Characters CC Byte 2 0-3 4-7 8-F b Scan Termination Character None. No change from current setting. Options Supported...
Intermec Terminal Emulator (ITE) Programmer's Reference Manual
Page 138
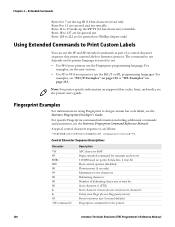
... error flags (do not flag parity errors) Receive timeout (use the ESC/P or IPL programming languages. Extended Commands Bytes 0 to 7 are the tag ID (16 hex characters) read only Bytes 8 to design custom bar code labels, see the printer user's guide. Fingerprint Examples For information on supported bar codes, fonts, and media, see the Intermec Fingerprint Developer's Guide. A typical control character sequence is as part...
... error flags (do not flag parity errors) Receive timeout (use the ESC/P or IPL programming languages. Extended Commands Bytes 0 to 7 are the tag ID (16 hex characters) read only Bytes 8 to design custom bar code labels, see the printer user's guide. Fingerprint Examples For information on supported bar codes, fonts, and media, see the Intermec Fingerprint Developer's Guide. A typical control character sequence is as part...

Intermec Terminal Emulator (ITE) Programmer's Reference Manual
Page 180
... multinational character set, 42 multiple area transfer mode, 80 N national replacement character sets, 49 NEL, 54 norcompress, 69 norrc command, 69 P parameter errors, for 5250 emulation, 39 Plessey, 111 prefixes, ansychronous, 39 printing, VT/ANSI, 60 private sequences, VT/ANSI, 69 product support, contacting, xi Program Tab, 9 proprietary sequences, VT/ANSI, 69 character mode, 69 line edit mode, 69 norrc command, 69 scanner lock mode, 69...
... multinational character set, 42 multiple area transfer mode, 80 N national replacement character sets, 49 NEL, 54 norcompress, 69 norrc command, 69 P parameter errors, for 5250 emulation, 39 Plessey, 111 prefixes, ansychronous, 39 printing, VT/ANSI, 60 private sequences, VT/ANSI, 69 product support, contacting, xi Program Tab, 9 proprietary sequences, VT/ANSI, 69 character mode, 69 line edit mode, 69 norrc command, 69 scanner lock mode, 69...

CV61 Vehicle Mount Computer (Windows 7) User Guide
Page 9
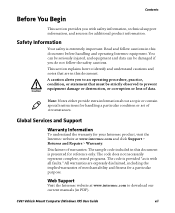
... data. The code does not necessarily represent complete, tested programs. The code is provided "as is extremely important. Read and follow the safety cautions. Web Support Visit the Intermec website at www.intermec.com and click Support > Returns and Repairs > Warranty. Note: Notes either provide extra information about a topic or contain special instructions for your Intermec product, visit the Intermec website at www.intermec.com to an operating...
... data. The code does not necessarily represent complete, tested programs. The code is provided "as is extremely important. Read and follow the safety cautions. Web Support Visit the Intermec website at www.intermec.com and click Support > Returns and Repairs > Warranty. Note: Notes either provide extra information about a topic or contain special instructions for your Intermec product, visit the Intermec website at www.intermec.com to an operating...
CV61 Vehicle Mount Computer (Windows 7) User Guide
Page 66
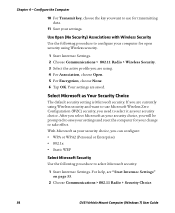
... Encryption, choose None. 6 Tap OK. For help, see "Start Intermec Settings" on page 33. 2 Choose Communications > 802.11 Radio > Security Choice. 54 CV61 Vehicle Mount Computer (Windows 7) User Guide Select Microsoft as your security choice. Use Open (No Security) Associations with Wireless Security Use the following procedure to take effect. Your settings are using Wireless security. 1 Start Intermec Settings. 2 Choose Communications > 802.11 Radio > Wireless Security. 3 Select the active profile you can configure: • WPA or WPA2 (Personal or Enterprise) • 802.1x...
... Encryption, choose None. 6 Tap OK. For help, see "Start Intermec Settings" on page 33. 2 Choose Communications > 802.11 Radio > Security Choice. 54 CV61 Vehicle Mount Computer (Windows 7) User Guide Select Microsoft as your security choice. Use Open (No Security) Associations with Wireless Security Use the following procedure to take effect. Your settings are using Wireless security. 1 Start Intermec Settings. 2 Choose Communications > 802.11 Radio > Wireless Security. 3 Select the active profile you can configure: • WPA or WPA2 (Personal or Enterprise) • 802.1x...

CV61 Vehicle Mount Computer (Windows 7) User Guide
Page 78
... device attached to the Set the Scanner Model command to touch the window. or obscured. Clean the window with Connecting Scanners or Reading Bar Codes (Continued) Problem Solution The scanner does not read bar code labels very quickly. port" error message appears. the symbologies being used. 66 CV61 Vehicle Mount Computer (Windows 7) User Guide symbology other application is Settings match those settings programmed in the scan enabled as an ASCII scanner. Reset the scanner to The scanner may be in the bar code...
... device attached to the Set the Scanner Model command to touch the window. or obscured. Clean the window with Connecting Scanners or Reading Bar Codes (Continued) Problem Solution The scanner does not read bar code labels very quickly. port" error message appears. the symbologies being used. 66 CV61 Vehicle Mount Computer (Windows 7) User Guide symbology other application is Settings match those settings programmed in the scan enabled as an ASCII scanner. Reset the scanner to The scanner may be in the bar code...
CV61 Vehicle Mount Computer (Windows XP) User Guide
Page 7
... in this document. The code does not necessarily represent complete, tested programs. The code is provided "as is extremely important. Web Support Visit the Intermec website at www.intermec.com and click Support > Returns and Repairs > Warranty. CV61 Vehicle Mount Computer (Windows XP) User Guide vii You can be seriously injured, and equipment and data can be strictly observed to an operating procedure, practice, condition...
... in this document. The code does not necessarily represent complete, tested programs. The code is provided "as is extremely important. Web Support Visit the Intermec website at www.intermec.com and click Support > Returns and Repairs > Warranty. CV61 Vehicle Mount Computer (Windows XP) User Guide vii You can be seriously injured, and equipment and data can be strictly observed to an operating procedure, practice, condition...

CV61 Vehicle Mount Computer (Windows XP) User Guide
Page 64
...reset the computer for open security using . 4 For Association, choose Open. 5 For Encryption, choose None. 6 Tap OK. Use Open (No Security) Associations with Wireless Security Use the following procedure to configure your computer for your security choice. With Microsoft as your change to select Microsoft security. 1 Start Intermec Settings. For help, see "Start Intermec Settings" on page 33. 2 Choose Communications > 802.11 Radio > Security Choice. 54 CV61 Vehicle Mount Computer (Windows XP) User Guide Your settings are using Wireless security. 1 Start Intermec Settings...
...reset the computer for open security using . 4 For Association, choose Open. 5 For Encryption, choose None. 6 Tap OK. Use Open (No Security) Associations with Wireless Security Use the following procedure to configure your computer for your security choice. With Microsoft as your change to select Microsoft security. 1 Start Intermec Settings. For help, see "Start Intermec Settings" on page 33. 2 Choose Communications > 802.11 Radio > Security Choice. 54 CV61 Vehicle Mount Computer (Windows XP) User Guide Your settings are using Wireless security. 1 Start Intermec Settings...

CV61 Vehicle Mount Computer (Windows XP) User Guide
Page 76
... the Set the Scanner Model command to the specific attached input computer does not work , try to restart the computer to see if the COM port application may be using the COM checked in the scan enabled as an ASCII scanner. Reset the scanner to touch the window. Wipe dry. Clean the window with Connecting Scanners or Reading Bar Codes (Continued) Problem Solution The scanner does not read bar code labels very quickly. If...
... the Set the Scanner Model command to the specific attached input computer does not work , try to restart the computer to see if the COM port application may be using the COM checked in the scan enabled as an ASCII scanner. Reset the scanner to touch the window. Wipe dry. Clean the window with Connecting Scanners or Reading Bar Codes (Continued) Problem Solution The scanner does not read bar code labels very quickly. If...


