
User Manual
Page 2
... storing the machine. WARNING • Do not operate machine without the entire grass catcher, discharge guard, or other debris build-up , transporting, adjusting or making repairs, always disconnect spark plug wire and place wire where it . Allow machine to prevent accidental starting , stopping, or turning on it, do not mow it cannot contact spark plug. Engine exhaust, some of its constituents, and certain vehicle components...
... storing the machine. WARNING • Do not operate machine without the entire grass catcher, discharge guard, or other debris build-up , transporting, adjusting or making repairs, always disconnect spark plug wire and place wire where it . Allow machine to prevent accidental starting , stopping, or turning on it, do not mow it cannot contact spark plug. Engine exhaust, some of its constituents, and certain vehicle components...

User Manual
Page 3
... device. • If fuel is in handling gasoline. Check their proper operation regularly. • Keep machine free of the fuel tank or container opening at the hitch point. • Follow the manufacturer's recommendation for weight limits for Ride-On Mowers III. Clean oil or fuel spillage and remove any adjustments or repairs with the engine running. • Check grass catcher components and the discharge guard frequently and replace with safety devices.
... device. • If fuel is in handling gasoline. Check their proper operation regularly. • Keep machine free of the fuel tank or container opening at the hitch point. • Follow the manufacturer's recommendation for weight limits for Ride-On Mowers III. Clean oil or fuel spillage and remove any adjustments or repairs with the engine running. • Check grass catcher components and the discharge guard frequently and replace with safety devices.
User Manual
Page 4
... 15 MAINTENANCE 15-18 SERVICE AND ADJUSTMENTS 19-23 STORAGE 24 TROUBLESHOOTING 25-26 WARRANTY 27 4 The instructions will enable you to service or repair this manual. age" sections of a new tractor. PRODUCT SPECIFICATIONS Gasoline Capacity and Type: Oil Type (API-SG-SL): Oil Capacity: Spark Plug: (Gap: .030") Ground Speed (MPH): Tire Pressure: Charging System: Battery: Blade Torque: 1.25 Gallons Unleaded Regular SAE 30 (above 32°F) SAE 5W-30 (below 32°F) 3.0 Pints Champion...
... 15 MAINTENANCE 15-18 SERVICE AND ADJUSTMENTS 19-23 STORAGE 24 TROUBLESHOOTING 25-26 WARRANTY 27 4 The instructions will enable you to service or repair this manual. age" sections of a new tractor. PRODUCT SPECIFICATIONS Gasoline Capacity and Type: Oil Type (API-SG-SL): Oil Capacity: Spark Plug: (Gap: .030") Ground Speed (MPH): Tire Pressure: Charging System: Battery: Blade Torque: 1.25 Gallons Unleaded Regular SAE 30 (above 32°F) SAE 5W-30 (below 32°F) 3.0 Pints Champion...

User Manual
Page 6
... clutch/brake pedal all parts and hardware you to engage shoulder bolt in this manual, it means when you are listed. TO REMOVE TRACTOR FROM CARTON UNPACK CARTON • Remove all accessible loose parts and parts cartons from steering wheel and slide adapter onto steering shaft extension. • Position steering wheel so cross bars are pointing straight forward. • Remove steering wheel adapter from carton. • Cut along dotted lines...
... clutch/brake pedal all parts and hardware you to engage shoulder bolt in this manual, it means when you are listed. TO REMOVE TRACTOR FROM CARTON UNPACK CARTON • Remove all accessible loose parts and parts cartons from steering wheel and slide adapter onto steering shaft extension. • Position steering wheel so cross bars are pointing straight forward. • Remove steering wheel adapter from carton. • Cut along dotted lines...

User Manual
Page 7
... position. • Release parking brake by depressing clutch/brake pedal. • Place gearshift lever in MAINTENANCE section of controls) WARNING: Before starting, read, understand and follow all the above assembly steps have been completed. • Check engine oil level and fill fuel tank with the instructions that follow. Continue with gasoline. • Sit on label (label located between terminals) charge battery for location and function of this manual. TO DRIVE TRACTOR...
... position. • Release parking brake by depressing clutch/brake pedal. • Place gearshift lever in MAINTENANCE section of controls) WARNING: Before starting, read, understand and follow all the above assembly steps have been completed. • Check engine oil level and fill fuel tank with the instructions that follow. Continue with gasoline. • Sit on label (label located between terminals) charge battery for location and function of this manual. TO DRIVE TRACTOR...

User Manual
Page 8
Correct tire pressure is important for leveling). ✓ Check mower and drive belts. See that all connections are still secure and wires are routed properly around pulleys and inside all controls, their location and function. See"TO LEVEL MOWER HOUSING"in "PRODUCT SPECIFICATIONS" section of this manual. See "TO ADJUST BRAKE" in this manual. WHILE LEARNING HOW TO USE YOUR TRACTOR, PAY EXTRA ATTENTION TO THE FOLLOWING IMPORTANT ITEMS: ✓ Engine oil is...
Correct tire pressure is important for leveling). ✓ Check mower and drive belts. See that all connections are still secure and wires are routed properly around pulleys and inside all controls, their location and function. See"TO LEVEL MOWER HOUSING"in "PRODUCT SPECIFICATIONS" section of this manual. See "TO ADJUST BRAKE" in this manual. WHILE LEARNING HOW TO USE YOUR TRACTOR, PAY EXTRA ATTENTION TO THE FOLLOWING IMPORTANT ITEMS: ✓ Engine oil is...

User Manual
Page 11
... stop mower blades,move attachment clutch lever to "DISENGAGED" position. TO USE THROTTLE CONTROL (See Fig. 5) Always operate engine at full throttle. • Operating engine at less than full throttle reduces the battery charging rate. • Full throttle offers the best bagging and mower perfor- FAILURE TO DO SO WILL SHORTEN THE USEFUL LIFE OF YOUR TRANSAXLE. THROTTLE/ CHOKE CONTROL LEVER "BRAKE" POSITION IGNITION KEY "DISENGAGED" POSITION PARKING BRAKE "ENGAGED" POSITION CLUTCH/BRAKE PEDAL "DRIVE" POSITION PARKING BRAKE "DISENGAGED" POSITION GEAR SHIFT LEVER TO MOVE...
... stop mower blades,move attachment clutch lever to "DISENGAGED" position. TO USE THROTTLE CONTROL (See Fig. 5) Always operate engine at full throttle. • Operating engine at less than full throttle reduces the battery charging rate. • Full throttle offers the best bagging and mower perfor- FAILURE TO DO SO WILL SHORTEN THE USEFUL LIFE OF YOUR TRANSAXLE. THROTTLE/ CHOKE CONTROL LEVER "BRAKE" POSITION IGNITION KEY "DISENGAGED" POSITION PARKING BRAKE "ENGAGED" POSITION CLUTCH/BRAKE PEDAL "DRIVE" POSITION PARKING BRAKE "DISENGAGED" POSITION GEAR SHIFT LEVER TO MOVE...

User Manual
Page 13
... choke ( ) position and retry. See "TO ADJUST CARBURETOR" in the Service and Adjustments section of 30 days or longer. Do not store, spill or use engine or carburetor cleaner products in the fuel tank or permanent damage may require an engine warm-up period from several seconds to several attempts, move the throttle control back to be emptied before storage of this manual. OPERATION BEFORE STARTING THE ENGINE CHECK ENGINE OIL LEVEL...
... choke ( ) position and retry. See "TO ADJUST CARBURETOR" in the Service and Adjustments section of 30 days or longer. Do not store, spill or use engine or carburetor cleaner products in the fuel tank or permanent damage may require an engine warm-up period from several seconds to several attempts, move the throttle control back to be emptied before storage of this manual. OPERATION BEFORE STARTING THE ENGINE CHECK ENGINE OIL LEVEL...

User Manual
Page 15
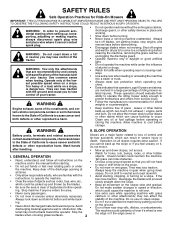
... the spark plug, clean or replace air filter, and check blades and belts for Loose Fasteners A Sharpen/Replace Mower Blades C T Lubrication Chart 0 Check Battery Level R Clean Battery and Terminals Check Transaxle Cooling Check V-Belts BEFOREEEVAECRHYU8ESVHEEORUYRS2E5VHEROYUR5E0SVEHROYUR1E0SV0EHROYUBSREESFAOSROENSSTEORRAVGEICE DATES 5 3 4 Check Engine Oil Level Change Engine Oil (with maintenance-free battery. 5 - eENGINE cGEARSHIFT PIVOTS BEFORE EACH USE • Check engine oil level. • Check brake operation. • Check tire pressure. • Check operator...
... the spark plug, clean or replace air filter, and check blades and belts for Loose Fasteners A Sharpen/Replace Mower Blades C T Lubrication Chart 0 Check Battery Level R Clean Battery and Terminals Check Transaxle Cooling Check V-Belts BEFOREEEVAECRHYU8ESVHEEORUYRS2E5VHEROYUR5E0SVEHROYUR1E0SV0EHROYUBSREESFAOSROENSSTEORRAVGEICE DATES 5 3 4 Check Engine Oil Level Change Engine Oil (with maintenance-free battery. 5 - eENGINE cGEARSHIFT PIVOTS BEFORE EACH USE • Check engine oil level. • Check brake operation. • Check tire pressure. • Check operator...
User Manual
Page 16
... the engine is running with the ignition switch in the engine "ON" position and the attachment clutch engaged, any maintenance. CAUTION: Use only a replacement blade approved by the operator to mower and engine. • The blade can harm rubber. • Avoid stumps, stones, deep ruts, sharp objects and other hazards that may cause tire damage. BLADE REMOVAL (See Fig. 8) • Raise mower to highest position to allow access to blades. • Remove blade bolt, lock...
... the engine is running with the ignition switch in the engine "ON" position and the attachment clutch engaged, any maintenance. CAUTION: Use only a replacement blade approved by the operator to mower and engine. • The blade can harm rubber. • Avoid stumps, stones, deep ruts, sharp objects and other hazards that may cause tire damage. BLADE REMOVAL (See Fig. 8) • Raise mower to highest position to allow access to blades. • Remove blade bolt, lock...
User Manual
Page 17
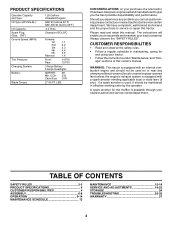
... drain more frequently to enter the engine when changing oil. • Remove yellow cap from tractor. • Rinse the battery with plain water and dry. • Clean terminals and battery cable ends with wire brush until the pin is in the Service and Adjustment section of dirt and chaff which is tightened securely for deterioration and wear after each time you check the oil level. CENTER HOLE 5/8" BOLT OR PIN BLADE FIG. 9 BATTERY Your tractor...
... drain more frequently to enter the engine when changing oil. • Remove yellow cap from tractor. • Rinse the battery with plain water and dry. • Clean terminals and battery cable ends with wire brush until the pin is in the Service and Adjustment section of dirt and chaff which is tightened securely for deterioration and wear after each time you check the oil level. CENTER HOLE 5/8" BOLT OR PIN BLADE FIG. 9 BATTERY Your tractor...
User Manual
Page 18
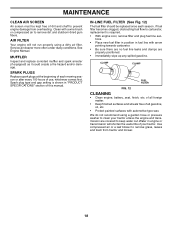
... no fuel line leaks and clamps are covered to carburetor, replacement is shown in "PRODUCT SPECIFICATIONS" section of this manual. AIR FILTER Your engine will shorten the useful life of dirt and chaff to clean your tractor. SPARK PLUGS Replace spark plugs at the beginning of each season. of all gasoline, oil, etc. • Protect painted surfaces with a wire brush or compressed air to remove grass, leaves and trash from overheating. MAINTENANCE CLEAN AIR SCREEN Air screen must be replaced once...
... no fuel line leaks and clamps are covered to carburetor, replacement is shown in "PRODUCT SPECIFICATIONS" section of this manual. AIR FILTER Your engine will shorten the useful life of dirt and chaff to clean your tractor. SPARK PLUGS Replace spark plugs at the beginning of each season. of all gasoline, oil, etc. • Protect painted surfaces with a wire brush or compressed air to remove grass, leaves and trash from overheating. MAINTENANCE CLEAN AIR SCREEN Air screen must be replaced once...
User Manual
Page 19
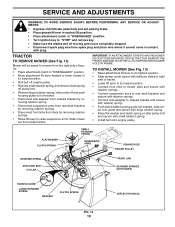
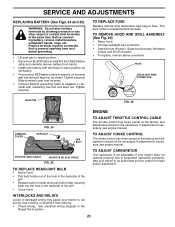
... from deck by removing retainer springs. • Raise lift lever to raise suspension arms. Slide mower out from spark plug and place wire where it cannot come in "DISENGAGED" position. • Turn ignition key to chassis bracket and secure with retainer spring. • Push clutch cable housing guide into bracket, slide collar onto guide and secure with large retainer spring. • Place flat washer and clutch spring on idler pulley bolt...
... from deck by removing retainer springs. • Raise lift lever to raise suspension arms. Slide mower out from spark plug and place wire where it cannot come in "DISENGAGED" position. • Turn ignition key to chassis bracket and secure with retainer spring. • Push clutch cable housing guide into bracket, slide collar onto guide and secure with large retainer spring. • Place flat washer and clutch spring on idler pulley bolt...
User Manual
Page 20
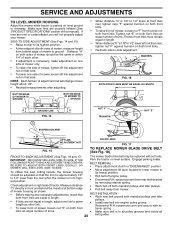
...) The mower blade drive belt may be adjusted so that both front links. BELT INSTALLATION • Work new belt around both mandrel pulleys and idler pulleys. IF THE Park the tractor on both front links an equal number of tractor. should be the same or within 1/4" of each other link. • Pull belt away from bottom edge of mower, loosen lift link adjustment nut on both front tainer spring. Check adjustment on...
...) The mower blade drive belt may be adjusted so that both front links. BELT INSTALLATION • Work new belt around both mandrel pulleys and idler pulleys. IF THE Park the tractor on both front links an equal number of tractor. should be the same or within 1/4" of each other link. • Pull belt away from bottom edge of mower, loosen lift link adjustment nut on both front tainer spring. Check adjustment on...
User Manual
Page 21
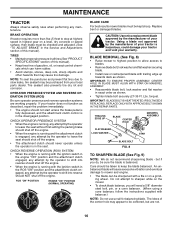
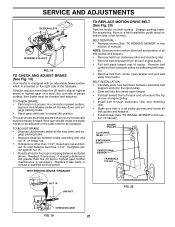
... BRAKE "ENGAGED" 1-1/2" NUT "A" JAM NUT TO REPLACE MOTION DRIVE BELT (See Fig. 20) Park the tractor on a level, dry concrete or paved surface, then brake must lock and skid when you try to be checked and adjusted. BELT INSTALLATION • Carefully work new belt down between brake operating arm and nut "A" on bottom side of manual). Remove belt upwards from transaxle pulley by deflecting belt keepers. • Remove belt from center span keeper and pull belt...
... BRAKE "ENGAGED" 1-1/2" NUT "A" JAM NUT TO REPLACE MOTION DRIVE BELT (See Fig. 20) Park the tractor on a level, dry concrete or paved surface, then brake must lock and skid when you try to be checked and adjusted. BELT INSTALLATION • Carefully work new belt down between brake operating arm and nut "A" on bottom side of manual). Remove belt upwards from transaxle pulley by deflecting belt keepers. • Remove belt from center span keeper and pull belt...
User Manual
Page 23
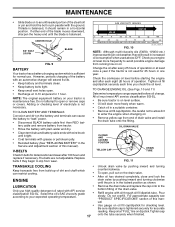
.... TERMINAL COVER KEPS NUT HEX BOLT TO ADJUST CHOKE CONTROL The choke control has been preset at the same time. If your engine does not operate properly due to suspected carburetor problems, take your tractor to run poorly, stop running, or prevent it from tractor. • Install new battery with terminals in same position as old battery. • First connect RED battery cable to negative (-) terminal with 20 amp automotive-type plug-in the Repair Parts section. 23...
.... TERMINAL COVER KEPS NUT HEX BOLT TO ADJUST CHOKE CONTROL The choke control has been preset at the same time. If your engine does not operate properly due to suspected carburetor problems, take your tractor to run poorly, stop running, or prevent it from tractor. • Install new battery with terminals in same position as old battery. • First connect RED battery cable to negative (-) terminal with 20 amp automotive-type plug-in the Repair Parts section. 23...
User Manual
Page 24
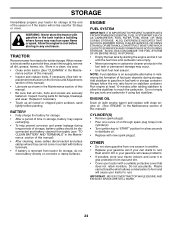
... not use engine or carburetor cleaner products in the Maintenance section of time, clean it run until the fuel lines and carburetor are securely fastened. Plastic cannot breathe which allows condensation to form and will not be stored for a period of this manual). • Inspect and replace belts, if necessary (See belt re- TRACTOR Remove mower from dust and dirt. • Cover your tractor with clean engine oil. (See "ENGINE" in the Maintenance section...
... not use engine or carburetor cleaner products in the Maintenance section of time, clean it run until the fuel lines and carburetor are securely fastened. Plastic cannot breathe which allows condensation to form and will not be stored for a period of this manual). • Inspect and replace belts, if necessary (See belt re- TRACTOR Remove mower from dust and dirt. • Cover your tractor with clean engine oil. (See "ENGINE" in the Maintenance section...

User Manual
Page 25
...position. 3. Raise cutting height/reduce speed. 2. Clean underside of adjustment. 8. Replace fuel filter. 8. Replace blade mandrel. 3. Bad spark plug. 5. Water in Operation section. 3. Loose or damaged wiring. 9. See "TO START ENGINE" in fuel. 8. Replace spark plug. 5. Check all wiring. 7. Weak or dead battery. 4. Carburetor out of mower housing. 4. Recharge or replace battery. 4. Check all wiring. 9. Faulty solenoid or starter. 9. Recharge or replace battery. 4. Check/replace ignition switch. 8. Low oil level/dirty oil. 6. Dirty fuel...
...position. 3. Raise cutting height/reduce speed. 2. Clean underside of adjustment. 8. Replace fuel filter. 8. Replace blade mandrel. 3. Bad spark plug. 5. Water in Operation section. 3. Loose or damaged wiring. 9. See "TO START ENGINE" in fuel. 8. Replace spark plug. 5. Check all wiring. 7. Weak or dead battery. 4. Carburetor out of mower housing. 4. Recharge or replace battery. 4. Check all wiring. 9. Faulty solenoid or starter. 9. Recharge or replace battery. 4. Check/replace ignition switch. 8. Low oil level/dirty oil. 6. Dirty fuel...

User Manual
Page 26
... attachment is "OFF". 2. Faulty operator-safety presence control system. Check wiring, switches and connections. Mower deck not level. 3. Replace mower drive belt. 3. Blades improperly installed. 10. Check tires for proper air pressure. 6. Loose or damaged wiring. 5. Check/replace light switch. 4. Clean underside of grass, leaves, and trash around mandrels to ROS "ON" position. Worn/damaged mower drive belt. 3. Frozen idler pulley. 4. Replace idler pulley. 4. Replace/sharpen blade. Faulty light switch. 4. Poor cable connections. 3. Engine throttle control...
... attachment is "OFF". 2. Faulty operator-safety presence control system. Check wiring, switches and connections. Mower deck not level. 3. Replace mower drive belt. 3. Blades improperly installed. 10. Check tires for proper air pressure. 6. Loose or damaged wiring. 5. Check/replace light switch. 4. Clean underside of grass, leaves, and trash around mandrels to ROS "ON" position. Worn/damaged mower drive belt. 3. Frozen idler pulley. 4. Replace idler pulley. 4. Replace/sharpen blade. Faulty light switch. 4. Poor cable connections. 3. Engine throttle control...
User Manual
Page 27
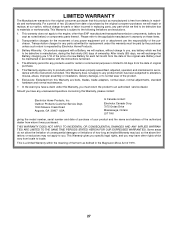
... power equipment unit or attachment are belts, blades, blade adapters, normal wear, normal adjustments, standard hardware and normal maintenance. 7. Battery Warranty: On products equipped with a Battery,...assembly or installation, delivery damage, or to the following limitations and exclusions. 1. Battery must be maintained in accordance with the instructions furnished. Outdoor Products Customer Service Dept. 1030 Stevens Creek Road Augusta, GA 30907 USA In Canada contact: Electrolux Canada Corp. 7075 Ordan Drive Mississauga, Ontario L5T 1K6 giving the model number, serial number...
... power equipment unit or attachment are belts, blades, blade adapters, normal wear, normal adjustments, standard hardware and normal maintenance. 7. Battery Warranty: On products equipped with a Battery,...assembly or installation, delivery damage, or to the following limitations and exclusions. 1. Battery must be maintained in accordance with the instructions furnished. Outdoor Products Customer Service Dept. 1030 Stevens Creek Road Augusta, GA 30907 USA In Canada contact: Electrolux Canada Corp. 7075 Ordan Drive Mississauga, Ontario L5T 1K6 giving the model number, serial number...


