
User Manual
Page 2
... your foot • Never direct discharged material toward the operator. These operators should evaluate their ability to operate the riding mower safely enough to operate the machine. Engine exhaust, some of its constituents, and certain vehicle components contain or emit chemicals ...operating machine with the instructions, to protect themselves and others from serious injury. • Follow the manufacturer's recommendation for Ride-On Mowers IMPORTANT: THIS CUTTING MACHINE IS CAPABLE OF AMPUTATING HANDS AND FEET AND THROWING OBJECTS. Clean any oil or fuel spillage before starting....
... your foot • Never direct discharged material toward the operator. These operators should evaluate their ability to operate the riding mower safely enough to operate the machine. Engine exhaust, some of its constituents, and certain vehicle components contain or emit chemicals ...operating machine with the instructions, to protect themselves and others from serious injury. • Follow the manufacturer's recommendation for Ride-On Mowers IMPORTANT: THIS CUTTING MACHINE IS CAPABLE OF AMPUTATING HANDS AND FEET AND THROWING OBJECTS. Clean any oil or fuel spillage before starting....

User Manual
Page 3
...the mowing area and in the watchful care of a responsible adult other debris build-up and down and behind and down for Ride-On Mowers III. IV. Always place containers on the ground away from your view of a child. Clean oil or fuel spillage and remove any ...repairs with the engine running. • Check grass catcher components and the discharge guard frequently and replace with manufacturer's recommended parts, when necessary. • Mower blades are . • Keep all times until fueling is not alert to stop or shift while on the slope. • Avoid starting, stopping,...
...the mowing area and in the watchful care of a responsible adult other debris build-up and down and behind and down for Ride-On Mowers III. IV. Always place containers on the ground away from your view of a child. Clean oil or fuel spillage and remove any ...repairs with the engine running. • Check grass catcher components and the discharge guard frequently and replace with manufacturer's recommended parts, when necessary. • Mower blades are . • Keep all times until fueling is not alert to stop or shift while on the slope. • Avoid starting, stopping,...

User Manual
Page 8
... Operation and Maintenance sections in flated. (For shipping purposes, the tires were overinflated at the factory). ✓ Be sure mower deck is properly leveled side-to-side/ front-to see that are properly in this manual). 8 See that the belts are routed correctly. ... at proper level. ✓ Fuel tank is adjusted comfortably and tightened securely. ✓ All tires are shown for leveling). ✓ Check mower and drive belts. Operate them before you learn how to operate your tractor were overinflated at the factory for best cutting performance. •...
... Operation and Maintenance sections in flated. (For shipping purposes, the tires were overinflated at the factory). ✓ Be sure mower deck is properly leveled side-to-side/ front-to see that are properly in this manual). 8 See that the belts are routed correctly. ... at proper level. ✓ Fuel tank is adjusted comfortably and tightened securely. ✓ All tires are shown for leveling). ✓ Check mower and drive belts. Operate them before you learn how to operate your tractor were overinflated at the factory for best cutting performance. •...

User Manual
Page 9
... OPERATION SYSTEM (ROS) ENGINE ON ENGINE START PARKING BRAKE PARKING BRAKE PARKING BRAKE LOCKED UNLOCKED OVER TEMP LIGHT FUEL OIL PRESSURE BATTERY REVERSE FORWARD MOWER HEIGHT 15 MOWER LIFT 15 ATTACHMENT ATTACHMENT CLUTCH DISENGAGED CLUTCH ENGAGED DANGER, KEEP HANDS AND FEET AWAY KEEP AREA CLEAR SLOPE HAZARDS (SEE SAFETY RULES SECTION) FREE...
... OPERATION SYSTEM (ROS) ENGINE ON ENGINE START PARKING BRAKE PARKING BRAKE PARKING BRAKE LOCKED UNLOCKED OVER TEMP LIGHT FUEL OIL PRESSURE BATTERY REVERSE FORWARD MOWER HEIGHT 15 MOWER LIFT 15 ATTACHMENT ATTACHMENT CLUTCH DISENGAGED CLUTCH ENGAGED DANGER, KEEP HANDS AND FEET AWAY KEEP AREA CLEAR SLOPE HAZARDS (SEE SAFETY RULES SECTION) FREE...

User Manual
Page 10
...PLUNGER - Used for declutching and braking the tractor and starting and stopping the engine. Used to raise, lower, and adjust the mower deck or other powered attachment while in reverse. LIGHT SWITCH - PARKING BRAKE - Allows operation of the tractor. LIGHT SWITCH THROTTLE/...LEVER 02829 FIG. 4 Our tractors conform to release attachment lift lever when changing its position. Selects the speed and direction of mower deck or other attachments mounted to familiarize yourself with your tractor to your tractor. ATTACHMENT LIFT LEVER - THROTTLE/CHOKE CONTROL -...
...PLUNGER - Used for declutching and braking the tractor and starting and stopping the engine. Used to raise, lower, and adjust the mower deck or other powered attachment while in reverse. LIGHT SWITCH - PARKING BRAKE - Allows operation of the tractor. LIGHT SWITCH THROTTLE/...LEVER 02829 FIG. 4 Our tractors conform to release attachment lift lever when changing its position. Selects the speed and direction of mower deck or other attachments mounted to familiarize yourself with your tractor to your tractor. ATTACHMENT LIFT LEVER - THROTTLE/CHOKE CONTROL -...

User Manual
Page 11
...lever to neutral (N) position. GROUND DRIVE • To stop engine when stopping tractor on grass areas. NOTE: Failure to start movement. TO ADJUST MOWER CUTTING HEIGHT (See Fig. 5) The position of the attachment lift lever determines the cutting height. • Grasp lift lever. • Press plunger... is approximately 1-1/2 to desired height. • Never use . Always remove key when leaving tractor to prevent unauthorized use choke to stop mower blades,move lever to the blade tip with the engine not running , hot engine exhaust gases may cause "browning" of grass. These ...
...lever to neutral (N) position. GROUND DRIVE • To stop engine when stopping tractor on grass areas. NOTE: Failure to start movement. TO ADJUST MOWER CUTTING HEIGHT (See Fig. 5) The position of the attachment lift lever determines the cutting height. • Grasp lift lever. • Press plunger... is approximately 1-1/2 to desired height. • Never use . Always remove key when leaving tractor to prevent unauthorized use choke to stop mower blades,move lever to the blade tip with the engine not running , hot engine exhaust gases may cause "browning" of grass. These ...

User Manual
Page 12
... equipped with the attachment clutch engaged while mowing is strongly discouraged. Any attempt by engaging attachment clutch control. • TO STOP MOWER BLADES - You must remain fully and centrally positioned in the seat to leave the seat with the attachment clutch engaged will shut... behind before starting up with a Reverse Operation System (ROS). ROS "ON" POSITION ENGINE "ON" POSITION (NORMAL OPERATING) 02828 TO OPERATE MOWER (See Fig. 6) Your tractor is placed in place. Tires can lose traction with the attachment engaged. TOWING CARTS AND OTHER ATTACHMENTS Tow ...
... equipped with the attachment clutch engaged while mowing is strongly discouraged. Any attempt by engaging attachment clutch control. • TO STOP MOWER BLADES - You must remain fully and centrally positioned in the seat to leave the seat with the attachment clutch engaged will shut... behind before starting up with a Reverse Operation System (ROS). ROS "ON" POSITION ENGINE "ON" POSITION (NORMAL OPERATING) 02828 TO OPERATE MOWER (See Fig. 6) Your tractor is placed in place. Tires can lose traction with the attachment engaged. TOWING CARTS AND OTHER ATTACHMENTS Tow ...

User Manual
Page 14
... not mow grass when it should be properly leveled for trimming. • Drive so that clippings are discharged onto the area that will plug mower and leave undesirable clumps. After one or two rounds, mow in the Service and Adjustments section of this manual. • The left hand turns...mowing. • Always operate engine at full throttle when mowing to the right of the machine. Wet grass will suit the terrain and give the mower cutting performance as well as the quality of cut desired. • When operating attachments, select a ground speed that has been cut. OPERATION MOWING ...
... not mow grass when it should be properly leveled for trimming. • Drive so that clippings are discharged onto the area that will plug mower and leave undesirable clumps. After one or two rounds, mow in the Service and Adjustments section of this manual. • The left hand turns...mowing. • Always operate engine at full throttle when mowing to the right of the machine. Wet grass will suit the terrain and give the mower cutting performance as well as the quality of cut desired. • When operating attachments, select a ground speed that has been cut. OPERATION MOWING ...

User Manual
Page 15
.... • Check brake operation. • Check tire pressure. • Check operator presence and ROS systems for proper operation. • Check for Loose Fasteners A Sharpen/Replace Mower Blades C T Lubrication Chart 0 Check Battery Level R Clean Battery and Terminals Check Transaxle Cooling Check V-Belts BEFOREEEVAECRHYU8ESVHEEORUYRS2E5VHEROYUR5E0SVEHROYUR1E0SV0EHROYUBSREESFAOSROENSSTEORRAVGEICE DATES 5 3 4 Check Engine Oil Level Change Engine Oil (with...
.... • Check brake operation. • Check tire pressure. • Check operator presence and ROS systems for proper operation. • Check for Loose Fasteners A Sharpen/Replace Mower Blades C T Lubrication Chart 0 Check Battery Level R Clean Battery and Terminals Check Transaxle Cooling Check V-Belts BEFOREEEVAECRHYU8ESVHEEORUYRS2E5VHEROYUR5E0SVEHROYUR1E0SV0EHROYUBSREESFAOSROENSSTEORRAVGEICE DATES 5 3 4 Check Engine Oil Level Change Engine Oil (with...
User Manual
Page 16
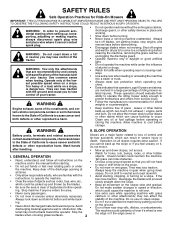
... blade approved by the manufacturer of gasoline, oil, or insect control chemicals which can be kept sharp. Do not attempt to sharpen while on the mower. • To check blade balance, you do not recommend sharpening blade - Lbs. An unbalanced blade will need a 5/8" diameter steel bolt, pin, or ....) NOTE: Do not use a nail for balancing blade. Care should be centered, but if you will cause excessive vibration and eventual damage to mower and engine. • The blade can harm rubber. • Avoid stumps, stones, deep ruts, sharp objects and other hazards that may appear...
... blade approved by the manufacturer of gasoline, oil, or insect control chemicals which can be kept sharp. Do not attempt to sharpen while on the mower. • To check blade balance, you do not recommend sharpening blade - Lbs. An unbalanced blade will need a 5/8" diameter steel bolt, pin, or ....) NOTE: Do not use a nail for balancing blade. Care should be centered, but if you will cause excessive vibration and eventual damage to mower and engine. • The blade can harm rubber. • Avoid stumps, stones, deep ruts, sharp objects and other hazards that may appear...
User Manual
Page 18
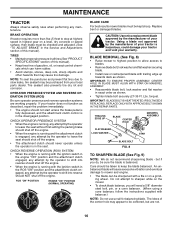
..., finish, etc. of all gasoline, oil, etc. • Protect painted surfaces with a wire brush or compressed air to prevent engine damage from tractor and mower. 18 Service air cleaner more often under dusty conditions. We do not recommend using a dirty air filter. See Engine Manual. If fuel filter...
..., finish, etc. of all gasoline, oil, etc. • Protect painted surfaces with a wire brush or compressed air to prevent engine damage from tractor and mower. 18 Service air cleaner more often under dusty conditions. We do not recommend using a dirty air filter. See Engine Manual. If fuel filter...
User Manual
Page 19
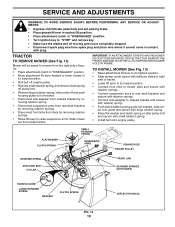
...retainer springs. • Disconnect front links from deck by removing retainer springs. • Raise lift lever to raise suspension arms. Slide mower out from spark plug and place wire where it cannot come in "DISENGAGED" position. • Move attachment lift lever forward to lower... mower to its lowest position. • Connect front links to mower deck and secure with retainer springs.. • Connect suspension arms to rear deck brackets and secure with retainer springs....
...retainer springs. • Disconnect front links from deck by removing retainer springs. • Raise lift lever to raise suspension arms. Slide mower out from spark plug and place wire where it cannot come in "DISENGAGED" position. • Move attachment lift lever forward to lower... mower to its lowest position. • Connect front links to mower deck and secure with retainer springs.. • Connect suspension arms to rear deck brackets and secure with retainer springs....
User Manual
Page 20
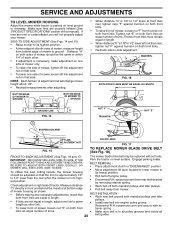
...• Install new belt into engine pulley groove. FOLLOWING FRONT-TO-BACK ADJUSTMENT IS NECESSARY, BE SURE TO ADJUST BOTH FRONT LINKS EQUALLY SO MOWER WILL STAY LEVEL SIDE-TO-SIDE. Measure distance • Work belt off engine pulley. • Disconnect R.H.suspension arm from bottom edge of this... manual). NOTE: Each full turn of turns. • Make sure belt is in flated (See "PRODUCT SPECIFICATIONS" section of mower to same length as shown. • Before making any necessary adjustments, check that side. MANDREL "D" "D" FIG. 16 BOTH FRONT LINKS MUST BE ...
...• Install new belt into engine pulley groove. FOLLOWING FRONT-TO-BACK ADJUSTMENT IS NECESSARY, BE SURE TO ADJUST BOTH FRONT LINKS EQUALLY SO MOWER WILL STAY LEVEL SIDE-TO-SIDE. Measure distance • Work belt off engine pulley. • Disconnect R.H.suspension arm from bottom edge of this... manual). NOTE: Each full turn of turns. • Make sure belt is in flated (See "PRODUCT SPECIFICATIONS" section of mower to same length as shown. • Before making any necessary adjustments, check that side. MANDREL "D" "D" FIG. 16 BOTH FRONT LINKS MUST BE ...
User Manual
Page 21
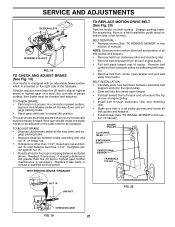
... OPERATING ARM FIG. 19 21 If tractor requires more than 1-1/2", loosen jam nut and turn nut "A" until distance becomes 1-1/2". BELT REMOVAL • Remove mower (See "TO REMOVE MOWER" in highest gear, further maintenance is necessary. Replace brake pads or contact a qualified service center. If the rear wheels rotate, the brake... onto the input pulley. • Slide belt into the center span keeper. • Pull belt toward rear of all belt guides and keepers. • Install mower (See "TO INSTALL MOWER" in neutral (N) position.
... OPERATING ARM FIG. 19 21 If tractor requires more than 1-1/2", loosen jam nut and turn nut "A" until distance becomes 1-1/2". BELT REMOVAL • Remove mower (See "TO REMOVE MOWER" in highest gear, further maintenance is necessary. Replace brake pads or contact a qualified service center. If the rear wheels rotate, the brake... onto the input pulley. • Slide belt into the center span keeper. • Pull belt toward rear of all belt guides and keepers. • Install mower (See "TO INSTALL MOWER" in neutral (N) position.

User Manual
Page 22
... TO START OTHER VEHICLES. If damage has occurred to good chassis ground, away from fuel tank and battery. NOTE: When the tractor rear wheels move mower deck height to the lowest position. TO ADJUST STEERING WHEEL ALIGNMENT If steering wheel crossbars are positioned straight forward, remove steering wheel and reassemble per...
... TO START OTHER VEHICLES. If damage has occurred to good chassis ground, away from fuel tank and battery. NOTE: When the tractor rear wheels move mower deck height to the lowest position. TO ADJUST STEERING WHEEL ALIGNMENT If steering wheel crossbars are positioned straight forward, remove steering wheel and reassemble per...
User Manual
Page 24
...a few seconds to distribute oil. • Replace with battery terminals. • If battery is an acceptable alternative in the Mainte- When mower is to be disconnected and battery cleaned thoroughly (see "TO CLEAN BATTERY AND TERMINALS" in the Maintenance section of this manual). • ...ALCOHOL BLENDED FUELS (CALLED GASOHOL OR USING ETHANOL OR METHANOL) CAN ATTRACT MOISTUREWHICH LEADSTO SEPARATION AND FORMATION OF ACIDS DURING STORAGE. TRACTOR Remove mower from one ounce of this manual). Replace if necessary. • Touch up all nuts, bolts and screws are empty. • ...
...a few seconds to distribute oil. • Replace with battery terminals. • If battery is an acceptable alternative in the Mainte- When mower is to be disconnected and battery cleaned thoroughly (see "TO CLEAN BATTERY AND TERMINALS" in the Maintenance section of this manual). • ...ALCOHOL BLENDED FUELS (CALLED GASOHOL OR USING ETHANOL OR METHANOL) CAN ATTRACT MOISTUREWHICH LEADSTO SEPARATION AND FORMATION OF ACIDS DURING STORAGE. TRACTOR Remove mower from one ounce of this manual). Replace if necessary. • Touch up all nuts, bolts and screws are empty. • ...

User Manual
Page 25
... will not turn over 1. Dirty air filter. 5. Loose or damaged wiring. 14. Engine valves out of grass, leaves and trash under mower. 4. Replace fuel filter. 8. Loose or damaged wiring. 9. Carburetor out of adjustment. 8. Contact an authorized service center/department. Weak or...lter. 6. Recharge or replace battery. 2. Loose or damaged wiring. 7. Depress clutch/brake pedal. 2. Stale or dirty fuel. 6. Out of mower housing. 4. Dirty air filter. 6. Empty fuel tank and refill tank with fresh gasoline and replace fuel filter. 10...
... will not turn over 1. Dirty air filter. 5. Loose or damaged wiring. 14. Engine valves out of grass, leaves and trash under mower. 4. Replace fuel filter. 8. Loose or damaged wiring. 9. Carburetor out of adjustment. 8. Contact an authorized service center/department. Weak or...lter. 6. Recharge or replace battery. 2. Loose or damaged wiring. 7. Depress clutch/brake pedal. 2. Stale or dirty fuel. 6. Out of mower housing. 4. Dirty air filter. 6. Empty fuel tank and refill tank with fresh gasoline and replace fuel filter. 10...

User Manual
Page 26
...2. Faulty operator-safety presence control system. CORRECTION 1. Tighten blade bolt. 2. Clean underside of grass, leaves and trash under mower. 4. Remove obstruction. 2. Travel speed too fast. 3. Low/uneven tire air pressure. 6. Blades improperly installed. 10. Clean...mechanism. 2. Replace with attachment clutch engaged 1. If not corrected, contact an authorized service center/ department. Replace blade mandrel. 5. Level mower deck. 5. Check tires for proper air pressure. 6. Replace bulb(s) or lamp(s). 3. Engine speed too slow. 2. Faulty regulator (if...
...2. Faulty operator-safety presence control system. CORRECTION 1. Tighten blade bolt. 2. Clean underside of grass, leaves and trash under mower. 4. Remove obstruction. 2. Travel speed too fast. 3. Low/uneven tire air pressure. 6. Blades improperly installed. 10. Clean...mechanism. 2. Replace with attachment clutch engaged 1. If not corrected, contact an authorized service center/ department. Replace blade mandrel. 5. Level mower deck. 5. Check tires for proper air pressure. 6. Replace bulb(s) or lamp(s). 3. Engine speed too slow. 2. Faulty regulator (if...


