Operation Manual
Page 9
...adjustment 13 Connecting the monitor and turning the monitor on and off 14 Securing the cables [LL-172G 14 Connecting the monitor to a computer 14 Connection of headphones (commercially available 17 Connecting the monitor to a power source 17 Turning the power on 17 Changing between input ... Automatic screen adjustment (When using an analog signal 21 Manual screen adjustment 22 Monitor care 25 Monitor care 25 Storage 25 Troubleshooting 25 Information for customers on environmentally friendly disposal of this SHARP product 26 Specifications 27 Installing set-up information and the...
...adjustment 13 Connecting the monitor and turning the monitor on and off 14 Securing the cables [LL-172G 14 Connecting the monitor to a computer 14 Connection of headphones (commercially available 17 Connecting the monitor to a power source 17 Turning the power on 17 Changing between input ... Automatic screen adjustment (When using an analog signal 21 Manual screen adjustment 22 Monitor care 25 Monitor care 25 Storage 25 Troubleshooting 25 Information for customers on environmentally friendly disposal of this SHARP product 26 Specifications 27 Installing set-up information and the...
Operation Manual
Page 11
... holders. Italiano Español English 11 Operation manual (1) Notes: - [LL-172A] Use only the cables supplied with the LL-172A and the LL-172G. Sharp Corporation holds authorship rights to use with the monitor. - [LL-172G] Be sure to the Utility...items are used . - All other brand and product names are registered trademarks of the supplied accessories may not be transported. - CD-ROM (1) - LCD monitor (1) - Manual Scope - Macintosh is to be exactly same as "Windows 3.1". Analog signal cable (1) (model name: 0NW1738GAB01A) - [LL-172G] Digital signal cable (1)...
... holders. Italiano Español English 11 Operation manual (1) Notes: - [LL-172A] Use only the cables supplied with the LL-172A and the LL-172G. Sharp Corporation holds authorship rights to use with the monitor. - [LL-172G] Be sure to the Utility...items are used . - All other brand and product names are registered trademarks of the supplied accessories may not be transported. - CD-ROM (1) - LCD monitor (1) - Manual Scope - Macintosh is to be exactly same as "Windows 3.1". Analog signal cable (1) (model name: 0NW1738GAB01A) - [LL-172G] Digital signal cable (1)...
Operation Manual
Page 16
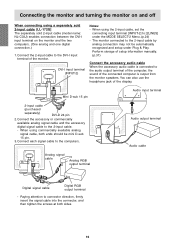
DVI-I input terminal of the monitor. Connect the accessory or commercially available analog signal cable and the accessory digital signal cable to the 2-input cable by analog connection may not be mini D-sub 15 pin. 3. Perform storage of setup information manually. (p.31) Connect the accessory audio cable When the ...connector, and then tighten the screws at both ends should be automatically recognized and setup under the MODE SELECT-2 Menu. (p.24) - The monitor connected to the 2-input cable. - You can also use the headphone jack of the connected computer is output from the...
DVI-I input terminal of the monitor. Connect the accessory or commercially available analog signal cable and the accessory digital signal cable to the 2-input cable by analog connection may not be mini D-sub 15 pin. 3. Perform storage of setup information manually. (p.31) Connect the accessory audio cable When the ...connector, and then tighten the screws at both ends should be automatically recognized and setup under the MODE SELECT-2 Menu. (p.24) - The monitor connected to the 2-input cable. - You can also use the headphone jack of the connected computer is output from the...

Operation Manual
Page 19
... lock before attempting to reset values when the adjustment lock is displayed, the control buttons are disabled. - If necessary perform manual adjustment. (p.22) Note: - Turn off the monitor power. 2. Español English 19 Without the OSD Menu being displayed, press the or the button. 2. Continue to...power button (i.e. Turn off . English Français Deutsch Italiano Adjusting the screen display and speaker volume For analog signal 1. Perform manual adjustment where necessary. (p.22) For digital signal [LL-172G] The monitor can be used without adjustment.
... lock before attempting to reset values when the adjustment lock is displayed, the control buttons are disabled. - If necessary perform manual adjustment. (p.22) Note: - Turn off the monitor power. 2. Español English 19 Without the OSD Menu being displayed, press the or the button. 2. Continue to...power button (i.e. Turn off . English Français Deutsch Italiano Adjusting the screen display and speaker volume For analog signal 1. Perform manual adjustment where necessary. (p.22) For digital signal [LL-172G] The monitor can be used without adjustment.

Operation Manual
Page 21
... screen automatically Automatic adjustment can be performed using either use the Adjustment Pattern or try repeating the automatic adjustment 2 or 3 times. - Perform manual screen adjustment when necessary. (p.22) AUTO button [LL-172A] 1. Note: - When [OUT OF ADJUST] is for Windows) This explanation ...complete.) 3. After a few seconds [ADJUSTING] will return. (The automatic adjustment is now complete.) MENU button 1. When setting up this monitor for adjustment First display an image that the CD-ROM drive is displayed on the accompanying CDROM. Press the MENU button 5 times to...
... screen automatically Automatic adjustment can be performed using either use the Adjustment Pattern or try repeating the automatic adjustment 2 or 3 times. - Perform manual screen adjustment when necessary. (p.22) AUTO button [LL-172A] 1. Note: - When [OUT OF ADJUST] is for Windows) This explanation ...complete.) 3. After a few seconds [ADJUSTING] will return. (The automatic adjustment is now complete.) MENU button 1. When setting up this monitor for adjustment First display an image that the CD-ROM drive is displayed on the accompanying CDROM. Press the MENU button 5 times to...
Operation Manual
Page 22
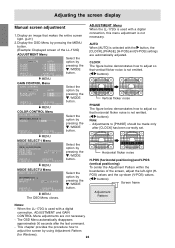
Adjusting the screen display Manual screen adjustment 1. MENU The OSD Menu closes. This chapter provides the procedure how to adjust the screen by pressing the / MODE button. MENU COLOR CONTROL ...
Adjusting the screen display Manual screen adjustment 1. MENU The OSD Menu closes. This chapter provides the procedure how to adjust the screen by pressing the / MODE button. MENU COLOR CONTROL ...
Operation Manual
Page 23
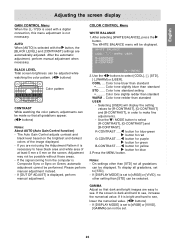
...WARM] or [USER]. GAMMA Adjust so that all gradations, set . Español English 23 AUTO When [AUTO] is displayed, perform manual adjustment. 2. If the signal coming from the computer is necessary to have black area and white area of the image displayed. - Use ...DISPLAY MODE] is bright and hard to see , lower the numerical value. ( buttons) - Please perform manual adjustment instead. - COOL ... After the automatic adjustment, perform manual adjustment when necessary. COLOR CONTROL Menu WHITE BALANCE 1. Color tone bluer than standard Color tone slightly bluer ...
...WARM] or [USER]. GAMMA Adjust so that all gradations, set . Español English 23 AUTO When [AUTO] is displayed, perform manual adjustment. 2. If the signal coming from the computer is necessary to have black area and white area of the image displayed. - Use ...DISPLAY MODE] is bright and hard to see , lower the numerical value. ( buttons) - Please perform manual adjustment instead. - COOL ... After the automatic adjustment, perform manual adjustment when necessary. COLOR CONTROL Menu WHITE BALANCE 1. Color tone bluer than standard Color tone slightly bluer ...

Operation Manual
Page 29
...for Power Macintosh and the Sun Ultra series are compliant only with the monitor. - Follow your computer's instruction manual to set the timing so that it is compatible with non-interlaced. - If the monitor is 1280 x 1024. - Recommended resolution is not receiving any signal... (synch signal), [NO SIGNAL] will appear. Follow your computer's instruction manual to be required. - Italiano Español English 29 All are reference values. If the monitor is 1280 x 1024. - US text - A computer with an output terminal conforming to ...
...for Power Macintosh and the Sun Ultra series are compliant only with the monitor. - Follow your computer's instruction manual to set the timing so that it is compatible with non-interlaced. - If the monitor is 1280 x 1024. - Recommended resolution is not receiving any signal... (synch signal), [NO SIGNAL] will appear. Follow your computer's instruction manual to be required. - Italiano Español English 29 All are reference values. If the monitor is 1280 x 1024. - US text - A computer with an output terminal conforming to ...
Operation Manual
Page 31
...files from 2 above. When installing Windows 98/2000/Me/XP set -up information. (Depending on the type of the LCD monitor. If you can be realized. - Click on [Settings], [Advanced] and [Monitor]. 5. If the "Add New Hardware Wizard" appears, repeat the installation commands beginning from :] is [D:], and click ... (described below to install the monitor set -up information on [Display a list of all the drivers in a specific location, so you can select the driver you want .], then click [Next]. 4. If so, follow the computer's own operation manual while reading this.) About the ...
...files from 2 above. When installing Windows 98/2000/Me/XP set -up information. (Depending on the type of the LCD monitor. If you can be realized. - Click on [Settings], [Advanced] and [Monitor]. 5. If the "Add New Hardware Wizard" appears, repeat the installation commands beginning from :] is [D:], and click ... (described below to install the monitor set -up information on [Display a list of all the drivers in a specific location, so you can select the driver you want .], then click [Next]. 4. If so, follow the computer's own operation manual while reading this.) About the ...

Operation Manual
Page 34
...) About the ColorSync profile ColorSync is necessary to have PC Exchange or File Exchange installed in the system folder. 3. Please follow the computer's own operation manual while reading this. 1. Load the accessory CD-ROM into the CD-ROM drive of the LCD monitor. This monitor's ColorSync profile works with a compatible application.
...) About the ColorSync profile ColorSync is necessary to have PC Exchange or File Exchange installed in the system folder. 3. Please follow the computer's own operation manual while reading this. 1. Load the accessory CD-ROM into the CD-ROM drive of the LCD monitor. This monitor's ColorSync profile works with a compatible application.

Operation Manual
Page 35
...! Spread out a soft cloth on it to let the stand drop. Have a gap of monitor to which arm is stored in the operation manual included with this could cause the monitor to fall off or break off or to be internally damaged. [LL-172G] Screw used to get your fingers pinched between the...
...! Spread out a soft cloth on it to let the stand drop. Have a gap of monitor to which arm is stored in the operation manual included with this could cause the monitor to fall off or break off or to be internally damaged. [LL-172G] Screw used to get your fingers pinched between the...

