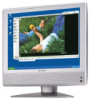
Operation Manual
Page 3
...REMOVE COVER (OR BACK). The lightning flash with arrowhead symbol, within an equilateral triangle, is intended to alert the user to the presence of uninsulated "dangerous voltage" within a triangle is intended to alert the user to constitute a risk of the monitor.... and maintenance (servicing) instructions in the space provided. English Français Deutsch Italiano ENGLISH IMPORTANT: To aid in reporting in case of loss or theft, please record the monitor's model and serial numbers in the literature accompanying the product. NO USER-SERVICEABLE PARTS INSIDE.
...REMOVE COVER (OR BACK). The lightning flash with arrowhead symbol, within an equilateral triangle, is intended to alert the user to the presence of uninsulated "dangerous voltage" within a triangle is intended to alert the user to constitute a risk of the monitor.... and maintenance (servicing) instructions in the space provided. English Français Deutsch Italiano ENGLISH IMPORTANT: To aid in reporting in case of loss or theft, please record the monitor's model and serial numbers in the literature accompanying the product. NO USER-SERVICEABLE PARTS INSIDE.
Operation Manual
Page 5
... COLOR CONTROL menu E31 MODE SELECT menu E32 Preventing changes to a power source E17 Instructions for attaching a VESA-compliant mount E18 Selecting the item in the MENU screen E19 Adjusting the computer display (AUTO ADJUSTMENT E20 Setting TV channels E21 Selecting broadcast (AIR) or cable TV (CABLE) for specific menu (RESET E33 Resetting all adjustment values (ALL RESET E34 Installing set-up information and the ICC profile (For Windows E35 Information about the ColorSync profile (For MacOS E38 E3 English...
... COLOR CONTROL menu E31 MODE SELECT menu E32 Preventing changes to a power source E17 Instructions for attaching a VESA-compliant mount E18 Selecting the item in the MENU screen E19 Adjusting the computer display (AUTO ADJUSTMENT E20 Setting TV channels E21 Selecting broadcast (AIR) or cable TV (CABLE) for specific menu (RESET E33 Resetting all adjustment values (ALL RESET E34 Installing set-up information and the ICC profile (For Windows E35 Information about the ColorSync profile (For MacOS E38 E3 English...
Operation Manual
Page 6
... to adjust E50 VIDEO ADJUST menu E51 CHANNEL SETTING menu (TV mode only E51 MODE SELECT menu E51 CLOSED CAPTION menu E52 V-CHIP BLOCK menu E52 Preventing changes to adjusted values (ADJUSTMENT LOCK E53 Resetting adjustment values for specific menu (RESET E53 Resetting all adjustment values (ALL RESET E54 Other features Other features E55 Checking the current channel and audio mode on screen (DISPLAY E55 Muting the sound (MUTE E55 Changing BRIGHT MODE E56 Using headphones (commercially available E56 Appendix Monitor care E57 Troubleshooting E57 Monitor...
... to adjust E50 VIDEO ADJUST menu E51 CHANNEL SETTING menu (TV mode only E51 MODE SELECT menu E51 CLOSED CAPTION menu E52 V-CHIP BLOCK menu E52 Preventing changes to adjusted values (ADJUSTMENT LOCK E53 Resetting adjustment values for specific menu (RESET E53 Resetting all adjustment values (ALL RESET E54 Other features Other features E55 Checking the current channel and audio mode on screen (DISPLAY E55 Muting the sound (MUTE E55 Changing BRIGHT MODE E56 Using headphones (commercially available E56 Appendix Monitor care E57 Troubleshooting E57 Monitor...

Operation Manual
Page 7
... SECTION 810-21) GROUND CLAMPS POWER SERVICE GROUNDING ELECTRODE SYSTEM (NEC ART 250, PART H) - For added protection for the grounding electrode. To ensure safety and many years of trouble-free operation of antenna-discharge unit, connection to grounding electrodes, and requirements for this monitor. Important safety precautions - Italiano Español English E5 If an outside antenna system...
... SECTION 810-21) GROUND CLAMPS POWER SERVICE GROUNDING ELECTRODE SYSTEM (NEC ART 250, PART H) - For added protection for the grounding electrode. To ensure safety and many years of trouble-free operation of antenna-discharge unit, connection to grounding electrodes, and requirements for this monitor. Important safety precautions - Italiano Español English E5 If an outside antenna system...

Operation Manual
Page 8
... Power Cord - Do not damage the power cord nor place heavy objects on the screen where pixels never light or are registered trademarks of the monitor. - Doing so could lead to this manual, Microsoft Windows XP will not affect the performance of Microsoft Corporation. - Do not place any other fluids. We recommend using a computer able to the service representative. - Ensure that no need...
... Power Cord - Do not damage the power cord nor place heavy objects on the screen where pixels never light or are registered trademarks of the monitor. - Doing so could lead to this manual, Microsoft Windows XP will not affect the performance of Microsoft Corporation. - Do not place any other fluids. We recommend using a computer able to the service representative. - Ensure that no need...

Operation Manual
Page 13
... strong lighting. Cautions regarding use the remote control simultaneously with new ("AAA" size, UM/SUM-4) batteries. 1 Open the battery cover. 2 Insert two ("AAA" size, UM/SUM-4) batteries. 3 Close the battery cover. + - + Slide the cover while pressing the ( ) part. Engage the claw on the monitor. If the remote control will not be used for the first time, install two ("AAA" size, UM/SUM-4) batteries (supplied). Español English E11...
... strong lighting. Cautions regarding use the remote control simultaneously with new ("AAA" size, UM/SUM-4) batteries. 1 Open the battery cover. 2 Insert two ("AAA" size, UM/SUM-4) batteries. 3 Close the battery cover. + - + Slide the cover while pressing the ( ) part. Engage the claw on the monitor. If the remote control will not be used for the first time, install two ("AAA" size, UM/SUM-4) batteries (supplied). Español English E11...
Operation Manual
Page 22
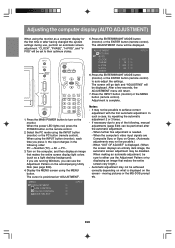
... having changed the system settings during use, perform an automatic screen adjustment. When the power LED lights red, press the POWER button on the screen - MENU ADJUSTMENT GAIN CONTROL COLOR CONTROL MODE SELECT < PC Notes: - When the computer's video input signals are running Windows, you can be displayed. Automatic adjustment may not be possible to any of the following order: PC → Number (TV) → AV → PC... 3. Press the ENTER/BRIGHT MODE button (monitor) or the ENTER button (remote control). Press...
... having changed the system settings during use, perform an automatic screen adjustment. When the power LED lights red, press the POWER button on the screen - MENU ADJUSTMENT GAIN CONTROL COLOR CONTROL MODE SELECT < PC Notes: - When the computer's video input signals are running Windows, you can be displayed. Automatic adjustment may not be possible to any of the following order: PC → Number (TV) → AV → PC... 3. Press the ENTER/BRIGHT MODE button (monitor) or the ENTER button (remote control). Press...

Operation Manual
Page 24
...It is necessary to set the receiving mode to "AIR" or "CABLE" channels to receive locally broadcast TV programs. INPUT MENU / ENTER BRIGHT MODE CH POWER PC TV AV SLEEP MENU BRIGHT MODE ENTER BRIGHT 5. Select "AIR/CABLE" using the MENU button (monitor) or the buttons (remote control), and press the ENTER/BRIGHT MODE button (monitor) or the ENTER button (remote control). Exit the MENU screen using the MENU button. VOL/BRIGHT DISPLAY CC MTS MUTE VOL MAIN POWER CH FLASHBACK 1. Display the MENU screen using the INPUT button (monitor) or the MENU button (remote control).
...It is necessary to set the receiving mode to "AIR" or "CABLE" channels to receive locally broadcast TV programs. INPUT MENU / ENTER BRIGHT MODE CH POWER PC TV AV SLEEP MENU BRIGHT MODE ENTER BRIGHT 5. Select "AIR/CABLE" using the MENU button (monitor) or the buttons (remote control), and press the ENTER/BRIGHT MODE button (monitor) or the ENTER button (remote control). Exit the MENU screen using the MENU button. VOL/BRIGHT DISPLAY CC MTS MUTE VOL MAIN POWER CH FLASHBACK 1. Display the MENU screen using the INPUT button (monitor) or the MENU button (remote control).
Operation Manual
Page 27
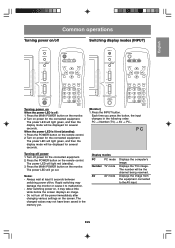
... image. Turn on the remote control. 2. The power LED will be displayed for the connected equipment. The number will go out. Español English E25 P C Turning off /on the screen. Press the MAIN POWER button on When the power LED is lit red (standby): 1. Press the INPUT button. English Français Deutsch Italiano Common operations Turning power on/off Switching display modes (INPUT) INPUT MENU / ENTER BRIGHT MODE CH POWER PC TV AV SLEEP MENU BRIGHT MODE ENTER BRIGHT INPUT MENU / ENTER BRIGHT MODE CH POWER PC TV AV SLEEP MENU...
... image. Turn on the remote control. 2. The power LED will be displayed for the connected equipment. The number will go out. Español English E25 P C Turning off /on the screen. Press the MAIN POWER button on When the power LED is lit red (standby): 1. Press the INPUT button. English Français Deutsch Italiano Common operations Turning power on/off Switching display modes (INPUT) INPUT MENU / ENTER BRIGHT MODE CH POWER PC TV AV SLEEP MENU BRIGHT MODE ENTER BRIGHT INPUT MENU / ENTER BRIGHT MODE CH POWER PC TV AV SLEEP MENU...

Operation Manual
Page 29
...Select "MODE SELECT" using the MENU button (monitor) or the buttons (remote control), and press the ENTER/BRIGHT MODE button (monitor) or the ENTER button (remote control). 4. Adjust the brightness using the VOL/BRIGHT buttons. INPUT MENU / ENTER BRIGHT MODE CH POWER PC TV AV SLEEP MENU BRIGHT MODE ENTER BRIGHT VOL/BRIGHT DISPLAY CC MTS MUTE VOL MAIN POWER CH FLASHBACK [Monitor] 1. Adjust the brightness using the buttons. Select the language you want to adjust the backlight. Increase Decrease VOL/BRIGHT > button VOL/BRIGHT < button The screen for adjusting the...
...Select "MODE SELECT" using the MENU button (monitor) or the buttons (remote control), and press the ENTER/BRIGHT MODE button (monitor) or the ENTER button (remote control). 4. Adjust the brightness using the VOL/BRIGHT buttons. INPUT MENU / ENTER BRIGHT MODE CH POWER PC TV AV SLEEP MENU BRIGHT MODE ENTER BRIGHT VOL/BRIGHT DISPLAY CC MTS MUTE VOL MAIN POWER CH FLASHBACK [Monitor] 1. Adjust the brightness using the buttons. Select the language you want to adjust the backlight. Increase Decrease VOL/BRIGHT > button VOL/BRIGHT < button The screen for adjusting the...

Operation Manual
Page 31
... previous screen: (1) Select "RETURN" using the MENU button (monitor) or the buttons (remote control), and press the ENTER/BRIGHT MODE button (monitor) or the ENTER button (remote control). 5. If your computer's display mode is for Windows). Select the PC mode using the VOL/BRIGHT buttons (monitor) or the buttons (remote control). Select the menu you may see the different color levels in a menu screen, the settings you can use the Adjustment Pattern on the use of the computer. 2. Español English E29 This manual describes display adjustment based...
... previous screen: (1) Select "RETURN" using the MENU button (monitor) or the buttons (remote control), and press the ENTER/BRIGHT MODE button (monitor) or the ENTER button (remote control). 5. If your computer's display mode is for Windows). Select the PC mode using the VOL/BRIGHT buttons (monitor) or the buttons (remote control). Select the menu you may see the different color levels in a menu screen, the settings you can use the Adjustment Pattern on the use of the computer. 2. Español English E29 This manual describes display adjustment based...

Operation Manual
Page 33
... areas. - If "OUT OF ADJUST" is necessary to the original image. - sRGB ........ See page E33 for this menu to individually adjust red, green, and blue contrast. English Adjusting the display GAIN CONTROL menu Option AUTO BLACK LEVEL Description Automatically adjusts "BLACK LEVEL" and "CONTRAST" based on the screen. COLOR CONTROL menu Option COLOR MODE WHITE BALANCE RESET Description Selects the color tone. - Notes about auto adjustment: - Color tone redder than standard. - Adjusts screen brightness while you to their original factory settings. See page E33 for...
... areas. - If "OUT OF ADJUST" is necessary to the original image. - sRGB ........ See page E33 for this menu to individually adjust red, green, and blue contrast. English Adjusting the display GAIN CONTROL menu Option AUTO BLACK LEVEL Description Automatically adjusts "BLACK LEVEL" and "CONTRAST" based on the screen. COLOR CONTROL menu Option COLOR MODE WHITE BALANCE RESET Description Selects the color tone. - Notes about auto adjustment: - Color tone redder than standard. - Adjusts screen brightness while you to their original factory settings. See page E33 for...

Operation Manual
Page 35
... mode using the INPUT button (monitor) or the MENU button (remote control). Exit the MENU screen using the INPUT button (monitor) or the PC button (remote control). 2. CAUTION! - POWER button - Continue to press the buttons until "ADJUSTMENT UNLOCKED" appears on the monitor. 1. VOL/BRIGHT buttons - Resetting is set , all buttons on ). FLASHBACK button Perform this procedure on the monitor. 1. Continue to press the buttons until "ADJUSTMENT LOCKED" appears on ). Turn off the monitor power. 2. MENU ADJUSTMENT GAIN CONTROL COLOR CONTROL MODE SELECT < PC 3. turn...
... mode using the INPUT button (monitor) or the MENU button (remote control). Exit the MENU screen using the INPUT button (monitor) or the PC button (remote control). 2. CAUTION! - POWER button - Continue to press the buttons until "ADJUSTMENT UNLOCKED" appears on the monitor. 1. VOL/BRIGHT buttons - Resetting is set , all buttons on ). FLASHBACK button Perform this procedure on the monitor. 1. Continue to press the buttons until "ADJUSTMENT LOCKED" appears on ). Turn off the monitor power. 2. MENU ADJUSTMENT GAIN CONTROL COLOR CONTROL MODE SELECT < PC 3. turn...

Operation Manual
Page 37
... is also installed. Using an application compatible with an ICC profile, highly accurate color reproduction can be realized. - When installing Windows 98/2000/Me/XP set -up information (described below to Installing the ICC profile on the [Start] button. Click on page E37. - From [Settings], choose [Control Panel]. 3. Check that the monitor details are displayed, then click [Apply]. 11. From [Settings], choose [Control Panel]. 3. Check that describes the color reproduction characteristics...
... is also installed. Using an application compatible with an ICC profile, highly accurate color reproduction can be realized. - When installing Windows 98/2000/Me/XP set -up information (described below to Installing the ICC profile on the [Start] button. Click on page E37. - From [Settings], choose [Control Panel]. 3. Check that the monitor details are displayed, then click [Apply]. 11. From [Settings], choose [Control Panel]. 3. Check that describes the color reproduction characteristics...

Operation Manual
Page 38
...], [Driver] and [Update Driver]. 6. Select the monitor from 2 above. For Windows Me Installing monitor set -up information into Windows Me, and setting the monitor's ICC profile as a predetermined value. Click on [Have disk], confirm that the CD-ROM drive is "D" drive. Select the monitor details from :] is [D:], and click [OK]. 9. Double click on [Settings], [Advanced] and [Monitor]. 5. Click on [Display]. 4. Check [Display a list of all the drivers in a specific...
...], [Driver] and [Update Driver]. 6. Select the monitor from 2 above. For Windows Me Installing monitor set -up information into Windows Me, and setting the monitor's ICC profile as a predetermined value. Click on [Have disk], confirm that the CD-ROM drive is "D" drive. Select the monitor details from :] is [D:], and click [OK]. 9. Double click on [Settings], [Advanced] and [Monitor]. 5. Click on [Display]. 4. Check [Display a list of all the drivers in a specific...

Operation Manual
Page 39
..., check [Install from the list displayed and click [Next]. Select the monitor from a list or specific location [Advanced]] and click [Next]. 8. Choose the profile and click on [Properties], [Driver] and [Update Driver]. 7. Italiano Español English E37 g02.P65 37 9/17/2003, 3:00 PM Click on [Set As Default]. 9. Confirm that you would like to install, and click on the screen. 12...
..., check [Install from the list displayed and click [Next]. Select the monitor from a list or specific location [Advanced]] and click [Next]. 8. Choose the profile and click on [Properties], [Driver] and [Update Driver]. 7. Italiano Español English E37 g02.P65 37 9/17/2003, 3:00 PM Click on [Set As Default]. 9. Confirm that you would like to install, and click on the screen. 12...
Operation Manual
Page 55
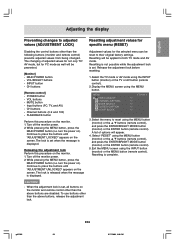
... buttons until "ADJUSTMENT UNLOCKED" appears on the screen. Select the menu to reset using the MENU button (monitor) or the buttons (remote control), and press the ENTER/BRIGHT MODE button (monitor) or the ENTER button (remote control). INPUT button - The lock is released when the message is complete. Adjustment values for the selected menu can be prevented. [Monitor] - MENU VIDEO ADJUST CHANNEL SETTING MODE SELECT CLOSED CAPTION V-CHIP BLOCK < TV/AV 3. While pressing the MENU button, press the MAIN POWER button (i.e. turn the power on the monitor and remote...
... buttons until "ADJUSTMENT UNLOCKED" appears on the screen. Select the menu to reset using the MENU button (monitor) or the buttons (remote control), and press the ENTER/BRIGHT MODE button (monitor) or the ENTER button (remote control). INPUT button - The lock is released when the message is complete. Adjustment values for the selected menu can be prevented. [Monitor] - MENU VIDEO ADJUST CHANNEL SETTING MODE SELECT CLOSED CAPTION V-CHIP BLOCK < TV/AV 3. While pressing the MENU button, press the MAIN POWER button (i.e. turn the power on the monitor and remote...

Operation Manual
Page 58
... SLEEP MENU BRIGHT MODE ENTER BRIGHT VOL/BRIGHT DISPLAY CC MTS MUTE VOL Using headphones (commercially available) You can be heard from the monitor speakers. [PC mode] DARK (power save) → BRIGHT → DARK (power save)... [TV/AV mode] NORMAL (power save 1) → DARK (power save 2) → BRIGHT → NORMAL (power save 1)... The mode switches in the following order each time you press the button: Note: - Headphone terminal Headphones MAIN POWER CH FLASHBACK 1. When the headphones are connected, no sound...
... SLEEP MENU BRIGHT MODE ENTER BRIGHT VOL/BRIGHT DISPLAY CC MTS MUTE VOL Using headphones (commercially available) You can be heard from the monitor speakers. [PC mode] DARK (power save) → BRIGHT → DARK (power save)... [TV/AV mode] NORMAL (power save 1) → DARK (power save 2) → BRIGHT → NORMAL (power save 1)... The mode switches in the following order each time you press the button: Note: - Headphone terminal Headphones MAIN POWER CH FLASHBACK 1. When the headphones are connected, no sound...

Operation Manual
Page 59
... no picture. (Power LED does not light.) There is lit orange.) The image appears distorted. There are using to the characteristics of fluorescent tubes the screen may flicker. (This is not a malfunction.) Should this replacement on TV picture. There is no picture. (Power LED is no video picture. Change the Vsync frequency (refresh rate) on the computer you are stripes or dots on your nearest Sharp authorized Service Center. Is the monitor switched...
... no picture. (Power LED does not light.) There is lit orange.) The image appears distorted. There are using to the characteristics of fluorescent tubes the screen may flicker. (This is not a malfunction.) Should this replacement on TV picture. There is no picture. (Power LED is no video picture. Change the Vsync frequency (refresh rate) on the computer you are stripes or dots on your nearest Sharp authorized Service Center. Is the monitor switched...

Operation Manual
Page 60
... plug from the cabinet and control panel. Never use thinner, benzine, alcohol, glass cleaner, etc., as this could leave marks or result in malfunction. E58 g02.P65 58 9/17/2003, 3:00 PM Monitor care Problem There is not available in PC mode. (Pages E28 and E46) - Are the audio cables properly connected? (Pages E12, E15 and E16) - Control buttons do not work. The MENU screen...
... plug from the cabinet and control panel. Never use thinner, benzine, alcohol, glass cleaner, etc., as this could leave marks or result in malfunction. E58 g02.P65 58 9/17/2003, 3:00 PM Monitor care Problem There is not available in PC mode. (Pages E28 and E46) - Are the audio cables properly connected? (Pages E12, E15 and E16) - Control buttons do not work. The MENU screen...


