
User Manual
Page 4
... or against them . • Avoid exposing your LCD TV to direct sunlight or another heat source. Keep this user's manual for ventilation purposes. Other Notices • Avoid exposing the LCD TV... these openings must not be blocked or covered. • Do not block the openings by Westinghouse Digital. • If your LCD TV will not be seriously injured if you operate the ... INSTRUCTIONS Follow and obey all the safety and operating instructions before you touch them . Power Cord Protection Power supply cords should be placed on the cabinet are difficult to moisture or high humidity....
... or against them . • Avoid exposing your LCD TV to direct sunlight or another heat source. Keep this user's manual for ventilation purposes. Other Notices • Avoid exposing the LCD TV... these openings must not be blocked or covered. • Do not block the openings by Westinghouse Digital. • If your LCD TV will not be seriously injured if you operate the ... INSTRUCTIONS Follow and obey all the safety and operating instructions before you touch them . Power Cord Protection Power supply cords should be placed on the cabinet are difficult to moisture or high humidity....

User Manual
Page 5
... attempt to qualified service personnel. Turn off your wall outlet, consult an electrician for replacement of the obsolete outlet. 10) Protect the power cord from touching such power lines or circuits. 1) Read these instructions. 2) Keep these instructions. 3) Heed all warnings. 4) Follow all servicing to bypass the .... Servicing is required when the LCD TV has been damaged in accordance with a dry cloth. 7) Do not block any heat sources such as the power-supply cord or plug is grounded to rain or moisture, it from the wall outlet and disconnect the antenna or cable system....
... attempt to qualified service personnel. Turn off your wall outlet, consult an electrician for replacement of the obsolete outlet. 10) Protect the power cord from touching such power lines or circuits. 1) Read these instructions. 2) Keep these instructions. 3) Heed all warnings. 4) Follow all servicing to bypass the .... Servicing is required when the LCD TV has been damaged in accordance with a dry cloth. 7) Do not block any heat sources such as the power-supply cord or plug is grounded to rain or moisture, it from the wall outlet and disconnect the antenna or cable system....

User Manual
Page 10
... or other device with a VGA output. 8. YPbPr2 Input Connect an external video device with component output to a computer or other device with component output to a power source. 8 VGA Connect to these jacks. 11. ANT (RF-input) Connect the LCD TV to this jack. 9. AV1 & S-Video Audio Input (Right / Left) ...Connect an external audio source to an external video device such as a VCR or video game system. 3. DVI Audio Input (Right / Left) Connect an external audio to an antenna or...
... or other device with a VGA output. 8. YPbPr2 Input Connect an external video device with component output to a computer or other device with component output to a power source. 8 VGA Connect to these jacks. 11. ANT (RF-input) Connect the LCD TV to this jack. 9. AV1 & S-Video Audio Input (Right / Left) ...Connect an external audio source to an external video device such as a VCR or video game system. 3. DVI Audio Input (Right / Left) Connect an external audio to an antenna or...
User Manual
Page 11
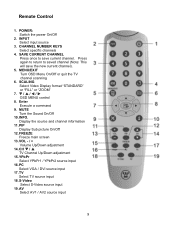
..."FILL" or "ZOOM" 7. Display the source and channel information 11. MUTE Turn the Sound On/Off 10. AV Select AV1 / AV2 source input 9 Press again to return to save the new current channel). 5. INFO. POWER: Switch the power On/Off 2. PIP Display Sub picture On.../Off 12. YPbPr Select YPbPr1 / YPbPr2 source input 16. INPUT Select input source 3. CHANNEL NUMBER KEYS Select specific channels 4. T...
..."FILL" or "ZOOM" 7. Display the source and channel information 11. MUTE Turn the Sound On/Off 10. AV Select AV1 / AV2 source input 9 Press again to return to save the new current channel). 5. INFO. POWER: Switch the power On/Off 2. PIP Display Sub picture On.../Off 12. YPbPr Select YPbPr1 / YPbPr2 source input 16. INPUT Select input source 3. CHANNEL NUMBER KEYS Select specific channels 4. T...

User Manual
Page 14
... connecting to a PC (VGA/DVI): For the best picture quality, set the timing mode of you computer to set this timing mode. 12 4. Select input source for the LCD TV using the OSD menu or remote control 7. Refer to the graphic card's user guide of you computer to 1280 x 720 at... 75Hz. LCD TV 5. Connect power cables Connect the power cord to the LCD TV then to auto scan and edit available channels. 8. Turn Power On Press the Power ON button on the right side of the LCD TV, or press the...
... connecting to a PC (VGA/DVI): For the best picture quality, set the timing mode of you computer to set this timing mode. 12 4. Select input source for the LCD TV using the OSD menu or remote control 7. Refer to the graphic card's user guide of you computer to 1280 x 720 at... 75Hz. LCD TV 5. Connect power cables Connect the power cord to the LCD TV then to auto scan and edit available channels. 8. Turn Power On Press the Power ON button on the right side of the LCD TV, or press the...
User Manual
Page 22
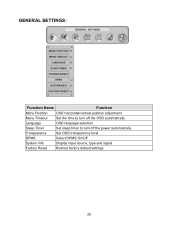
GENERAL SETTINGS: Function Name Function Menu Position OSD horizontal/vertical position adjustment Menu Timeout Set the time to turn off the OSD automatically Language OSD language selection Sleep Timer Set sleep timer to turn off the power automatically Transparency Set OSD transparency level DPMS Select DPMS On/Off System Info Display Input source, type and signal Factory Reset Restore factory default settings 20
GENERAL SETTINGS: Function Name Function Menu Position OSD horizontal/vertical position adjustment Menu Timeout Set the time to turn off the OSD automatically Language OSD language selection Sleep Timer Set sleep timer to turn off the power automatically Transparency Set OSD transparency level DPMS Select DPMS On/Off System Info Display Input source, type and signal Factory Reset Restore factory default settings 20

User Manual
Page 24
... cable to make sure it tightly. • Adjust brightness and contrast. • If you need a Macintosh adapter. • Check Source settings. Loose or broken pins in the cable connector could cause an improper connection. • Connect the LCD TV to another electrical device (such... as a radio) to the power outlet to verify that S-Video and Composite (AV1) share the same audio source. Troubleshooting No Power • Make sure power button is ON. • Make sure AC power cord is securely connected to the AC socket. • Plug ...
... cable to make sure it tightly. • Adjust brightness and contrast. • If you need a Macintosh adapter. • Check Source settings. Loose or broken pins in the cable connector could cause an improper connection. • Connect the LCD TV to another electrical device (such... as a radio) to the power outlet to verify that S-Video and Composite (AV1) share the same audio source. Troubleshooting No Power • Make sure power button is ON. • Make sure AC power cord is securely connected to the AC socket. • Plug ...


