
Quick Start Guide
Page 1
...on purchasing a HD-ready LCD TV! W2602 BK LCD TV Quick Connect Guide Westinghouse Digital Electronics KEYPAD S-Video/AV... Inputs VGA/YPbPr/DVI Inputs Congratulations on the back for connection to satellite set top box or digital cable. On the back you will help you do not use these options. Antenna 23 Connect the Tuner Connect either analog cable or TV...the enclosed AC power cable to connect the AC power to maximize your LCD TV experience. www.westinghousedigital.com Connect a DVD Player Connect a DVD player to turn...
...on purchasing a HD-ready LCD TV! W2602 BK LCD TV Quick Connect Guide Westinghouse Digital Electronics KEYPAD S-Video/AV... Inputs VGA/YPbPr/DVI Inputs Congratulations on the back for connection to satellite set top box or digital cable. On the back you will help you do not use these options. Antenna 23 Connect the Tuner Connect either analog cable or TV...the enclosed AC power cable to connect the AC power to maximize your LCD TV experience. www.westinghousedigital.com Connect a DVD Player Connect a DVD player to turn...
Quick Start Guide
Page 2
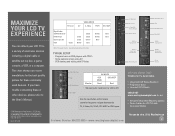
... set top box, a game console, a VCR, or a computer. Specifications subject to change without notice. ¼, Westinghouse and You can attach your LCD TV to a variety of Westinghouse Electric Corporation and are used devices. DID YOU KNOW THAT YOUR LCD TV ALSO HAS: • Integrated 9 W Stereo Speakers • Progressive Scan • Inverse 3:2 Pull Down Check...
... set top box, a game console, a VCR, or a computer. Specifications subject to change without notice. ¼, Westinghouse and You can attach your LCD TV to a variety of Westinghouse Electric Corporation and are used devices. DID YOU KNOW THAT YOUR LCD TV ALSO HAS: • Integrated 9 W Stereo Speakers • Progressive Scan • Inverse 3:2 Pull Down Check...

User Manual
Page 2
... Product Safety Instructions 2 Antenna Installation Safety 3 Safety Guidelines 4 Cleaning the LCD TV 5 INSTALLATION Package Contents 6 Front View of the LCD TV 6 Side View of the LCD TV 7 Rear View of the LCD TV 9 Remote Controls 10 Installation 11 OSD Functions PICTURE PARAMETERS: Brightness / Contrast ... PIP Source / Swap / PIP Position / PIP Size / Audio From...........18 CHANNEL SETTINGS: TV / CATV / Auto Scan / Channel EDIT / Close Caption 19 PARENTAL CONTROLS: Lock Menu / MPAA Rating / TV PG Rating / Password EDIT 19 GENERAL SETTINGS: Menu Position / Menu Timeout / Language / ...
... Product Safety Instructions 2 Antenna Installation Safety 3 Safety Guidelines 4 Cleaning the LCD TV 5 INSTALLATION Package Contents 6 Front View of the LCD TV 6 Side View of the LCD TV 7 Rear View of the LCD TV 9 Remote Controls 10 Installation 11 OSD Functions PICTURE PARAMETERS: Brightness / Contrast ... PIP Source / Swap / PIP Position / PIP Size / Audio From...........18 CHANNEL SETTINGS: TV / CATV / Auto Scan / Channel EDIT / Close Caption 19 PARENTAL CONTROLS: Lock Menu / MPAA Rating / TV PG Rating / Password EDIT 19 GENERAL SETTINGS: Menu Position / Menu Timeout / Language / ...

User Manual
Page 4
...on a bed, sofa, rug or other similar surface. • Do not place the LCD TV in a built-in airtight compartments. Your warranty does not cover repairs or attempted repairs by anyone not authorized by Westinghouse Digital. • If your LCD display with liquids, such as a bookcase or rack unless ... from the remote control. To Reduce The Risk Of Fire Or Electric Shock, Do Not Expose The LCD TV To Rain Or Moisture! For your LCD TV to protect it off and contact the Westinghouse Service Center. • WARNING - Periodically inspect the cords and each end of moisture. • Do ...
...on a bed, sofa, rug or other similar surface. • Do not place the LCD TV in a built-in airtight compartments. Your warranty does not cover repairs or attempted repairs by anyone not authorized by Westinghouse Digital. • If your LCD display with liquids, such as a bookcase or rack unless ... from the remote control. To Reduce The Risk Of Fire Or Electric Shock, Do Not Expose The LCD TV To Rain Or Moisture! For your LCD TV to protect it off and contact the Westinghouse Service Center. • WARNING - Periodically inspect the cords and each end of moisture. • Do ...

User Manual
Page 5
... safety purpose of the polarized or grounding- Antenna Installation Safety Outdoor Antenna Grounding If an outside antenna or cable system is connected to the LCD TV, be taken to keep from touching such power lines or circuits. 1) Read these instructions. 2) Keep these instructions. 3) Heed all warnings. 4) Follow ... to an antenna discharge unit, connection to grounding electrodes, and requirements for long periods of time, unplug it is required when the LCD TV has been damaged in the vicinity of the cord. 11) Only use caution when moving the cart to lightning and power-line surges. ...
... safety purpose of the polarized or grounding- Antenna Installation Safety Outdoor Antenna Grounding If an outside antenna or cable system is connected to the LCD TV, be taken to keep from touching such power lines or circuits. 1) Read these instructions. 2) Keep these instructions. 3) Heed all warnings. 4) Follow ... to an antenna discharge unit, connection to grounding electrodes, and requirements for long periods of time, unplug it is required when the LCD TV has been damaged in the vicinity of the cord. 11) Only use caution when moving the cart to lightning and power-line surges. ...
User Manual
Page 6
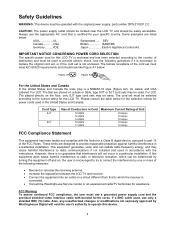
... NOTICE CONCERNING POWER CORD SELECTION The specific power cord for a Class B digital device, pursuant to operate this LCD TV is connected. • Consult the Westinghouse Service Center or an experienced radio/TV technician for the LCD TV. FCC Warning To assure continued FCC compliance, the user must use only a shielded BNC (5) cable. CAUTION: The...
... NOTICE CONCERNING POWER CORD SELECTION The specific power cord for a Class B digital device, pursuant to operate this LCD TV is connected. • Consult the Westinghouse Service Center or an experienced radio/TV technician for the LCD TV. FCC Warning To assure continued FCC compliance, the user must use only a shielded BNC (5) cable. CAUTION: The...

User Manual
Page 7
...is not clean, apply a small amount of any ammonia or alcohol-based cleaners on the LCD TV screen or case. abrasive detergent onto a clean, soft, lint-free cloth, then wipe the surface. Disclaimer Westinghouse Digital does not recommend the use of non-ammonia, non-alcohol based, mild non- Cleaning ...the LCD TV • MAKE SURE THE LCD TV IS TURNED OFF • NEVER SPRAY OR POUR ANY LIQUID DIRECTLY ONTO THE SCREEN...
...is not clean, apply a small amount of any ammonia or alcohol-based cleaners on the LCD TV screen or case. abrasive detergent onto a clean, soft, lint-free cloth, then wipe the surface. Disclaimer Westinghouse Digital does not recommend the use of non-ammonia, non-alcohol based, mild non- Cleaning ...the LCD TV • MAKE SURE THE LCD TV IS TURNED OFF • NEVER SPRAY OR POUR ANY LIQUID DIRECTLY ONTO THE SCREEN...

User Manual
Page 8
W2602 BK) • Remote Control (with batteries) • Power Cord • User's Manual • Warranty Card Front View of the LCD TV Use the buttons on the right side of the LCD TV or on page 13. The OSD controls are defined in "OSD Functions" on the remote control to display the On Screen Display (OSD). INSTALLATION Package Contents Your product package includes: • Westinghouse LCD TV (Model No. "IR" Receiver Speakers 6
W2602 BK) • Remote Control (with batteries) • Power Cord • User's Manual • Warranty Card Front View of the LCD TV Use the buttons on the right side of the LCD TV or on page 13. The OSD controls are defined in "OSD Functions" on the remote control to display the On Screen Display (OSD). INSTALLATION Package Contents Your product package includes: • Westinghouse LCD TV (Model No. "IR" Receiver Speakers 6

User Manual
Page 9
Input 5. Channel up/down when input is TV or highlight a control while in the OSD Menu. Power Button Turn OSD Menu ON/OFF Increase/Decrease sound volume or adjust a highlighted control while in the OSD Menu. Side View of the LCD TV 1. Menu 2. Channel + / 4. Power ON/OFF 7 Select Active Video Input or choose a selection while in the OSD MENU. Volume + / 3.
Input 5. Channel up/down when input is TV or highlight a control while in the OSD Menu. Power Button Turn OSD Menu ON/OFF Increase/Decrease sound volume or adjust a highlighted control while in the OSD Menu. Side View of the LCD TV 1. Menu 2. Channel + / 4. Power ON/OFF 7 Select Active Video Input or choose a selection while in the OSD MENU. Volume + / 3.

User Manual
Page 10
... external audio receiver. 5. AV1 Video Input Connect to an external video device such as a VCR or video game system. 3. ANT (RF-input) Connect the LCD TV to the Audio out (Green) from AC IN to this jack. 9. YPbPr1 Audio 1 Input (Left / Right) Connect an external audio source to this output to...
... external audio receiver. 5. AV1 Video Input Connect to an external video device such as a VCR or video game system. 3. ANT (RF-input) Connect the LCD TV to the Audio out (Green) from AC IN to this jack. 9. YPbPr1 Audio 1 Input (Left / Right) Connect an external audio source to this output to...
User Manual
Page 11
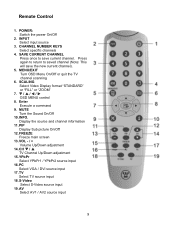
...CHANNEL Press once to saved channel (Note: This will save current channel. MENU/EXIT Turn OSD Menu On/Off or quit the TV channel scanning 6. PIP Display Sub picture On/Off 12. YPbPr Select YPbPr1 / YPbPr2 source input 16. SCALING Select Video Display ... T / S / W / X OSD MENU control 8. AV Select AV1 / AV2 source input 9 POWER: Switch the power On/Off 2. Enter Execute a command 9. TV Select TV source input 18. Display the source and channel information 11. S-Video Select S-Video source input 19. INFO. CHANNEL NUMBER KEYS Select specific channels 4. MUTE Turn...
...CHANNEL Press once to saved channel (Note: This will save current channel. MENU/EXIT Turn OSD Menu On/Off or quit the TV channel scanning 6. PIP Display Sub picture On/Off 12. YPbPr Select YPbPr1 / YPbPr2 source input 16. SCALING Select Video Display ... T / S / W / X OSD MENU control 8. AV Select AV1 / AV2 source input 9 POWER: Switch the power On/Off 2. Enter Execute a command 9. TV Select TV source input 18. Display the source and channel information 11. S-Video Select S-Video source input 19. INFO. CHANNEL NUMBER KEYS Select specific channels 4. MUTE Turn...

User Manual
Page 13
Connect audio and video cables to a PC VGA CONNECTION: Connect an analog VGA cable from the PC's AUDIO OUT port to the AUDIO IN port on the LCD TV. 3. Connect AV, Component, S-Video, Antenna/Cable to the LCD TV VGA IN port. IMPORTANT: Before beginning, make sure all of the following compatible devices into the back of the LCD TV. AUDIO CONNECTION: Connect a stereo mini cable from your PC VGA OUT port to Video Devices Connect one or all devices are turned off. 2. VCR (Not supplied) (Not supplied) 11
Connect audio and video cables to a PC VGA CONNECTION: Connect an analog VGA cable from the PC's AUDIO OUT port to the AUDIO IN port on the LCD TV. 3. Connect AV, Component, S-Video, Antenna/Cable to the LCD TV VGA IN port. IMPORTANT: Before beginning, make sure all of the following compatible devices into the back of the LCD TV. AUDIO CONNECTION: Connect a stereo mini cable from your PC VGA OUT port to Video Devices Connect one or all devices are turned off. 2. VCR (Not supplied) (Not supplied) 11

User Manual
Page 14
... power cord to the LCD TV then to 1280 x 720 at 75Hz. Select input source for the LCD TV using the OSD menu or remote control 7. Turn Power On Press the Power ON button on the right side of the LCD TV, or press the Power ON... (Red) button on TV Inputs: See page 18 to auto scan and edit available channels. 8. If connecting to a PC (VGA/DVI...graphic card's user guide of you computer to Antenna, Cable or other RF source on the remote control. 6. 4. LCD TV 5.
... power cord to the LCD TV then to 1280 x 720 at 75Hz. Select input source for the LCD TV using the OSD menu or remote control 7. Turn Power On Press the Power ON button on the right side of the LCD TV, or press the Power ON... (Red) button on TV Inputs: See page 18 to auto scan and edit available channels. 8. If connecting to a PC (VGA/DVI...graphic card's user guide of you computer to Antenna, Cable or other RF source on the remote control. 6. 4. LCD TV 5.
User Manual
Page 15
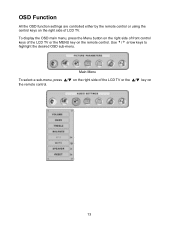
Main Menu To select a sub-menu, press ▲/▼ on the right side of the LCD TV or the ▲/▼ key on the remote control. To display the OSD main menu, press the Menu button on the right side of front control keys of LCD TV. Use 3/4 arrow keys to highlight the desired OSD sub-menu. OSD Function All the OSD function settings are controlled either by the remote control or using the control keys on the right side of the LCD TV or the MENU key on the remote control. 13
Main Menu To select a sub-menu, press ▲/▼ on the right side of the LCD TV or the ▲/▼ key on the remote control. To display the OSD main menu, press the Menu button on the right side of front control keys of LCD TV. Use 3/4 arrow keys to highlight the desired OSD sub-menu. OSD Function All the OSD function settings are controlled either by the remote control or using the control keys on the right side of the LCD TV or the MENU key on the remote control. 13
User Manual
Page 20
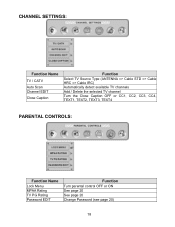
CHANNEL SETTINGS: Function Name TV / CATV Auto Scan Channel EDIT Close Caption Function Select TV Source Type (ANTENNA => Cable STD => Cable HRC => Cable IRC) Automatically detect available TV channels Add / Delete the selected TV channel Turn the Close Caption OFF or CC1, CC2, CC3, CC4, TEXT1, TEXT2, TEXT3, TEXT4 PARENTAL CONTROLS: Function Name Lock Menu MPAA Rating TV PG Rating Password EDIT Function Turn parental control OFF or ON See page 20 See page 20 Change Password (see page 20) 18
CHANNEL SETTINGS: Function Name TV / CATV Auto Scan Channel EDIT Close Caption Function Select TV Source Type (ANTENNA => Cable STD => Cable HRC => Cable IRC) Automatically detect available TV channels Add / Delete the selected TV channel Turn the Close Caption OFF or CC1, CC2, CC3, CC4, TEXT1, TEXT2, TEXT3, TEXT4 PARENTAL CONTROLS: Function Name Lock Menu MPAA Rating TV PG Rating Password EDIT Function Turn parental control OFF or ON See page 20 See page 20 Change Password (see page 20) 18
User Manual
Page 21
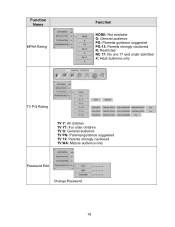
Function Name MPAA Rating Function NONE: Not available G: General audience PG: Parental guidance suggested PG-13: Parents strongly cautioned R: Restricted NC 17: No one 17 and under admitted X: Adult audience only TV PG Rating TV Y: All children TV Y7: For older children TV G: General audience TV PG: Parental guidance suggested TV 14: Parents strongly cautioned TV MA: Mature audience only Password Edit Change Password 19
Function Name MPAA Rating Function NONE: Not available G: General audience PG: Parental guidance suggested PG-13: Parents strongly cautioned R: Restricted NC 17: No one 17 and under admitted X: Adult audience only TV PG Rating TV Y: All children TV Y7: For older children TV G: General audience TV PG: Parental guidance suggested TV 14: Parents strongly cautioned TV MA: Mature audience only Password Edit Change Password 19

User Manual
Page 23
...556.76mm (H) x 186.2mm (D) Weight Net / Gross 13.0kg / 16.0kg Regulations UL/C-UL, FCC-B Power saving On LCD TV Specifications Model Name W2602 BK Panel Type TFT (Thin Film Transistor), Active Matrix WXGA LCD, 1280 x 720 vertical stripe Color Anti-reflective... * 1 (75 ohms, 0.7 Vp-p)/Mini-Stereo *1 H/V separated (TTL) for PC DVI-D * 1 (HDCP support) / RCA (L/R) * 1 fh: 30-80 kHz, fv: 50-75 Hz TV system antenna / NTSC*1 Component Video * 2 / RCA (L/R) Stereo * 2 Composite * 1 / S-Video * 1 / RCA (L/R) stereo * 1 Output Signal RCA (L/R) Stereo * 1 HDTV Compatibility 480i...
...556.76mm (H) x 186.2mm (D) Weight Net / Gross 13.0kg / 16.0kg Regulations UL/C-UL, FCC-B Power saving On LCD TV Specifications Model Name W2602 BK Panel Type TFT (Thin Film Transistor), Active Matrix WXGA LCD, 1280 x 720 vertical stripe Color Anti-reflective... * 1 (75 ohms, 0.7 Vp-p)/Mini-Stereo *1 H/V separated (TTL) for PC DVI-D * 1 (HDCP support) / RCA (L/R) * 1 fh: 30-80 kHz, fv: 50-75 Hz TV system antenna / NTSC*1 Component Video * 2 / RCA (L/R) Stereo * 2 Composite * 1 / S-Video * 1 / RCA (L/R) stereo * 1 Output Signal RCA (L/R) Stereo * 1 HDTV Compatibility 480i...

User Manual
Page 24
...to make sure it tightly. • Adjust brightness and contrast. • If you are not connected to the Headphone Jack on the LCD TV. 22 The LCD TV audio may be set to SAP or minimum. • Press the Volume + (Up) key on the remote control, so that the outlet is... supplying the proper voltage. Loose or broken pins in the cable connector could cause an improper connection. • Connect the LCD TV to another electrical device (such as a radio) to the power outlet to verify that MUTE disappears from the screen. • Check the audio settings. Snow...
...to make sure it tightly. • Adjust brightness and contrast. • If you are not connected to the Headphone Jack on the LCD TV. 22 The LCD TV audio may be set to SAP or minimum. • Press the Volume + (Up) key on the remote control, so that the outlet is... supplying the proper voltage. Loose or broken pins in the cable connector could cause an improper connection. • Connect the LCD TV to another electrical device (such as a radio) to the power outlet to verify that MUTE disappears from the screen. • Check the audio settings. Snow...
User Manual
Page 25
How Can I Find More Help? • Log on to: www.westinghousedigital.com • Contact Westinghouse Customer Service at (866) 287-5555 or write us at [email protected] 23 Remote Control Does Not Work • Make sure batteries are inserted correctly. • Replace batteries with new ones if necessary. Remote Control Code Not Found in 4:3 format. Image Quality Issues • For the best TV image quality, "Standard Definition" TV should be viewed in a "Universal" Remote • Purchase a separate "learning" remote control.
How Can I Find More Help? • Log on to: www.westinghousedigital.com • Contact Westinghouse Customer Service at (866) 287-5555 or write us at [email protected] 23 Remote Control Does Not Work • Make sure batteries are inserted correctly. • Replace batteries with new ones if necessary. Remote Control Code Not Found in 4:3 format. Image Quality Issues • For the best TV image quality, "Standard Definition" TV should be viewed in a "Universal" Remote • Purchase a separate "learning" remote control.


