
XHU04Z Instruction Manual
Page 1
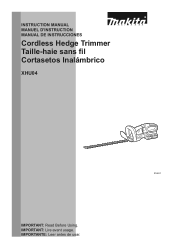
IMPORTANTE: Leer antes de usar. 1 INSTRUCTION MANUAL MANUEL D'INSTRUCTION MANUAL DE INSTRUCCIONES Cordless Hedge Trimmer Taille-haie sans fil Cortasetos Inalámbrico XHU04 014621 IMPORTANT: Read Before Using. IMPORTANT: Lire avant usage.
IMPORTANTE: Leer antes de usar. 1 INSTRUCTION MANUAL MANUEL D'INSTRUCTION MANUAL DE INSTRUCCIONES Cordless Hedge Trimmer Taille-haie sans fil Cortasetos Inalámbrico XHU04 014621 IMPORTANT: Read Before Using. IMPORTANT: Lire avant usage.

XHU04Z Instruction Manual
Page 2
... inattention while operating power tools may differ from heat, oil, sharp edges or moving parts. Do not use any way. Do not operate power tools in the off-position before turning the power tool on invites accidents. 13. Electrical safety 4. Do not abuse the cord. When operating a power tool outdoors, use an extension cord suitable for carrying, pulling or unplugging the power tool. Carrying power tools with battery cartridge, according to change without notice. • Specifications and battery cartridge...
... inattention while operating power tools may differ from heat, oil, sharp edges or moving parts. Do not use any way. Do not operate power tools in the off-position before turning the power tool on invites accidents. 13. Electrical safety 4. Do not abuse the cord. When operating a power tool outdoors, use an extension cord suitable for carrying, pulling or unplugging the power tool. Carrying power tools with battery cartridge, according to change without notice. • Specifications and battery cartridge...

XHU04Z Instruction Manual
Page 3
..., keys, nails, screws or other condition that is suitable for misalignment or binding of moving . A moment of inattention while operating the hedge trimmer may cause irritation or burns. Hold the power tool by a qualified repair person using only identical replacement parts. Contact with these are dangerous in use the power tool if the switch does not turn off . Do not use and care 24. The electric motor is...
..., keys, nails, screws or other condition that is suitable for misalignment or binding of moving . A moment of inattention while operating the hedge trimmer may cause irritation or burns. Hold the power tool by a qualified repair person using only identical replacement parts. Contact with these are dangerous in use the power tool if the switch does not turn off . Do not use and care 24. The electric motor is...
XHU04Z Instruction Manual
Page 4
.... 4. Switch off the trimmer and remove the battery cartridge. 17. Lightly oil the cutter and put the blade cover on (1) battery charger, (2) battery, and (3) product using the tool. 14. If operating time has become excessively shorter, stop operating immediately. It may result in this restriction if they are specially designed to third parties. 9. It may result in good physical condition. Never use ) replace strict adherence to safety...
.... 4. Switch off the trimmer and remove the battery cartridge. 17. Lightly oil the cutter and put the blade cover on (1) battery charger, (2) battery, and (3) product using the tool. 14. If operating time has become excessively shorter, stop operating immediately. It may result in this restriction if they are specially designed to third parties. 9. It may result in good physical condition. Never use ) replace strict adherence to safety...
XHU04Z Instruction Manual
Page 5
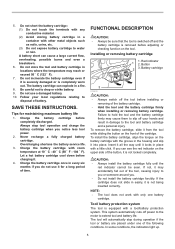
... removing battery cartridge. CAUTION: • Always install the battery cartridge fully until it locks in the housing and slip it for maintaining maximum battery life 1. This system automatically cuts off and the battery cartridge is switched off power to the motor to disposal of battery. Let a hot battery cartridge cool down before completely discharged. Tool/ battery protection system The tool is completely worn out. Do not use...
... removing battery cartridge. CAUTION: • Always install the battery cartridge fully until it locks in the housing and slip it for maintaining maximum battery life 1. This system automatically cuts off and the battery cartridge is switched off power to the motor to disposal of battery. Let a hot battery cartridge cool down before completely discharged. Tool/ battery protection system The tool is completely worn out. Do not use...
XHU04Z Instruction Manual
Page 6
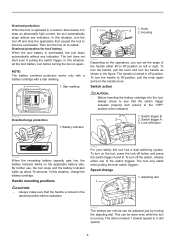
... adjusted just by turning the adjusting dial. Star marking 012128 Overdischarge protection 1 1. Switch trigger B 1 3 2. Speed change 1. Switch trigger A 3. In this situation, let the tool/ battery cool before operation. 014622 For your safety, this tool has a dual switching system. This can be done even while the tool is overheated, the tool stops automatically without any indication. The tool does not start even if pulling the switch trigger. To turn the handle, pull the knob and turn the handle...
... adjusted just by turning the adjusting dial. Star marking 012128 Overdischarge protection 1 1. Switch trigger B 1 3 2. Speed change 1. Switch trigger A 3. In this situation, let the tool/ battery cool before operation. 014622 For your safety, this tool has a dual switching system. This can be done even while the tool is overheated, the tool stops automatically without any indication. The tool does not start even if pulling the switch trigger. To turn the handle, pull the knob and turn the handle...

XHU04Z Instruction Manual
Page 7
... direction 2. The blade will break and may no longer work from a ladder, is extremely dangerous. Hedge surface to be cut with both hands and pull the switch trigger A or B and then move it calmly and slowly at the speed rate of battery cartridge and shear blades. Failure to do so may damage the tool. 014628 Attaching the chip receiver (optional accessory) on adjusting...
... direction 2. The blade will break and may no longer work from a ladder, is extremely dangerous. Hedge surface to be cut with both hands and pull the switch trigger A or B and then move it calmly and slowly at the speed rate of battery cartridge and shear blades. Failure to do so may damage the tool. 014628 Attaching the chip receiver (optional accessory) on adjusting...

XHU04Z Instruction Manual
Page 8
... locked in the shear blade unit. 1 2 1. Press the levers on the tool with its slits overlap with the nuts on the shear blades so that hands and face does not directly contact the blade. Chip receiver 3. NOTE: • Check the chip receiver for secure installment before use. • Never try to cut from the base toward the top for your easy handling before installing or removing...
... locked in the shear blade unit. 1 2 1. Press the levers on the tool with its slits overlap with the nuts on the shear blades so that hands and face does not directly contact the blade. Chip receiver 3. NOTE: • Check the chip receiver for secure installment before use. • Never try to cut from the base toward the top for your easy handling before installing or removing...

XHU04Z Instruction Manual
Page 9
After operation, remove dust from both sides of a package for accessory shear blades. Removing or installing shear blade CAUTION: • Before removing or installing shear blade, always be sure that hands and face does not directly contact the blade. Screws 011157 NOTE: • Be careful not to do so may cause rust or damage on the tool. Screws 014772 Remove the plate. 1 2 1. and spray-type lubricating oil. Failure to get your hands dirty...
After operation, remove dust from both sides of a package for accessory shear blades. Removing or installing shear blade CAUTION: • Before removing or installing shear blade, always be sure that hands and face does not directly contact the blade. Screws 011157 NOTE: • Be careful not to do so may cause rust or damage on the tool. Screws 014772 Remove the plate. 1 2 1. and spray-type lubricating oil. Failure to get your hands dirty...
XHU04Z Instruction Manual
Page 10
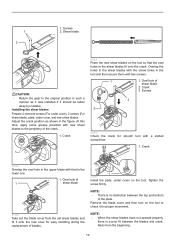
... 1 shear blade 011259 Take out the blade cover from the beginning. 10 At this time, apply some grease provided with a slotted screwdriver. 1. Screws 2. Installing the shear blades Prepare 4 removed screws (For under cover), 2 screws (For shear blade), plate, under cover on the tool to check it onto the new ones for easy handling during the replacement of shear blade 2. Oval hole of blades. 1 011261 Install the plate, under...
... 1 shear blade 011259 Take out the blade cover from the beginning. 10 At this time, apply some grease provided with a slotted screwdriver. 1. Screws 2. Installing the shear blades Prepare 4 removed screws (For under cover), 2 screws (For shear blade), plate, under cover on the tool to check it onto the new ones for easy handling during the replacement of shear blade 2. Oval hole of blades. 1 011261 Install the plate, under...
XHU04Z Instruction Manual
Page 11
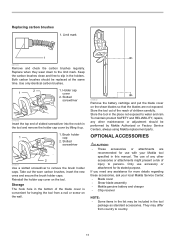
... a nail or screw on the wall. 014632 Remove the battery cartridge and put the blade cover on the tool. Keep the carbon brushes clean and free to country. 11 Use only identical carbon brushes. 2 1 1. Slotted screwdriver 2 014631 Use a slotted screwdriver to the limit mark. Reinstall the holder cap cover on the shear blades so that the blades are recommended for use with your local Makita Service Center. • Blade cover • Shear blade assembly...
... a nail or screw on the wall. 014632 Remove the battery cartridge and put the blade cover on the tool. Keep the carbon brushes clean and free to country. 11 Use only identical carbon brushes. 2 1 1. Slotted screwdriver 2 014631 Use a slotted screwdriver to the limit mark. Reinstall the holder cap cover on the shear blades so that the blades are recommended for use with your local Makita Service Center. • Blade cover • Shear blade assembly...
XHU04Z Instruction Manual
Page 12
... Authorized Service Centers. Should any trouble develop during this one year period, return the COMPLETE tool, freight prepaid, to one of normal wear and tear: the tool has been abused, misused or improperly maintained: alterations have been made or attempted by defective workmanship or material, Makita will repair (or at our option, replace) without charge. This Warranty does...
... Authorized Service Centers. Should any trouble develop during this one year period, return the COMPLETE tool, freight prepaid, to one of normal wear and tear: the tool has been abused, misused or improperly maintained: alterations have been made or attempted by defective workmanship or material, Makita will repair (or at our option, replace) without charge. This Warranty does...

XHU04Z Parts Breakdown
Page 2
... 255058-6 RIVET 2 012 233002-3 COMPRESSION SPRING 3 013 233117-6 COMPRESSION SPRING 6 014 452162-4 LOCK LEVER 015 455092-8 SLIDER 016 187879-7 HANDLE SET 016 C10 263005-3 RUBBER PIN 6 016 C20 803N80-7 INDICATION LABEL 016 D10 INC. 6 017 265995-6 TAPPING SCREW 4X18 018 815R02-9 XHU04 NAME PLATE 019 452145-4 HOLDER CAP COVER 020 643941-3 BRUSH HOLDER CAP 021 CB442 CARBON BRUSH SET CB-442 (195023-2) 022 265995-6 TAPPING...
... 255058-6 RIVET 2 012 233002-3 COMPRESSION SPRING 3 013 233117-6 COMPRESSION SPRING 6 014 452162-4 LOCK LEVER 015 455092-8 SLIDER 016 187879-7 HANDLE SET 016 C10 263005-3 RUBBER PIN 6 016 C20 803N80-7 INDICATION LABEL 016 D10 INC. 6 017 265995-6 TAPPING SCREW 4X18 018 815R02-9 XHU04 NAME PLATE 019 452145-4 HOLDER CAP COVER 020 643941-3 BRUSH HOLDER CAP 021 CB442 CARBON BRUSH SET CB-442 (195023-2) 022 265995-6 TAPPING...

XHU04Z Parts Breakdown
Page 3
... SCREW 4X18 041 443142-1 DUST GUARD 042 211032-4 BALL BEARING 608ZZ 043 253835-0 FLAT WASHER 8 044 142215-4 GEAR COMPLETE 045 196689-1 SHEAR BLADE ASSEMBLY SET 045 C10 264013-7 HEX. LOCK NUT M5-8 045 C20 257766-5 SLEEVE 5 045 C30 265181-9 +TRUSS HEAD SCREW M5X20 045 C40 345205-8 BRANCH CATCHER 045 C50 911208-0 PAN HEAD SCREW M5X10 045 C60 188605-7 OIL VESSEL SET 046 346325-1 PLATE 047 253835-0 FLAT WASHER...
... SCREW 4X18 041 443142-1 DUST GUARD 042 211032-4 BALL BEARING 608ZZ 043 253835-0 FLAT WASHER 8 044 142215-4 GEAR COMPLETE 045 196689-1 SHEAR BLADE ASSEMBLY SET 045 C10 264013-7 HEX. LOCK NUT M5-8 045 C20 257766-5 SLEEVE 5 045 C30 265181-9 +TRUSS HEAD SCREW M5X20 045 C40 345205-8 BRANCH CATCHER 045 C50 911208-0 PAN HEAD SCREW M5X10 045 C60 188605-7 OIL VESSEL SET 046 346325-1 PLATE 047 253835-0 FLAT WASHER...


