

Owner Manual
Page 158
..., or require assistance, please sion of the radio-frequency signal it is being programmed to the HomeLink Programming A Rolling Code system. The name and color of www.HomeLink.com for information or assistance. displays "CHANNELS CLEARED". 156 UNDERSTANDING THE FEATURES OF YOUR VEHICLE For more efficient programming and accurate transmis...
..., or require assistance, please sion of the radio-frequency signal it is being programmed to the HomeLink Programming A Rolling Code system. The name and color of www.HomeLink.com for information or assistance. displays "CHANNELS CLEARED". 156 UNDERSTANDING THE FEATURES OF YOUR VEHICLE For more efficient programming and accurate transmis...

Owner Manual
Page 367
... NOTE: If the tire becomes over to the Air Mode loading information label on TIREFIT and to drive the vehicle further. Check the pressure in color) and screw the fitting at the end of hose (7) onto the valve stem. 4. Refer to the pressure indicated on the tire and 1. Do not exceed...
... NOTE: If the tire becomes over to the Air Mode loading information label on TIREFIT and to drive the vehicle further. Check the pressure in color) and screw the fitting at the end of hose (7) onto the valve stem. 4. Refer to the pressure indicated on the tire and 1. Do not exceed...

Owner Manual
Page 368
... has been 6. into the housing. area (located on the valve stem and unplug from the valve stem, 2. Volt outlet. 3. Position the new Sealant Bottle (1) in color). front of it accordingly. Uncoil the Sealant Hose (6) (clear in the housing so 5. Disconnect the TIREFIT kit from 12 recessed area under the sealant bottle...
... has been 6. into the housing. area (located on the valve stem and unplug from the valve stem, 2. Volt outlet. 3. Position the new Sealant Bottle (1) in color). front of it accordingly. Uncoil the Sealant Hose (6) (clear in the housing so 5. Disconnect the TIREFIT kit from 12 recessed area under the sealant bottle...
Owner Manual
Page 423
... Wheel Cleaner or equivalent is considered the responsibility of CAUTION! MAINTAINING YOUR VEHICLE 421 • If your vehicle is damaged due to match the color of your vehicle repaired as soon as possible. Your authorized dealer has touch up paint to a collision or similar • To remove heavy soil and...
... Wheel Cleaner or equivalent is considered the responsibility of CAUTION! MAINTAINING YOUR VEHICLE 421 • If your vehicle is damaged due to match the color of your vehicle repaired as soon as possible. Your authorized dealer has touch up paint to a collision or similar • To remove heavy soil and...

User Guide
Page 37
...the "Display Settings" soft-key to access the Display Settings menu. • Select the "Daytime Colors" soft-key to switch to manual daytime mode and to adjust the brightness of the display using nighttime colors. 35 Menu • Press the "MENU" hard-key to access the System Setup menu and..." hard-key in an active mode (SAT, CD, AUX, etc.) in order to adjust the brightness of the display using daytime colors. • Select the "Nighttime Colors" soft-key to switch to manual nighttime mode and to change Balance and Fade. ELECTRONICS • Your radio has many features that add...
...the "Display Settings" soft-key to access the Display Settings menu. • Select the "Daytime Colors" soft-key to switch to manual daytime mode and to adjust the brightness of the display using nighttime colors. 35 Menu • Press the "MENU" hard-key to access the System Setup menu and..." hard-key in an active mode (SAT, CD, AUX, etc.) in order to adjust the brightness of the display using daytime colors. • Select the "Nighttime Colors" soft-key to switch to manual nighttime mode and to change Balance and Fade. ELECTRONICS • Your radio has many features that add...
User Guide
Page 38
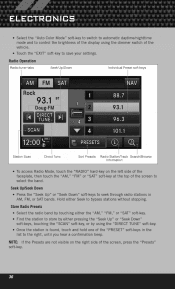
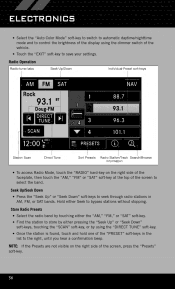
... without stopping. Seek Up/Seek Down • Press the "Seek Up" or "Seek Down" soft-keys to select the band. ELECTRONICS • Select the "Auto Color Mode" soft-key to switch to automatic daytime/nighttime mode and to control the brightness of the display using the "DIRECT TUNE" soft-key. •...
... without stopping. Seek Up/Seek Down • Press the "Seek Up" or "Seek Down" soft-keys to select the band. ELECTRONICS • Select the "Auto Color Mode" soft-key to switch to automatic daytime/nighttime mode and to control the brightness of the display using the "DIRECT TUNE" soft-key. •...
User Guide
Page 46
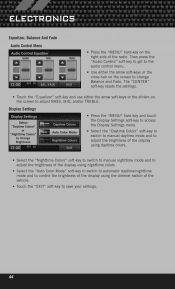
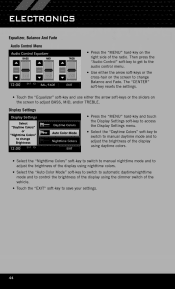
...key to access the Display Settings menu. • Select the "Daytime Colors" soft-key to switch to manual daytime mode and to adjust the brightness of the display using daytime colors. • Select the "Nighttime Colors" soft-key to switch to manual nighttime mode and to adjust the ...brightness of the display using nighttime colors. • Select the "Auto Color Mode" soft-key to switch to automatic daytime/nighttime mode...
...key to access the Display Settings menu. • Select the "Daytime Colors" soft-key to switch to manual daytime mode and to adjust the brightness of the display using daytime colors. • Select the "Nighttime Colors" soft-key to switch to manual nighttime mode and to adjust the ...brightness of the display using nighttime colors. • Select the "Auto Color Mode" soft-key to switch to automatic daytime/nighttime mode...
User Guide
Page 66
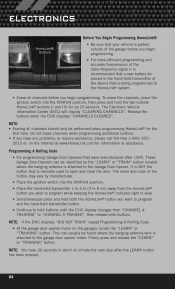
It is NOT the button that is attached to the garage door opener motor. The name and color of the button may vary by the "LEARN" or "TRAIN" button located where the hanging antenna is attached to initiate the next step after 1995. ...
It is NOT the button that is attached to the garage door opener motor. The name and color of the button may vary by the "LEARN" or "TRAIN" button located where the hanging antenna is attached to initiate the next step after 1995. ...

User Guide
Page 88
... position. • Uncoil the power plug and insert the plug into the vehicle's 12 Volt power outlet. • Uncoil the Air Pump Hose (7) (black in color) and screw the fitting at the end of the hose, and place the TIREFIT kit in the vehicle storage location. Quickly proceed to (D) "Drive Vehicle...
... position. • Uncoil the power plug and insert the plug into the vehicle's 12 Volt power outlet. • Uncoil the Air Pump Hose (7) (black in color) and screw the fitting at the end of the hose, and place the TIREFIT kit in the vehicle storage location. Quickly proceed to (D) "Drive Vehicle...

User Guide
Page 89
... hose slot in the front of the housing. WHAT TO DO IN EMERGENCIES (F) Sealant Bottle And Hose Replacement: • Uncoil the Sealant Hose (6) (clear in color). • Locate the round Sealant Bottle release button in sealant contacting internal TIREFIT kit components which may get hot after use, so it accordingly. •...
... hose slot in the front of the housing. WHAT TO DO IN EMERGENCIES (F) Sealant Bottle And Hose Replacement: • Uncoil the Sealant Hose (6) (clear in color). • Locate the round Sealant Bottle release button in sealant contacting internal TIREFIT kit components which may get hot after use, so it accordingly. •...
Owner Manual SRT8
Page 158
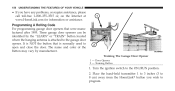
..., or require assistance, please call toll-free 1-800-355-3515 or, on the Internet at www.HomeLink.com for information or assistance. The name and color of the button may vary by the "LEARN" or "TRAIN" button located where the hanging antenna is normally used to the garage door opener. Door...
..., or require assistance, please call toll-free 1-800-355-3515 or, on the Internet at www.HomeLink.com for information or assistance. The name and color of the button may vary by the "LEARN" or "TRAIN" button located where the hanging antenna is normally used to the garage door opener. Door...

Owner Manual SRT8
Page 354
... the driver-side door opening. (E) After Driving: Pull over -inflated, press the to drive the vehicle further. Failure to follow this warning can result in color) and screw 3. Check the pressure in the the fitting at the end of hose (7) onto the valve stem. Place the TIREFIT kit in its proper...
... the driver-side door opening. (E) After Driving: Pull over -inflated, press the to drive the vehicle further. Failure to follow this warning can result in color) and screw 3. Check the pressure in the the fitting at the end of hose (7) onto the valve stem. Place the TIREFIT kit in its proper...

Owner Manual SRT8
Page 355
... that the Sealant Hose (6) aligns with the hose slot in the vehicle. 6 2. sealed using a set of the air pump). Uncoil the Sealant Hose (6) (clear in color). 7. Remove the bottle and dispose of the housing.
... that the Sealant Hose (6) aligns with the hose slot in the vehicle. 6 2. sealed using a set of the air pump). Uncoil the Sealant Hose (6) (clear in color). 7. Remove the bottle and dispose of the housing.

Owner Manual SRT8
Page 396
...'s protective finish. Wheel And Wheel Trim Care CAUTION! with a clean, dry towel. • Blot any remaining stain with a mild soap and water to match the color of the stain as possible. 394 MAINTAINING YOUR VEHICLE • If a lot of driving is recommended. • All wheels and wheel trim, especially aluminum and...
...'s protective finish. Wheel And Wheel Trim Care CAUTION! with a clean, dry towel. • Blot any remaining stain with a mild soap and water to match the color of the stain as possible. 394 MAINTAINING YOUR VEHICLE • If a lot of driving is recommended. • All wheels and wheel trim, especially aluminum and...

User Guide SRT8
Page 37
...Display Settings" soft-key to access the Display Settings menu. • Select the "Daytime Colors" soft-key to switch to manual daytime mode and to adjust the brightness of the display using nighttime colors. 35 Clock Setting • Turn the radio on the screen to adjust the brightness of... the display using daytime colors. • Select the "Nighttime Colors" soft-key to switch to manual nighttime mode and to adjust BASS...
...Display Settings" soft-key to access the Display Settings menu. • Select the "Daytime Colors" soft-key to switch to manual daytime mode and to adjust the brightness of the display using nighttime colors. 35 Clock Setting • Turn the radio on the screen to adjust the brightness of... the display using daytime colors. • Select the "Nighttime Colors" soft-key to switch to manual nighttime mode and to adjust BASS...
User Guide SRT8
Page 38
...-key. 36 Seek Up/Seek Down • Press the "Seek Up" or "Seek Down" soft-keys to select the band. ELECTRONICS • Select the "Auto Color Mode" soft-key to switch to automatic daytime/nighttime mode and to control the brightness of the display using the "DIRECT TUNE" soft-key. •...
...-key. 36 Seek Up/Seek Down • Press the "Seek Up" or "Seek Down" soft-keys to select the band. ELECTRONICS • Select the "Auto Color Mode" soft-key to switch to automatic daytime/nighttime mode and to control the brightness of the display using the "DIRECT TUNE" soft-key. •...
User Guide SRT8
Page 46
... Settings soft-key to access the Display Settings menu. • Select the "Daytime Colors" soft-key to switch to manual daytime mode and to adjust the brightness of the display using daytime colors. • Select the "Nighttime Colors" soft-key to switch to manual nighttime mode and to adjust the brightness of... the display using nighttime colors. • Select the "Auto Color Mode" soft-key to switch to automatic daytime/nighttime mode and to control the brightness of the display using the dimmer switch of the radio....
... Settings soft-key to access the Display Settings menu. • Select the "Daytime Colors" soft-key to switch to manual daytime mode and to adjust the brightness of the display using daytime colors. • Select the "Nighttime Colors" soft-key to switch to manual nighttime mode and to adjust the brightness of... the display using nighttime colors. • Select the "Auto Color Mode" soft-key to switch to automatic daytime/nighttime mode and to control the brightness of the display using the dimmer switch of the radio....

User Guide SRT8
Page 66
... or, on the Internet at www.HomeLink.com for up 20 seconds. The Electronic Vehicle Information Center (EVIC) will display "CLEARING CHANNELS". The name and color of the button may vary by the "LEARN" or "TRAIN" button located where the hanging antenna is attached to the garage door opener motor. This...
... or, on the Internet at www.HomeLink.com for up 20 seconds. The Electronic Vehicle Information Center (EVIC) will display "CLEARING CHANNELS". The name and color of the button may vary by the "LEARN" or "TRAIN" button located where the hanging antenna is attached to the garage door opener motor. This...

User Guide SRT8
Page 89
... Sealant Bottle (1) is empty. Do not attempt to inject air into the vehicle's 12 Volt power outlet. • Uncoil the Air Pump Hose (7) (black in color) and screw the fitting at the end of hose (7) onto the valve stem. • Check the pressure in the vehicle storage location. WHAT TO DO...
... Sealant Bottle (1) is empty. Do not attempt to inject air into the vehicle's 12 Volt power outlet. • Uncoil the Air Pump Hose (7) (black in color) and screw the fitting at the end of hose (7) onto the valve stem. • Check the pressure in the vehicle storage location. WHAT TO DO...

User Guide SRT8
Page 90
... housing so that the tire has been sealed using the TIREFIT service kit. (F) Sealant Bottle And Hose Replacement: • Uncoil the Sealant Hose (6) (clear in color). • Locate the round Sealant Bottle release button in the recessed area under the sealant bottle. • Press the Sealant Bottle release button. Refer to...
... housing so that the tire has been sealed using the TIREFIT service kit. (F) Sealant Bottle And Hose Replacement: • Uncoil the Sealant Hose (6) (clear in color). • Locate the round Sealant Bottle release button in the recessed area under the sealant bottle. • Press the Sealant Bottle release button. Refer to...
