

Owners Manual
Page 5
units of motorcycle controls 52 Ignition switch and steering lock 53 Left-hand handlebar switch 54 Clutch lever 55 Cold start control lever 56 Right-hand handlebar switch 57 4 How to set/display parameters 16 Total distance covered indicator: "Odometer" 19 Vehicle "speed" indicator 20 "TRIP" meter 21 Distance travelled on 44 The immobilizer system 45 Code card 46 Immobilizer override procedure 47 Duplicate keys 49 Service menu...
units of motorcycle controls 52 Ignition switch and steering lock 53 Left-hand handlebar switch 54 Clutch lever 55 Cold start control lever 56 Right-hand handlebar switch 57 4 How to set/display parameters 16 Total distance covered indicator: "Odometer" 19 Vehicle "speed" indicator 20 "TRIP" meter 21 Distance travelled on 44 The immobilizer system 45 Code card 46 Immobilizer override procedure 47 Duplicate keys 49 Service menu...

Owners Manual
Page 6
... on the vehicle 61 Tank filler plug 62 Seat lock and helmet holder 63 Side stand 64 Rear shock absorber adjusters 65 Running-in recommendations 66 Pre-ride checks 67 Starting the engine 69 Moving off 71 Braking 72 Stopping the motorcycle 73 Refuelling 73 Parking 74 Tool kit and accessories 75 Riding the motorcycle 66 Changing the air filter 76 Checking brake and clutch fluid level 76 Checking brake pads for...
... on the vehicle 61 Tank filler plug 62 Seat lock and helmet holder 63 Side stand 64 Rear shock absorber adjusters 65 Running-in recommendations 66 Pre-ride checks 67 Starting the engine 69 Moving off 71 Braking 72 Stopping the motorcycle 73 Refuelling 73 Parking 74 Tool kit and accessories 75 Riding the motorcycle 66 Changing the air filter 76 Checking brake and clutch fluid level 76 Checking brake pads for...

Owners Manual
Page 9
... slip roads to inhale noxious fuel vapours. take special care not to touch exhaust system with both hands. ALWAYS turn signals. Warning 8 Always make sure you to inflammable material (wood, leaves etc.). Both rider and pillion passenger must ALWAYS wear a safety helmet. The rider should ALWAYS hold the handlebars firmly with any fuel drops be hot, even after engine is switched...
... slip roads to inhale noxious fuel vapours. take special care not to touch exhaust system with both hands. ALWAYS turn signals. Warning 8 Always make sure you to inflammable material (wood, leaves etc.). Both rider and pillion passenger must ALWAYS wear a safety helmet. The rider should ALWAYS hold the handlebars firmly with any fuel drops be hot, even after engine is switched...

Owners Manual
Page 12
... the engine will be locked. It turns on when fuel is switched to ON and normally goes out a few seconds after engine starts. 5 3 1 6 7 fig. 3 If this light (6) stays on, stop the engine to correct operation. 6) ENGINE OIL PRESSURE LIGHT (RED). Indicates engine revs per minute. 3) NEUTRAL LIGHT N (GREEN). Illuminates when engine oil pressure is in neutral. 4) FUEL WARNING LIGHT (AMBER YELLOW). Illuminates when the high beam headlight is on briefly if the engine is signalled by...
... the engine will be locked. It turns on when fuel is switched to ON and normally goes out a few seconds after engine starts. 5 3 1 6 7 fig. 3 If this light (6) stays on, stop the engine to correct operation. 6) ENGINE OIL PRESSURE LIGHT (RED). Indicates engine revs per minute. 3) NEUTRAL LIGHT N (GREEN). Illuminates when engine oil pressure is in neutral. 4) FUEL WARNING LIGHT (AMBER YELLOW). Illuminates when the high beam headlight is on briefly if the engine is signalled by...

Owners Manual
Page 24
Time is always displayed as follows: AM from 0:00 to 11:59 PM from 12:00 to 11:59 If battery power is suddenly cut off (Batt-OFF), when battery power is restored and upon next Key-On, the clock is reset and restarts operating from "0:00". Clock display indicator This function shows the time. E fig. 15 23
Time is always displayed as follows: AM from 0:00 to 11:59 PM from 12:00 to 11:59 If battery power is suddenly cut off (Batt-OFF), when battery power is restored and upon next Key-On, the clock is reset and restarts operating from "0:00". Clock display indicator This function shows the time. E fig. 15 23

Owners Manual
Page 33
In the event of an interruption of the power supply from the battery, when power is restored at the next Key-On, the backlighting will be set the backlighting, access the "LIGHT SET" page of the menu. Press B B= ON for 3 sec in this page to access the setup mode and the... in position B "▼" to go to page 1. Press B fig. 24 32 page 1 - press switch (1, fig. 10) in one these three pages, the instrument panel goes back to the "LIGHT SET" page and stores the selected backlighting setup. press switch (1, fig. 10) in position B "▼" for 3 secs. If you press the button (1, fig...
In the event of an interruption of the power supply from the battery, when power is restored at the next Key-On, the backlighting will be set the backlighting, access the "LIGHT SET" page of the menu. Press B B= ON for 3 sec in this page to access the setup mode and the... in position B "▼" to go to page 1. Press B fig. 24 32 page 1 - press switch (1, fig. 10) in one these three pages, the instrument panel goes back to the "LIGHT SET" page and stores the selected backlighting setup. press switch (1, fig. 10) in position B "▼" for 3 secs. If you press the button (1, fig...

Owners Manual
Page 46
... keys, comprising: - 2 (BLACK) keys B These contain the "code" of the black keys to start -up the engine - The black keys (B) are the keys for normal use only one of the immobilizer system. open the fuel tank filler plug. - The grip of each start the motorcycle. The modulated signal represents the "password" (which is changed at each ignition key contains an electronic device that locks the engine automatically whenever the ignition switch is turned...
... keys, comprising: - 2 (BLACK) keys B These contain the "code" of the black keys to start -up the engine - The black keys (B) are the keys for normal use only one of the immobilizer system. open the fuel tank filler plug. - The grip of each start the motorcycle. The modulated signal represents the "password" (which is changed at each ignition key contains an electronic device that locks the engine automatically whenever the ignition switch is turned...
Owners Manual
Page 50
... means that you are the legitimate owner of any keys you sell your CODE CARD. The Ducati Service Centre will be asked to ON again. If the engine still does not start the engine: 1) if the code is recognised, the protection system releases the engine lock. Operation When the ignition key is turned from recognising the code in the key. The codes of the motorcycle. Always use the...
... means that you are the legitimate owner of any keys you sell your CODE CARD. The Ducati Service Centre will be asked to ON again. If the engine still does not start the engine: 1) if the code is recognised, the protection system releases the engine lock. Operation When the ignition key is turned from recognising the code in the key. The codes of the motorcycle. Always use the...
Owners Manual
Page 68
.... BRAKE AND CLUTCH FLUID Check the fluid levels in the tank. from any burnt-out bulbs (page 101). E ABS light After Key-On, the ABS light (10, fig. 4) stays on. LIGHTS AND INDICATORS Make sure lights, indicators and horn work properly. TYRE CONDITION Check tyre pressure and condition (page 104). In case of the ABS system. Throughout the running-in period, be careful to stick to the running-in recommendations will release Ducati Motor...
.... BRAKE AND CLUTCH FLUID Check the fluid levels in the tank. from any burnt-out bulbs (page 101). E ABS light After Key-On, the ABS light (10, fig. 4) stays on. LIGHTS AND INDICATORS Make sure lights, indicators and horn work properly. TYRE CONDITION Check tyre pressure and condition (page 104). In case of the ABS system. Throughout the running-in period, be careful to stick to the running-in recommendations will release Ducati Motor...
Owners Manual
Page 73
... causes the friction material to the wheel signals the electronic control unit that they operate independently. and yet the most difficult and dangerous moments when riding a two wheeled vehicle: the possibility of a lockup disappears. E Braking Slow down in time, change down gears to prevent the engine stalling. Tyre inflation pressures below the specified value will perceive ABS operation as you may lead to...
... causes the friction material to the wheel signals the electronic control unit that they operate independently. and yet the most difficult and dangerous moments when riding a two wheeled vehicle: the possibility of a lockup disappears. E Braking Slow down in time, change down gears to prevent the engine stalling. Tyre inflation pressures below the specified value will perceive ABS operation as you may lead to...
Owners Manual
Page 109
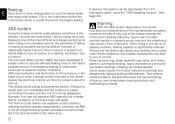
..., wheel hub assembly, electric system, headlight (fogging), front fork seals, air inlets or exhaust silencers, with consequent loss of the engine are unusually dirty or greasy, use a degreasing agent, avoiding contact with a high pressure water jet may be loss of braking efficiency immediately after use, as this would cause loss of the ABS so to avoid damaging the phonic wheels and the sensors. If...
..., wheel hub assembly, electric system, headlight (fogging), front fork seals, air inlets or exhaust silencers, with consequent loss of the engine are unusually dirty or greasy, use a degreasing agent, avoiding contact with a high pressure water jet may be loss of braking efficiency immediately after use, as this would cause loss of the ABS so to avoid damaging the phonic wheels and the sensors. If...
Owners Manual
Page 112
... wheel hub bearings Check the indicators and lighting Check tightness of nuts and screw securing the engine to the frame Check the sidestand Check tightness of the front wheel axle nut Check tightness of intervention [set mileage (km/mi) or time interval *] Change the air filter Check throttle body synchronisation and idle speed setting (1) Check the brake and clutch fluid levels Change the clutch and brake fluid Check and adjust the brake and clutch control...
... wheel hub bearings Check the indicators and lighting Check tightness of nuts and screw securing the engine to the frame Check the sidestand Check tightness of the front wheel axle nut Check tightness of intervention [set mileage (km/mi) or time interval *] Change the air filter Check throttle body synchronisation and idle speed setting (1) Check the brake and clutch fluid levels Change the clutch and brake fluid Check and adjust the brake and clutch control...

Owners Manual
Page 114
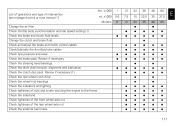
If necessary, contact your dealer to be carried out in accordance with the specified distance or time intervals (km or months), whichever occurs first. 113 Programmed maintenance plan: operations to renew pads mi. x1000 Months * Service operation to be carried out by the customer E 1 0.6 6 Km. x1000 List of operations and type of intervention [set mileage (km/mi) or time interval *] Checking the engine oil level Check the brake and clutch fluid levels Check tyre pressure and wear Check the drive chain tension and lubrication Check the brake pads.
If necessary, contact your dealer to be carried out in accordance with the specified distance or time intervals (km or months), whichever occurs first. 113 Programmed maintenance plan: operations to renew pads mi. x1000 Months * Service operation to be carried out by the customer E 1 0.6 6 Km. x1000 List of operations and type of intervention [set mileage (km/mi) or time interval *] Checking the engine oil level Check the brake and clutch fluid levels Check tyre pressure and wear Check the drive chain tension and lubrication Check the brake pads.

Owners Manual
Page 122
... black rims. Black Stealth; Brake light switches. Battery, 12 V-10 Ah. Tail light and brake signal: LED 13.5V 3.2W/0.1W. E To replace the bulbs, refer to the side of the electrical system are: HEADLIGHT: low beam: H7 (12 V-55 W). Horn. Starter motor, 12 V-0.7 kW. high beam: H1 (12 V-55 W). ALTERNATOR, 12 V-480 W. Electric system Colour schemes Ducati Anniversary red 473.101 (PPG); Matt black frame with catalityc converter. Electrical controls on...
... black rims. Black Stealth; Brake light switches. Battery, 12 V-10 Ah. Tail light and brake signal: LED 13.5V 3.2W/0.1W. E To replace the bulbs, refer to the side of the electrical system are: HEADLIGHT: low beam: H7 (12 V-55 W). Horn. Starter motor, 12 V-0.7 kW. high beam: H1 (12 V-55 W). ALTERNATOR, 12 V-480 W. Electric system Colour schemes Ducati Anniversary red 473.101 (PPG); Matt black frame with catalityc converter. Electrical controls on...
Owners Manual
Page 124
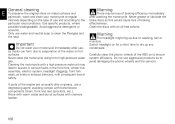
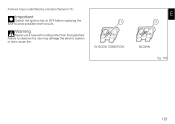
Failure to avoid possible short-circuits. Important Warning E 11 11 Never use a fuse with a rating other than that specified. A blown fuse is identified by a broken filament (11). Switch the ignition key to OFF before replacing the fuse to observe this rule may damage the electric system or even cause fire. IN GOOD CONDITION BLOWN fig. 118 123
Failure to avoid possible short-circuits. Important Warning E 11 11 Never use a fuse with a rating other than that specified. A blown fuse is identified by a broken filament (11). Switch the ignition key to OFF before replacing the fuse to observe this rule may damage the electric system or even cause fire. IN GOOD CONDITION BLOWN fig. 118 123
Owners Manual
Page 125
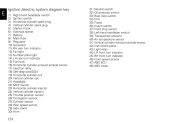
... Starter motor Solenoid starter Battery Main fuse Regulator Generator RH rear turn indicator Tail light Number plate light LH rear turn indicator Fuel tank Horizontal cylinder exhaust lambda sensor Injection relay Self-diagnosis/DDA Horizontal cylinder coil Vertical cylinder coil Headlight MAP sensor Horizontal cylinder injector Vertical cylinder injector Throttle position sensor Timing/rpm sensor Cylinder sensor Rear speed sensor Side stand Horn 31) 32) 33) 34) 35) 36) 37) 38) 39) 40) 41) 42) 43) 44) 45) 46) 47) 48) Neutral switch Oil pressure switch Rear stop switch ECU Fuses Clutch switch...
... Starter motor Solenoid starter Battery Main fuse Regulator Generator RH rear turn indicator Tail light Number plate light LH rear turn indicator Fuel tank Horizontal cylinder exhaust lambda sensor Injection relay Self-diagnosis/DDA Horizontal cylinder coil Vertical cylinder coil Headlight MAP sensor Horizontal cylinder injector Vertical cylinder injector Throttle position sensor Timing/rpm sensor Cylinder sensor Rear speed sensor Side stand Horn 31) 32) 33) 34) 35) 36) 37) 38) 39) 40) 41) 42) 43) 44) 45) 46) 47) 48) Neutral switch Oil pressure switch Rear stop switch ECU Fuses Clutch switch...

Owners Manual
Page 129
... with Noise Control System Prohibited. Rough idle. Federal Law prohibits the following symptoms, have the vehicle inspected and repaired by any other component which consists of design has been removed or rendered inoperative by your local Ducati dealer. Symptoms: Hard starting . Poor performance (driveability) and poor economy. USA Crankcase Emission Control System The engine is separate from the throttle body and fuel tank. Tampering warning...
... with Noise Control System Prohibited. Rough idle. Federal Law prohibits the following symptoms, have the vehicle inspected and repaired by any other component which consists of design has been removed or rendered inoperative by your local Ducati dealer. Symptoms: Hard starting . Poor performance (driveability) and poor economy. USA Crankcase Emission Control System The engine is separate from the throttle body and fuel tank. Tampering warning...
Owners Manual
Page 130
... surfaces, the ability to spare rather than overloading the engine. Warning 129 When going down shift at the proper rate of brake, clutch, shifter, throttle controls, correct fuel and oil supply. When going up steep slopes, shift to a lower gear so that there is clear. Use the front and rear brakes for proper operation of speed and avoiding unnecessarily fast acceleration are applicable for every day...
... surfaces, the ability to spare rather than overloading the engine. Warning 129 When going down shift at the proper rate of brake, clutch, shifter, throttle controls, correct fuel and oil supply. When going up steep slopes, shift to a lower gear so that there is clear. Use the front and rear brakes for proper operation of speed and avoiding unnecessarily fast acceleration are applicable for every day...
Owners Manual
Page 134
... control warranty statement Your warranty rights and obligations The California Air Resources Board is pleased to explain the emission control system warranty on your motorcycle to a Ducati dealer as soon as fuelinjection system, the ignition system, catalytic converter, and engine computer. must be hoses, belts, connectors and other emission-related assemblies. Your emission control system may be designated, built and equipped to abuse, neglect, improper maintenance...
... control warranty statement Your warranty rights and obligations The California Air Resources Board is pleased to explain the emission control system warranty on your motorcycle to a Ducati dealer as soon as fuelinjection system, the ignition system, catalytic converter, and engine computer. must be hoses, belts, connectors and other emission-related assemblies. Your emission control system may be designated, built and equipped to abuse, neglect, improper maintenance...

Owners Manual
Page 136
... charges based on which adversely affect performance and/or (5) use of replacement parts or accessories not conforming to exceed Ducati's suggested retail price for routine maintenance. controlled vehicles; oil filler cap; pressure control valve; fuel/ vapor separator; canister; ignition points, condensers, and spark plugs if failure occors prior to the first scheduled replacement, and hoses, clamps, fittings and tubing used in connection with the sale or use in these parts and...
... charges based on which adversely affect performance and/or (5) use of replacement parts or accessories not conforming to exceed Ducati's suggested retail price for routine maintenance. controlled vehicles; oil filler cap; pressure control valve; fuel/ vapor separator; canister; ignition points, condensers, and spark plugs if failure occors prior to the first scheduled replacement, and hoses, clamps, fittings and tubing used in connection with the sale or use in these parts and...