Owner's Manual
Page 57
... Temperature Gauge ...68 Controls Near the Steering Wheel ...69 Headlights ...70 Daytime Running Lights...71 Instrument Panel Brightness ...71 Turn Signals ...72 Windshield Wipers ...72 Windshield Washers ...Power Windows ...92 Moonroof ...94 Mirrors ...95 Adjusting the Power Mirrors ...95 Parking Brake ...96 Glove Box ...97 Beverage Holder ...98 Console Compartment ...98 Coin Box ...99... ...99 Accessory Power Socket ...99 Coat Hook ...100 Interior Lights ...100 Ceiling Light ...100 Spotlights ...101 Courtesy Lights ...102 Instruments and Controls Control Locations ...58 57 Instruments and...
... Temperature Gauge ...68 Controls Near the Steering Wheel ...69 Headlights ...70 Daytime Running Lights...71 Instrument Panel Brightness ...71 Turn Signals ...72 Windshield Wipers ...72 Windshield Washers ...Power Windows ...92 Moonroof ...94 Mirrors ...95 Adjusting the Power Mirrors ...95 Parking Brake ...96 Glove Box ...97 Beverage Holder ...98 Console Compartment ...98 Coin Box ...99... ...99 Accessory Power Socket ...99 Coat Hook ...100 Interior Lights ...100 Ceiling Light ...100 Spotlights ...101 Courtesy Lights ...102 Instruments and Controls Control Locations ...58 57 Instruments and...

Owner's Manual
Page 58
CONTINUED Instruments and Controls 59 Indicator Lights U.S.: HX, LX, EX, Canada: LX, Si SUPPLEMENTAL RESTRAINT SYSTEM INDICATOR (P. 61) ANTI-LOCK BRAKE SYSTEM INDICATOR 1 (P. 62) SEAT BELT REMINDER LIGHT (P. 61) IMMOBILIZER SYSTEM INDICATOR (P. 64) LOW OIL PRESSURE INDICATOR (P. 278) TRUNK-...OPEN INDICATOR (P. 63) SIDE AIRBAG OFF INDICATOR (P. 61) CRUISE CONTROL INDICATOR (P. 63) LOW FUEL INDICATOR (P. 63) PARKING BRAKE AND BRAKE SYSTEM...
CONTINUED Instruments and Controls 59 Indicator Lights U.S.: HX, LX, EX, Canada: LX, Si SUPPLEMENTAL RESTRAINT SYSTEM INDICATOR (P. 61) ANTI-LOCK BRAKE SYSTEM INDICATOR 1 (P. 62) SEAT BELT REMINDER LIGHT (P. 61) IMMOBILIZER SYSTEM INDICATOR (P. 64) LOW OIL PRESSURE INDICATOR (P. 278) TRUNK-...OPEN INDICATOR (P. 63) SIDE AIRBAG OFF INDICATOR (P. 61) CRUISE CONTROL INDICATOR (P. 63) LOW FUEL INDICATOR (P. 63) PARKING BRAKE AND BRAKE SYSTEM...
Owner's Manual
Page 59
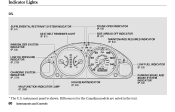
Indicator Lights DX SUPPLEMENTAL RESTRAINT SYSTEM INDICATOR (P. 61) SEAT BELT REMINDER LIGHT (P. 61) IMMOBILIZER SYSTEM INDICATOR (P. 64) LOW OIL PRESSURE INDICATOR (P. 278) TRUNK-OPEN INDICATOR (P. 63) SIDE AIRBAG OFF INDICATOR (P. 61) MAINTENANCE REQUIRED INDICATOR (P. 64) LOW FUEL INDICATOR (P. 63) PARKING BRAKE AND BRAKE SYSTEM INDICATOR (P. 62) CHARGING SYSTEM INDICATOR (P. 279) HIGH BEAM INDICATOR (P. 63) MALFUNCTION INDICATOR LAMP (P. 280) The U.S. Differences for the Canadian models are noted in the text. 60 Instruments and Controls instrument panel is shown.
Indicator Lights DX SUPPLEMENTAL RESTRAINT SYSTEM INDICATOR (P. 61) SEAT BELT REMINDER LIGHT (P. 61) IMMOBILIZER SYSTEM INDICATOR (P. 64) LOW OIL PRESSURE INDICATOR (P. 278) TRUNK-OPEN INDICATOR (P. 63) SIDE AIRBAG OFF INDICATOR (P. 61) MAINTENANCE REQUIRED INDICATOR (P. 64) LOW FUEL INDICATOR (P. 63) PARKING BRAKE AND BRAKE SYSTEM INDICATOR (P. 62) CHARGING SYSTEM INDICATOR (P. 279) HIGH BEAM INDICATOR (P. 63) MALFUNCTION INDICATOR LAMP (P. 280) The U.S. Differences for the Canadian models are noted in the text. 60 Instruments and Controls instrument panel is shown.
Owner's Manual
Page 61
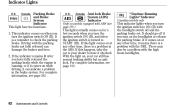
...take the car to have fully released the parking brake while the engine is a reminder to ON (II) with the headlight switch off and the parking brake set. With the light on while driving, it can damage the brakes and tires. 2. For complete information, see page... released can indicate a problem in the ABS. Canada Anti-lock Brake System (ABS) Indicator ''Daytime Running Lights'' Indicator Canadian models only Only on at any other time, it checked. Indicator Lights Parking Brake and Brake System Indicator This light has two functions: U.S. Canada U.S. Driving with ABS (see page...
...take the car to have fully released the parking brake while the engine is a reminder to ON (II) with the headlight switch off and the parking brake set. With the light on while driving, it can damage the brakes and tires. 2. For complete information, see page... released can indicate a problem in the ABS. Canada Anti-lock Brake System (ABS) Indicator ''Daytime Running Lights'' Indicator Canadian models only Only on at any other time, it checked. Indicator Lights Parking Brake and Brake System Indicator This light has two functions: U.S. Canada U.S. Driving with ABS (see page...
Owner's Manual
Page 70
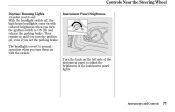
Instruments and Controls 71 They remain on with reduced brightness when you set the parking brake. The headlights revert to normal operation when you turn them on until you turn the ignition off , the high beam headlights come on the left side of the instrument panel lights. Controls Near the Steering Wheel Daytime Running Lights Canadian models only Instrument Panel Brightness With the headlight switch off , even if you turn the ignition switch to adjust the brightness of the instrument panel to ON (II) and release the parking brake. Turn the knob on with the switch.
Instruments and Controls 71 They remain on with reduced brightness when you set the parking brake. The headlights revert to normal operation when you turn them on until you turn the ignition off , the high beam headlights come on the left side of the instrument panel lights. Controls Near the Steering Wheel Daytime Running Lights Canadian models only Instrument Panel Brightness With the headlight switch off , even if you turn the ignition switch to adjust the brightness of the instrument panel to ON (II) and release the parking brake. Turn the knob on with the switch.
Owner's Manual
Page 95
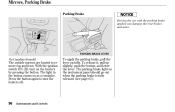
... the parking brake, pull the lever up slightly, push the button, and lower the lever. To release it, pull up fully. Mirrors, Parking Brake Parking Brake Driving the car with the parking brake applied can damage the rear brakes and axles. The light in the ...button comes on the instrument panel should go out when the parking brake is fully released (see page 62 ). 96 Instruments and Controls Press the button again to remove fog and frost. The parking brake light...
... the parking brake, pull the lever up slightly, push the button, and lower the lever. To release it, pull up fully. Mirrors, Parking Brake Parking Brake Driving the car with the parking brake applied can damage the rear brakes and axles. The light in the ...button comes on the instrument panel should go out when the parking brake is fully released (see page 62 ). 96 Instruments and Controls Press the button again to remove fog and frost. The parking brake light...
Owner's Manual
Page 156
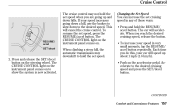
... the cruise control. Each time you reach the desired cruising speed, release the button. The CRUISE CONTROL light on the instrument panel comes on the accelerator pedal. The CRUISE CONTROL light on the instrument panel comes on the steering wheel. To increase your speed increases going up about 1 ... To resume the set speed. Changing the Set Speed You can increase the set speed when you are going down a hill, use the brakes to slow down hills. CONTINUED Comfort and Convenience Features 157 Push on to hold the RESUME/ accel button. This will accelerate. When you do...
... the cruise control. Each time you reach the desired cruising speed, release the button. The CRUISE CONTROL light on the instrument panel comes on the accelerator pedal. The CRUISE CONTROL light on the instrument panel comes on the steering wheel. To increase your speed increases going up about 1 ... To resume the set speed. Changing the Set Speed You can increase the set speed when you are going down a hill, use the brakes to slow down hills. CONTINUED Comfort and Convenience Features 157 Push on to hold the RESUME/ accel button. This will accelerate. When you do...
Owner's Manual
Page 157
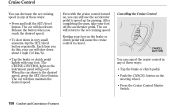
... button. Press the Cruise Control Master Switch. 158 Comfort and Convenience Features Tap the brake or clutch pedal lightly with the cruise control turned on the brake or clutch pedal will slow down in any of these ways: Tap the brake or clutch pedal. When the car slows to speed up for passing. After... the SET/decel button repeatedly. Push the CANCEL button on the instrument panel will return to cancel. The car will go out. The CRUISE CONTROL light on the steering wheel. The car will then maintain the desired speed.
... button. Press the Cruise Control Master Switch. 158 Comfort and Convenience Features Tap the brake or clutch pedal lightly with the cruise control turned on the brake or clutch pedal will slow down in any of these ways: Tap the brake or clutch pedal. When the car slows to speed up for passing. After... the SET/decel button repeatedly. Push the CANCEL button on the instrument panel will return to cancel. The car will go out. The CRUISE CONTROL light on the steering wheel. The car will then maintain the desired speed.
Owner's Manual
Page 158
... the system completely off and erases the previous cruising speed from memory. To use the accelerator pedal in the normal way. The CRUISE CONTROL light comes on the instrument panel will go out and the car will accelerate to above 25 mph (40 km/h), then press the RESUME/accel... button. Comfort and Convenience Features 159 Cruise Control When you push the CANCEL button, or tap the brake or clutch pedal, the CRUISE CONTROL light on , and the car will begin to Using the Cruise Control. The system remembers the previously-set cruising speed.
... the system completely off and erases the previous cruising speed from memory. To use the accelerator pedal in the normal way. The CRUISE CONTROL light comes on the instrument panel will go out and the car will accelerate to above 25 mph (40 km/h), then press the RESUME/accel... button. Comfort and Convenience Features 159 Cruise Control When you push the CANCEL button, or tap the brake or clutch pedal, the CRUISE CONTROL light on , and the car will begin to Using the Cruise Control. The system remembers the previously-set cruising speed.
Owner's Manual
Page 167
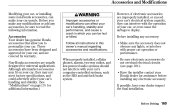
... installing any accessory: Make sure the accessory does not obscure any lights, or interfere with your car. Accessories Your dealer has genuine Honda accessories that allow you to personalize your car's computer-controlled systems, such as the SRS and anti-lock brake system. When properly installed, cellular phones, alarms, two-way radios, and...
... installing any accessory: Make sure the accessory does not obscure any lights, or interfere with your car. Accessories Your dealer has genuine Honda accessories that allow you to personalize your car's computer-controlled systems, such as the SRS and anti-lock brake system. When properly installed, cellular phones, alarms, two-way radios, and...
Owner's Manual
Page 186
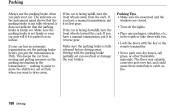
If you . Turn off the lights. Parking Always use the parking brake when you have a manual transmission, put the transmission in the transmission making it does not indicate that the parking brake is facing downhill, turn the front wheels away from moving and putting pressure on fire. 188 Driving ...manual transmission, put it in reverse gear. Never park over dry leaves, tall grass, or other flammable materials. Make sure the parking brake is set the parking brake before driving away. If your car has an automatic transmission, set firmly or your car. Make sure the parking...
If you . Turn off the lights. Parking Always use the parking brake when you have a manual transmission, put the transmission in the transmission making it does not indicate that the parking brake is facing downhill, turn the front wheels away from moving and putting pressure on fire. 188 Driving ...manual transmission, put it in reverse gear. Never park over dry leaves, tall grass, or other flammable materials. Make sure the parking brake is set the parking brake before driving away. If your car has an automatic transmission, set firmly or your car. Make sure the parking...
Owner's Manual
Page 187
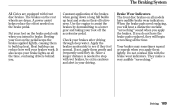
... wheels are equipped with wet brakes, be extra cautious and alert in your brake lights on the pedal keeps the brakes applied lightly, causing them lightly. Heat build-up heat and reduces their effectiveness. Check your foot off the accelerator pedal. They make a very audible ''screeching.'' Driving 189 The Braking System All Civics are drum. A power assist helps...
... wheels are equipped with wet brakes, be extra cautious and alert in your brake lights on the pedal keeps the brakes applied lightly, causing them lightly. Heat build-up heat and reduces their effectiveness. Check your foot off the accelerator pedal. They make a very audible ''screeching.'' Driving 189 The Braking System All Civics are drum. A power assist helps...
Owner's Manual
Page 193
... complex maintenance tasks on how to obtain a copy, or see your Honda dealer. Maintenance Safety ...196 Important Safety Precautions .. 197 Maintenance Schedule ...198...Windshield Washers ...219 Transmission Fluid ...220 Automatic Transmission...220 5-speed Manual Transmission...222 Brake and Clutch Fluid ...223 Brake System ...223 Clutch System ...223 Power Steering ...224 Air Cleaner Element ...225...Wheels and Tires ...243 Winter Driving ...243 Snow Tires ...243 Traction Devices...244 Lights ...245 Headlight Aiming ...247 Replacing Bulbs ...250 Storing Your Car ...254 Maintenance 195 ...
... complex maintenance tasks on how to obtain a copy, or see your Honda dealer. Maintenance Safety ...196 Important Safety Precautions .. 197 Maintenance Schedule ...198...Windshield Washers ...219 Transmission Fluid ...220 Automatic Transmission...220 5-speed Manual Transmission...222 Brake and Clutch Fluid ...223 Brake System ...223 Clutch System ...223 Power Steering ...224 Air Cleaner Element ...225...Wheels and Tires ...243 Winter Driving ...243 Snow Tires ...243 Traction Devices...244 Lights ...245 Headlight Aiming ...247 Replacing Bulbs ...250 Storing Your Car ...254 Maintenance 195 ...

Owner's Manual
Page 200
... miles (96,000 km) or 5 years Every 3 years (independent of fluids Exhaust system, Fuel lines and connections Lights and controls, Vehicle underbody Check parking brake adjustment Inspect and adjust drive belts Replace dust and pollen filter 1 Replace transmission fluid 24 36 48 60 Replace every... Tie rod ends, steering gear box and boots, Suspension components Driveshaft boots Check engine oil and coolant Visually inspect the following items: Brake hoses and lines (including ABS) All fluid levels and condition of mileage) 1: Refer to page 235 for replacement information under special ...
... miles (96,000 km) or 5 years Every 3 years (independent of fluids Exhaust system, Fuel lines and connections Lights and controls, Vehicle underbody Check parking brake adjustment Inspect and adjust drive belts Replace dust and pollen filter 1 Replace transmission fluid 24 36 48 60 Replace every... Tie rod ends, steering gear box and boots, Suspension components Driveshaft boots Check engine oil and coolant Visually inspect the following items: Brake hoses and lines (including ABS) All fluid levels and condition of mileage) 1: Refer to page 235 for replacement information under special ...
Owner's Manual
Page 205
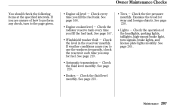
... the operation of how to perform any check, turn signals, brake lights, and license plate lights monthly. Engine oil level Check every time you stop for wear and foreign objects. Windshield washer fluid Check the level in the reservoir monthly. See ... the following items at the specified intervals. Engine coolant level Check the radiator reserve tank every time you are unsure of the headlights, parking lights, taillights, high-mount brake light, turn to use the washers frequently, check the reservoir each time you fill the fuel tank. See page 220 . Examine the tread for...
... the operation of how to perform any check, turn signals, brake lights, and license plate lights monthly. Engine oil level Check every time you stop for wear and foreign objects. Windshield washer fluid Check the level in the reservoir monthly. See ... the following items at the specified intervals. Engine coolant level Check the radiator reserve tank every time you are unsure of the headlights, parking lights, taillights, high-mount brake light, turn to use the washers frequently, check the reservoir each time you fill the fuel tank. See page 220 . Examine the tread for...
Owner's Manual
Page 243
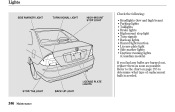
Lights Check the following: SIDE MARKER LIGHT TURN SIGNAL LIGHT HIGH-MOUNT STOP LIGHT Headlights (low and high beam) Parking lights Taillights Brake lights High-mount stop light Turn signals Back-up lights Hazard light function License plate light Side marker lights Daytime running lights (Canadian models) If you find any bulbs are burned out, replace them as soon as possible. Refer to the chart on page 295 to determine what type of replacement bulb is needed. LICENSE PLATE LIGHTS STOP/TAILLIGHT BACK-UP LIGHT 246 Maintenance
Lights Check the following: SIDE MARKER LIGHT TURN SIGNAL LIGHT HIGH-MOUNT STOP LIGHT Headlights (low and high beam) Parking lights Taillights Brake lights High-mount stop light Turn signals Back-up lights Hazard light function License plate light Side marker lights Daytime running lights (Canadian models) If you find any bulbs are burned out, replace them as soon as possible. Refer to the chart on page 295 to determine what type of replacement bulb is needed. LICENSE PLATE LIGHTS STOP/TAILLIGHT BACK-UP LIGHT 246 Maintenance
Owner's Manual
Page 248
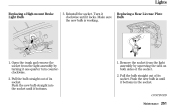
Open the trunk and remove the socket from the light assembly by turning it locks. Replacing a Rear License Plate Bulb 1. Lights Replacing a High-mount Brake Light Bulb 3. Turn it clockwise until it one-quarter turn counterclockwise. 2. Push the new bulb in until it bottoms in the socket. Make sure the new ... new bulb straight into the socket until it bottoms. 1. Pull the bulb straight out of its socket. Reinstall the socket. Remove the socket from the light assembly by squeezing the tabs on both sides of the socket. 2. Pull the bulb straight out of its socket.
Open the trunk and remove the socket from the light assembly by turning it locks. Replacing a Rear License Plate Bulb 1. Lights Replacing a High-mount Brake Light Bulb 3. Turn it clockwise until it one-quarter turn counterclockwise. 2. Push the new bulb in until it bottoms in the socket. Make sure the new ... new bulb straight into the socket until it bottoms. 1. Pull the bulb straight out of its socket. Reinstall the socket. Remove the socket from the light assembly by squeezing the tabs on both sides of the socket. 2. Pull the bulb straight out of its socket.
Owner's Manual
Page 285
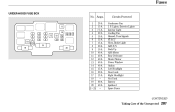
Fuses UNDER-HOOD FUSE BOX No. Lights, Exterior Lights Interior Light Cooling Fan Hazard, Turn Signals FI ECU Horn, Brake Light ABS F/S Back Up ABS Motor Rear Defroster Heater Motor Power Window Option Left Headlight Door Lock Right Headlight Not Used Battery Ignition 1 Spare Fuses CONTINUED Taking Care of the Unexpected 287 Amps. 20 A 1 15 A 2 7.5 A 3 20 A 4 10 A 5 15 A 6 15 A 7 20 A 8 10 A 9 40 A 10 40 A 11 40 A 12 40 A 13 40 A 14 15 A 15 20 A 16 15 A 17 18 80 A 19 40 A 20 21 25 Circuits Protected Condenser Fan I. P.
Fuses UNDER-HOOD FUSE BOX No. Lights, Exterior Lights Interior Light Cooling Fan Hazard, Turn Signals FI ECU Horn, Brake Light ABS F/S Back Up ABS Motor Rear Defroster Heater Motor Power Window Option Left Headlight Door Lock Right Headlight Not Used Battery Ignition 1 Spare Fuses CONTINUED Taking Care of the Unexpected 287 Amps. 20 A 1 15 A 2 7.5 A 3 20 A 4 10 A 5 15 A 6 15 A 7 20 A 8 10 A 9 40 A 10 40 A 11 40 A 12 40 A 13 40 A 14 15 A 15 20 A 16 15 A 17 18 80 A 19 40 A 20 21 25 Circuits Protected Condenser Fan I. P.
Owner's Manual
Page 309
... Control, Instruments ...71 Brights, Headlights ...70 Bulb Replacement Back-up Lights ...251 Brake Lights...250 Ceiling Light ...253 Front Parking Lights ...248 Front Side Marker Lights...248 Headlights ...247 High-mount Brake Light ...251 License Plate Lights ...251 Rear Side Marker Lights ...250 Specifications ...294 Spotlights ...253 Trunk Light ...252 Turn Signal Lights ...248 Bulbs, Halogen ...247 CONTINUED B Battery Charging System Indicator...
... Control, Instruments ...71 Brights, Headlights ...70 Bulb Replacement Back-up Lights ...251 Brake Lights...250 Ceiling Light ...253 Front Parking Lights ...248 Front Side Marker Lights...248 Headlights ...247 High-mount Brake Light ...251 License Plate Lights ...251 Rear Side Marker Lights ...250 Specifications ...294 Spotlights ...253 Trunk Light ...252 Turn Signal Lights ...248 Bulbs, Halogen ...247 CONTINUED B Battery Charging System Indicator...
Owner's Manual
Page 312
...Turning on ...70 Head Restraints ...88 Heating and Cooling ...104 High Altitude, Starting at ...177 High-Low Beam Switch ...70 High-mount Brake Light...247 Hood Latch ...226 Hood, Opening the ...164 Horn...69 Hydraulic Clutch ...223 Hydroplaning...194 G Gas Mileage, Improving...168 Gasohol ...... ...239 Inside Mirror ...94 Inspection, Tire ...240 Instrument Panel ...2, 58 Instrument Panel Brightness ...71 Interior Cleaning ...258 Interior Lights ...101 Introduction ...i J Jacking up the Car ...265 Jack, Tire ...265 Jump Starting ...273 I Identification Number, Vehicle...292 Ignition Keys...76 ...
...Turning on ...70 Head Restraints ...88 Heating and Cooling ...104 High Altitude, Starting at ...177 High-Low Beam Switch ...70 High-mount Brake Light...247 Hood Latch ...226 Hood, Opening the ...164 Horn...69 Hydraulic Clutch ...223 Hydroplaning...194 G Gas Mileage, Improving...168 Gasohol ...... ...239 Inside Mirror ...94 Inspection, Tire ...240 Instrument Panel ...2, 58 Instrument Panel Brightness ...71 Interior Cleaning ...258 Interior Lights ...101 Introduction ...i J Jacking up the Car ...265 Jack, Tire ...265 Jump Starting ...273 I Identification Number, Vehicle...292 Ignition Keys...76 ...


