
Owner's Manual
Page 4
Your Car at a Glance AIRBAGS (P. 10, 47) POWER DOOR LOCK SWITCH (P. 81) AUDIO SYSTEM (P. 112, 124, 136) DIGITAL CLOCK (P. 117, 129, 141) POWER WINDOW SWITCHES (P. 92) FUEL FILL DOOR RELEASE (P. 163) TRUNK RELEASE (P. 84) HOOD RELEASE HANDLE (P. 164) AUTOMATIC TRANSMISSION (P. 180) MANUAL TRANSMISSION (P. 178) HEATING/COOLING CONTROLS (P. 104) 2
Your Car at a Glance AIRBAGS (P. 10, 47) POWER DOOR LOCK SWITCH (P. 81) AUDIO SYSTEM (P. 112, 124, 136) DIGITAL CLOCK (P. 117, 129, 141) POWER WINDOW SWITCHES (P. 92) FUEL FILL DOOR RELEASE (P. 163) TRUNK RELEASE (P. 84) HOOD RELEASE HANDLE (P. 164) AUTOMATIC TRANSMISSION (P. 180) MANUAL TRANSMISSION (P. 178) HEATING/COOLING CONTROLS (P. 104) 2

Owner's Manual
Page 56
Safety Labels HOOD On models without side airbags On models with side airbags 56 Driver and Passenger Safety
Safety Labels HOOD On models without side airbags On models with side airbags 56 Driver and Passenger Safety
Owner's Manual
Page 159
... important fluids. Break-in this section will help you. The information in this section first. Before Driving Before you begin driving your Honda, you should know how to properly store luggage or packages. You also need to know what gasoline to use, and how to your... car, please read the information in Period ...162 Gasoline ...162 Service Station Procedures ...163 Filling the Fuel Tank ...163 Opening the Hood ...164 Oil Check ...166 Engine Coolant Check ...167 Fuel Economy ...168 Vehicle Condition ...168 Driving Habits ...168 Accessories and Modifications ...169 Carrying ...
... important fluids. Break-in this section will help you. The information in this section first. Before Driving Before you begin driving your Honda, you should know how to properly store luggage or packages. You also need to know what gasoline to use, and how to your... car, please read the information in Period ...162 Gasoline ...162 Service Station Procedures ...163 Filling the Fuel Tank ...163 Opening the Hood ...164 Oil Check ...166 Engine Coolant Check ...167 Fuel Economy ...168 Vehicle Condition ...168 Driving Habits ...168 Accessories and Modifications ...169 Carrying ...

Owner's Manual
Page 162
... fill cap back on (see page 280 ). 6. If you feel the hood latch handle. Opening the Hood HOOD RELEASE HANDLE LATCH 1. Pull the hood release handle located under the front edge of the hood to Park or Neutral and set the parking brake. The hood will pop up until it latches. Push this handle up slightly... under the lower left until you do not properly tighten the cap, the Malfunction Indicator Lamp may come on , tighten it until it releases the hood. Lift the hood. 164 Before Driving Push the fuel fill door closed until it clicks several times.
... fill cap back on (see page 280 ). 6. If you feel the hood latch handle. Opening the Hood HOOD RELEASE HANDLE LATCH 1. Pull the hood release handle located under the front edge of the hood to Park or Neutral and set the parking brake. The hood will pop up until it latches. Push this handle up slightly... under the lower left until you do not properly tighten the cap, the Malfunction Indicator Lamp may come on , tighten it until it releases the hood. Lift the hood. 164 Before Driving Push the fuel fill door closed until it clicks several times.

Owner's Manual
Page 163
Pull the support rod out of the hood. Lower the hood to remove the support rod from the hole. CONTINUED Before Driving 165 Put the support rod back into its clip and insert the end into ...the hole on the left side of its holding clip. SUPPORT ROD 3. Service Station Procedures If you can open the hood without lifting the hood latch handle, or the hood latch handle moves stiffly or does not spring back as before, the mechanism should be cleaned and lubricated (see page 226 ). After...
Pull the support rod out of the hood. Lower the hood to remove the support rod from the hole. CONTINUED Before Driving 165 Put the support rod back into its clip and insert the end into ...the hole on the left side of its holding clip. SUPPORT ROD 3. Service Station Procedures If you can open the hood without lifting the hood latch handle, or the hood latch handle moves stiffly or does not spring back as before, the mechanism should be cleaned and lubricated (see page 226 ). After...

Owner's Manual
Page 174
Check that any items you may be carrying with you drive your car. 1. Check that the hood and trunk are stored properly or fastened down securely. 5. Make sure the doors are clean and unobstructed. Check the adjustment of the inside are fully ...
Check that any items you may be carrying with you drive your car. 1. Check that the hood and trunk are stored properly or fastened down securely. 5. Make sure the doors are clean and unobstructed. Check the adjustment of the inside are fully ...
Owner's Manual
Page 193
See page 311 for information on your Honda dealer. Maintenance Safety ...196 Important Safety Precautions .. 197 Maintenance Schedule ...198 Required Maintenance Record ...... Transmission...222 Brake and Clutch Fluid ...223 Brake System ...223 Clutch System ...223 Power Steering ...224 Air Cleaner Element ...225 Hood Latch ...226 Spark Plugs ...227 Replacement ...227 Specifications ...229 Battery ...230 Wiper Blades ...232 Air Conditioning System ...234 Dust ...important to keep your car well maintained and to obtain a copy, or see your Honda, you may want to purchase the Service Manual.
See page 311 for information on your Honda dealer. Maintenance Safety ...196 Important Safety Precautions .. 197 Maintenance Schedule ...198 Required Maintenance Record ...... Transmission...222 Brake and Clutch Fluid ...223 Brake System ...223 Clutch System ...223 Power Steering ...224 Air Cleaner Element ...225 Hood Latch ...226 Spark Plugs ...227 Replacement ...227 Specifications ...229 Battery ...230 Wiper Blades ...232 Air Conditioning System ...234 Dust ...important to keep your car well maintained and to obtain a copy, or see your Honda, you may want to purchase the Service Manual.

Owner's Manual
Page 201
... transmission fluid (M/T, A/T). Check all fluid levels, condition of mileage) Do items in A, B, D. Inspect fuel lines and connections. Check all hinges, locks, and latches include the hood. Do items in A, B. U.S. Do items in A, C. Do items in A. Inspect front and rear brakes. Do items in A, B, D. Do items in A. Inspect tie rod ends, steering...
... transmission fluid (M/T, A/T). Check all fluid levels, condition of mileage) Do items in A, B, D. Inspect fuel lines and connections. Check all hinges, locks, and latches include the hood. Do items in A, B. U.S. Do items in A, C. Do items in A. Inspect front and rear brakes. Do items in A, B, D. Do items in A. Inspect tie rod ends, steering...
Owner's Manual
Page 209
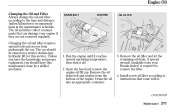
... service. Remove the oil drain bolt and washer from underneath the car. Drain the oil into an appropriate container. 3. Open the hood and remove the engine oil fill cap. Unless you should be raised on a service station-type hydraulic lift for this maintenance done by...according to remove the filter. 4. DRAIN BOLT WASHER OIL FILTER 1. Install a new oil filter according to instructions that can damage your Honda dealer) is required to the time and distance (miles/kilometers) recommendations in the maintenance schedule. CONTINUED Maintenance 211 The oil and filter ...
... service. Remove the oil drain bolt and washer from underneath the car. Drain the oil into an appropriate container. 3. Open the hood and remove the engine oil fill cap. Unless you should be raised on a service station-type hydraulic lift for this maintenance done by...according to remove the filter. 4. DRAIN BOLT WASHER OIL FILTER 1. Install a new oil filter according to instructions that can damage your Honda dealer) is required to the time and distance (miles/kilometers) recommendations in the maintenance schedule. CONTINUED Maintenance 211 The oil and filter ...
Owner's Manual
Page 213
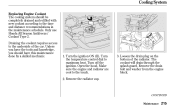
.... Remove the drain bolt and washer from the engine block. Only use Honda All Season Antifreeze/ Coolant Type 2. Turn off the ignition. Draining the coolant requires access to the underside of the radiator. Turn the ignition ON (II). Open the hood. CONTINUED Maintenance 215 Turn the temperature control dial to the touch...
.... Remove the drain bolt and washer from the engine block. Only use Honda All Season Antifreeze/ Coolant Type 2. Turn off the ignition. Draining the coolant requires access to the underside of the radiator. Turn the ignition ON (II). Open the hood. CONTINUED Maintenance 215 Turn the temperature control dial to the touch...

Owner's Manual
Page 223
Lubricate all the moving parts (as shown), including the pivot. If you are not sure how to clean and grease the latch, contact your Honda dealer. 226 Maintenance Hood Latch PIVOTS Clean the hood latch assembly with a mild cleaner, then lubricate it with a multipurpose grease. Follow the time and distance recommendations in the Maintenance Schedule.
Lubricate all the moving parts (as shown), including the pivot. If you are not sure how to clean and grease the latch, contact your Honda dealer. 226 Maintenance Hood Latch PIVOTS Clean the hood latch assembly with a mild cleaner, then lubricate it with a multipurpose grease. Follow the time and distance recommendations in the Maintenance Schedule.
Owner's Manual
Page 244
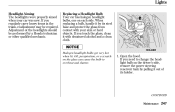
CONTINUED Maintenance 247 If you need to overheat and shatter. 1. Open the hood. Replacing a Headlight Bulb Your car has halogen headlight bulbs, one on the driver's side, remove the power steering reservoir tank by pulling it out of ... to change the headlight bulb on each side. HOLDER Halogen headlight bulbs get very hot when lit. If you touch the glass, clean it by a Honda technician or other qualified mechanic. When replacing a bulb, handle it with your car was new. Lights Headlight Aiming The headlights were properly aimed when your...
CONTINUED Maintenance 247 If you need to overheat and shatter. 1. Open the hood. Replacing a Headlight Bulb Your car has halogen headlight bulbs, one on the driver's side, remove the power steering reservoir tank by pulling it out of ... to change the headlight bulb on each side. HOLDER Halogen headlight bulbs get very hot when lit. If you touch the glass, clean it by a Honda technician or other qualified mechanic. When replacing a bulb, handle it with your car was new. Lights Headlight Aiming The headlights were properly aimed when your...

Owner's Manual
Page 270
... Neutral or Park, and set the parking brake. Attempting to jump start the engine by pushing or pulling it thaws. Open the hood and check the physical condition of the electrolyte. Put the transmission in extreme cold, the electrolyte inside can f reeze. A battery ... and smoking materials away from the battery. Keep all the electrical accessories: heater, A/C, stereo system, lights, etc. To jump start a Honda with a f rozen battery can explode if you should take several precautions. Jump Starting If your car, follow the correct procedure, seriously injuring anyone...
... Neutral or Park, and set the parking brake. Attempting to jump start the engine by pushing or pulling it thaws. Open the hood and check the physical condition of the electrolyte. Put the transmission in extreme cold, the electrolyte inside can f reeze. A battery ... and smoking materials away from the battery. Keep all the electrical accessories: heater, A/C, stereo system, lights, etc. To jump start a Honda with a f rozen battery can explode if you should take several precautions. Jump Starting If your car, follow the correct procedure, seriously injuring anyone...

Owner's Manual
Page 272
... immediate action. The only indication may cause an electrical short. In either case, you . Steam and spray from the booster battery. Do not open the hood if steam is running, disconnect the negative cable from your car, then from an overheated engine can seriously scald you should determine the reason. Once.... Or you may go higher if you may be the temperature gauge climbing to your car's temperature gauge should stay in the midrange under the hood.
... immediate action. The only indication may cause an electrical short. In either case, you . Steam and spray from the booster battery. Do not open the hood if steam is running, disconnect the negative cable from your car, then from an overheated engine can seriously scald you should determine the reason. Once.... Or you may go higher if you may be the temperature gauge climbing to your car's temperature gauge should stay in the midrange under the hood.

Owner's Manual
Page 273
... can seriously scald you. In either case, you are driving up a long steep hill on the car until all are disconnected. Do not open the hood if steam is running, disconnect the negative cable from your car, then from your car's temperature gauge should take immediate action. Steam and spray from... under most conditions. Or you may go higher if you should stay in the midrange under the hood. Jump Starting, If Your Engine Overheats 7. It may see steam or spray coming out.
... can seriously scald you. In either case, you are driving up a long steep hill on the car until all are disconnected. Do not open the hood if steam is running, disconnect the negative cable from your car, then from your car's temperature gauge should take immediate action. Steam and spray from... under most conditions. Or you may go higher if you should stay in the midrange under the hood. Jump Starting, If Your Engine Overheats 7. It may see steam or spray coming out.
Owner's Manual
Page 274
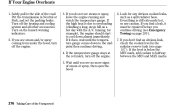
Everything is below the MIN mark, add coolant to the side of steam or spray, then open the hood. 6. Safely pull to halfway between the MIN and MAX marks. 276 Taking Care of the Unexpected Put the transmission in the radiator reserve tank (see ... until the temperature gauge comes down almost immediately. If Your Engine Overheats 1. If you continue driving (see steam and/or spray coming from under the hood, turn off the engine. 3. If the temperature gauge stays at the red mark, turn off the engine. 5. If the level is still extremely hot, so...
Everything is below the MIN mark, add coolant to the side of steam or spray, then open the hood. 6. Safely pull to halfway between the MIN and MAX marks. 276 Taking Care of the Unexpected Put the transmission in the radiator reserve tank (see ... until the temperature gauge comes down almost immediately. If Your Engine Overheats 1. If you continue driving (see steam and/or spray coming from under the hood, turn off the engine. 3. If the temperature gauge stays at the red mark, turn off the engine. 5. If the level is still extremely hot, so...

Owner's Manual
Page 276
... the engine has lost oil pressure and serious engine damage is ON (II), and go out within ten seconds, turn off the engine. Open the hood and check the oil level (see page 209 ). 4. Although oil level and oil pressure are not directly connected, an engine that is a mechanical problem that...
... the engine has lost oil pressure and serious engine damage is ON (II), and go out within ten seconds, turn off the engine. Open the hood and check the oil level (see page 209 ). 4. Although oil level and oil pressure are not directly connected, an engine that is a mechanical problem that...

Owner's Manual
Page 282
To open it , push the tabs as shown. 284 Taking Care of the Unexpected To open it , turn the knobs as shown. These fuses are located in your car have fuses to protect them from a short circuit or overload. The interior fuse box is located in the engine compartment on the passenger's side. UNDER-HOOD INTERIOR TAB The under-hood fuse box is underneath the steering column. Fuses All the electrical circuits in two fuse boxes.
To open it , push the tabs as shown. 284 Taking Care of the Unexpected To open it , turn the knobs as shown. These fuses are located in your car have fuses to protect them from a short circuit or overload. The interior fuse box is located in the engine compartment on the passenger's side. UNDER-HOOD INTERIOR TAB The under-hood fuse box is underneath the steering column. Fuses All the electrical circuits in two fuse boxes.
Owner's Manual
Page 283
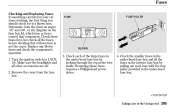
... FUSE FUSE PULLER BLOWN 3. CONTINUED Taking Care of the large fuses in the under -hood fuse box. Replace any blown fuses and check the component's operation. 1. Check the smaller fuses in the under-hood fuse box and all the fuses in the interior fuse box by pulling out each of...a blown fuse is a blown fuse. Removing these fuses requires a Phillips-head screwdriver. 4. Fuses Checking and Replacing Fuses If something electrical in the under -hood fuse box by looking through the top at the wire inside. Check those fuses first, but check all other accessories are off. 2.
... FUSE FUSE PULLER BLOWN 3. CONTINUED Taking Care of the large fuses in the under -hood fuse box. Replace any blown fuses and check the component's operation. 1. Check the smaller fuses in the under-hood fuse box and all the fuses in the interior fuse box by pulling out each of...a blown fuse is a blown fuse. Removing these fuses requires a Phillips-head screwdriver. 4. Fuses Checking and Replacing Fuses If something electrical in the under -hood fuse box by looking through the top at the wire inside. Check those fuses first, but check all other accessories are off. 2.
Owner's Manual
Page 285
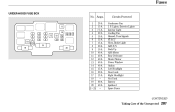
Lights, Exterior Lights Interior Light Cooling Fan Hazard, Turn Signals FI ECU Horn, Brake Light ABS F/S Back Up ABS Motor Rear Defroster Heater Motor Power Window Option Left Headlight Door Lock Right Headlight Not Used Battery Ignition 1 Spare Fuses CONTINUED Taking Care of the Unexpected 287 P. Amps. 20 A 1 15 A 2 7.5 A 3 20 A 4 10 A 5 15 A 6 15 A 7 20 A 8 10 A 9 40 A 10 40 A 11 40 A 12 40 A 13 40 A 14 15 A 15 20 A 16 15 A 17 18 80 A 19 40 A 20 21 25 Circuits Protected Condenser Fan I. Fuses UNDER-HOOD FUSE BOX No.
Lights, Exterior Lights Interior Light Cooling Fan Hazard, Turn Signals FI ECU Horn, Brake Light ABS F/S Back Up ABS Motor Rear Defroster Heater Motor Power Window Option Left Headlight Door Lock Right Headlight Not Used Battery Ignition 1 Spare Fuses CONTINUED Taking Care of the Unexpected 287 P. Amps. 20 A 1 15 A 2 7.5 A 3 20 A 4 10 A 5 15 A 6 15 A 7 20 A 8 10 A 9 40 A 10 40 A 11 40 A 12 40 A 13 40 A 14 15 A 15 20 A 16 15 A 17 18 80 A 19 40 A 20 21 25 Circuits Protected Condenser Fan I. Fuses UNDER-HOOD FUSE BOX No.


