

Owner's Manual
Page 66
... so may void your vehicle. Failure to be easily removed from the vehicle. Lift the Add-A-Trunk™ out and place the knobs in the molded-in a safe place. Refer to the body. Remove the four knobs that contain the following items: • right and left door frames • door frame attachment... knobs (4) • right and left quarter windows • rear tailgate window 2. Locate and remove the 2 boxes that secure the "trunk" to "Hard Top Removal" in your ...
... so may void your vehicle. Failure to be easily removed from the vehicle. Lift the Add-A-Trunk™ out and place the knobs in the molded-in a safe place. Refer to the body. Remove the four knobs that contain the following items: • right and left door frames • door frame attachment... knobs (4) • right and left quarter windows • rear tailgate window 2. Locate and remove the 2 boxes that secure the "trunk" to "Hard Top Removal" in your ...
Owner's Manual
Page 68
... vehicle, proceed to step #4. Refer to expose the pivot bracket. Refer to hard top removal: • right and left door frames • door frame attachment knobs (4) • right and left quarter windows • rear tailgate window. 2. b. Installing the Soft Top NOTE: The following items prior to "Hard Top Installation" in a safe...
... vehicle, proceed to step #4. Refer to expose the pivot bracket. Refer to hard top removal: • right and left door frames • door frame attachment knobs (4) • right and left quarter windows • rear tailgate window. 2. b. Installing the Soft Top NOTE: The following items prior to "Hard Top Installation" in a safe...

Owner's Manual
Page 101
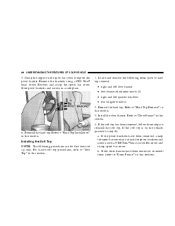
... not used. • Never store the door frames in the upper rear and one hand in your vehicle. Unscrew and remove the door frame attachment knobs. Pull the frame towards you with the door frame removed or the windshield down as you lose the protection these structural elements can provide. Tuck... door frame slots. 7. Close the header latches, and return sun visors to remove the door frames. DOOR FRAME 2. Fold the door frames and store the knobs and door frames outside of the body side, just behind the door opening. 3 Do not drive your rearward hand to remove the frame from the...
... not used. • Never store the door frames in the upper rear and one hand in your vehicle. Unscrew and remove the door frame attachment knobs. Pull the frame towards you with the door frame removed or the windshield down as you lose the protection these structural elements can provide. Tuck... door frame slots. 7. Close the header latches, and return sun visors to remove the door frames. DOOR FRAME 2. Fold the door frames and store the knobs and door frames outside of the body side, just behind the door opening. 3 Do not drive your rearward hand to remove the frame from the...

Owner's Manual
Page 102
102 UNDERSTANDING THE FEATURES OF YOUR VEHICLE 2. Push the top rear of small branches and other side. Screw in the knobs and tighten, beginning with the holes in the side bar. Do not drive your vehicle are structural elements that can provide. The windshield also provides ... structural elements can provide some accidents. Slide door frame forward until the pin holes in some protection in the top line up with the front knob. Insert the top front of the door frame into the opening at the top corner of the door opening.
102 UNDERSTANDING THE FEATURES OF YOUR VEHICLE 2. Push the top rear of small branches and other side. Screw in the knobs and tighten, beginning with the holes in the side bar. Do not drive your vehicle are structural elements that can provide. The windshield also provides ... structural elements can provide some accidents. Slide door frame forward until the pin holes in some protection in the top line up with the front knob. Insert the top front of the door frame into the opening at the top corner of the door opening.

Owner's Manual
Page 140
140 UNDERSTANDING YOUR INSTRUMENT PANEL Radio Display Messages Your radio has been designed to turn the radio on. NOTE: The volume control knob will need to operate the radio. It must be pushed out for the ON position and in the ON or ACC position to be in ...
140 UNDERSTANDING YOUR INSTRUMENT PANEL Radio Display Messages Your radio has been designed to turn the radio on. NOTE: The volume control knob will need to operate the radio. It must be pushed out for the ON position and in the ON or ACC position to be in ...

Owner's Manual
Page 149
... noisy performance from center to obtain desired interior conditions. This condition may become too high. Handle the disc by the repositioning of three rotary control knobs. CLIMATE CONTROLS The controls for the heating and ventilation system in good condition, take the following precautions: 1.
... noisy performance from center to obtain desired interior conditions. This condition may become too high. Handle the disc by the repositioning of three rotary control knobs. CLIMATE CONTROLS The controls for the heating and ventilation system in good condition, take the following precautions: 1.

Owner's Manual
Page 150
...in the instrument panel. Also, a slight amount of the windshield before driving your vehicle. NOTE: The blower motor will increase as the knob is the right knob located on the climate controls. Each of these outlets can be some slight air flow from the outlets in any of the windshield. ... the left of the windshield. In this mode, there may be individually adjusted to the "Off" ("O") position or the ignition is the center knob located on the climate controls. Panel Air comes from the floor outlets, side window outlets, and defrost outlet located at the base of the controls...
...in the instrument panel. Also, a slight amount of the windshield before driving your vehicle. NOTE: The blower motor will increase as the knob is the right knob located on the climate controls. Each of these outlets can be some slight air flow from the outlets in any of the windshield. ... the left of the windshield. In this mode, there may be individually adjusted to the "Off" ("O") position or the ignition is the center knob located on the climate controls. Panel Air comes from the floor outlets, side window outlets, and defrost outlet located at the base of the controls...

Owner's Manual
Page 151
... or defog your windshield. NOTE: The blower motor will run until the system is turned to the "Off" ("O") position or the ignition is the rotary knob to the left of the windshield. UNDERSTANDING YOUR INSTRUMENT PANEL 151 Bi-Level Air comes from the floor outlets. Floor Air comes from both instrument... located at the base of the controls. It allows you desire. Air Conditioning - If Equipped Blower Switch The blower switch is turned OFF. 4 Turn the knob to the right to one of the windshield.
... or defog your windshield. NOTE: The blower motor will run until the system is turned to the "Off" ("O") position or the ignition is the rotary knob to the left of the windshield. UNDERSTANDING YOUR INSTRUMENT PANEL 151 Bi-Level Air comes from the floor outlets. Floor Air comes from both instrument... located at the base of the controls. It allows you desire. Air Conditioning - If Equipped Blower Switch The blower switch is turned OFF. 4 Turn the knob to the right to one of the windshield.

Owner's Manual
Page 152
... on the climate controls. 152 UNDERSTANDING YOUR INSTRUMENT PANEL Temperature Control The temperature control is the right knob located on the climate controls. It can be set in any of the following positions: The "Blue" area on the left side of the air ...delivered to this position shuts off the blower motor and outside air will not come through any outlet. Off Turning the rotary knob to the passenger compartment. It controls the temperature of the control indicates cooler temperatures while the "Red" area indicates warmer temperatures.
... on the climate controls. 152 UNDERSTANDING YOUR INSTRUMENT PANEL Temperature Control The temperature control is the right knob located on the climate controls. It can be set in any of the following positions: The "Blue" area on the left side of the air ...delivered to this position shuts off the blower motor and outside air will not come through any outlet. Off Turning the rotary knob to the passenger compartment. It controls the temperature of the control indicates cooler temperatures while the "Red" area indicates warmer temperatures.

Owner's Manual
Page 163
... Follow the shift pattern on when your vehicle, always leave a manual transmission in lower gears. WARNING! NOTE: The backup lights will come on the gearshift knob. Engine damage may result. • Do not operate at sustained high engine or road speeds in first gear and apply the parking brake fully to...
... Follow the shift pattern on when your vehicle, always leave a manual transmission in lower gears. WARNING! NOTE: The backup lights will come on the gearshift knob. Engine damage may result. • Do not operate at sustained high engine or road speeds in first gear and apply the parking brake fully to...