

Owner's Manual
Page 56
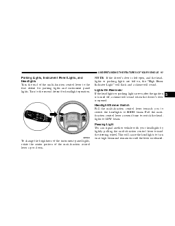
...operation of the parking lights, headlights, headlight beam selection, passing light, fog lights, instrument panel light dimming, and turn off in the dome light position. Daytime Brightness Feature Certain instrument panel components (odometer, radio display) can be turned on by rotating the control for the ...dimmer switch on during the daytime. If the hood is not fully latched, it could fly up when the vehicle is opened. To activate this feature, rotate the left in about 20 minutes if a door...
...operation of the parking lights, headlights, headlight beam selection, passing light, fog lights, instrument panel light dimming, and turn off in the dome light position. Daytime Brightness Feature Certain instrument panel components (odometer, radio display) can be turned on by rotating the control for the ...dimmer switch on during the daytime. If the hood is not fully latched, it could fly up when the vehicle is opened. To activate this feature, rotate the left in about 20 minutes if a door...
Owner's Manual
Page 57
... on at high beam and remain on after the ignition is turned off, a chime will sound when the driver's door is released. 3 To change the brightness of the instrument panel lights, rotate the center portion of the multi-function control lever to the second detent for parking lights and instrument...beam. This will sound. UNDERSTANDING THE FEATURES OF YOUR VEHICLE 57 Parking Lights, Instrument Panel Lights, and Headlights Turn the end of the muti-function control lever up or down. NOTE: If the driver's door is left open, and the headlights or parking lights are on until the lever is...
... on at high beam and remain on after the ignition is turned off, a chime will sound when the driver's door is released. 3 To change the brightness of the instrument panel lights, rotate the center portion of the multi-function control lever to the second detent for parking lights and instrument...beam. This will sound. UNDERSTANDING THE FEATURES OF YOUR VEHICLE 57 Parking Lights, Instrument Panel Lights, and Headlights Turn the end of the muti-function control lever up or down. NOTE: If the driver's door is left open, and the headlights or parking lights are on until the lever is...
Owner's Manual
Page 74
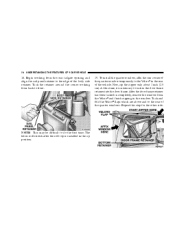
... 19. Tuck the retainer around the corner working from the rear tailgate opening and align the sail panel retainer to do the first time. 74 UNDERSTANDING THE FEATURES OF YOUR VEHICLE 18. After the door frame retainer has been tucked in completely, remove the window from back to tuck in the rear...the vehicle. Now, zip the zipper only about 1 inch (2.5 cm). Tuck and fold the Velcro flaps which are above and to the Velcro in the door frame retainer into the door frame. Begin working from the Velcro and finish zipping in the up position. At this step for the other side.
... 19. Tuck the retainer around the corner working from the rear tailgate opening and align the sail panel retainer to do the first time. 74 UNDERSTANDING THE FEATURES OF YOUR VEHICLE 18. After the door frame retainer has been tucked in completely, remove the window from back to tuck in the rear...the vehicle. Now, zip the zipper only about 1 inch (2.5 cm). Tuck and fold the Velcro flaps which are above and to the Velcro in the door frame retainer into the door frame. Begin working from the Velcro and finish zipping in the up position. At this step for the other side.

Owner's Manual
Page 88
As you begin to lower the top, wrap the sail panels so that they rest on both door rails (Unlimited Models Only). 11. Release the hook portion of the vehicle. NOTE: If your vehicle is equipped with a Dual Top, ensure that the check ...
As you begin to lower the top, wrap the sail panels so that they rest on both door rails (Unlimited Models Only). 11. Release the hook portion of the vehicle. NOTE: If your vehicle is equipped with a Dual Top, ensure that the check ...

Owner's Manual
Page 93
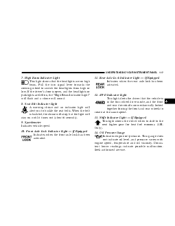
UNDERSTANDING THE FEATURES OF YOUR VEHICLE 93 6. Move to the rear of the vehicle and gently pull the sail panels over the sport bar. 3 NOTE: Do not tuck the drip rails into the door frame at this time. Grasp the drip rail retainer and untuck them hang down into bracket on door rails. Make sure door rail Sunrider pins engage into bracket on side bows (Unlimited Models Only). 7. Guide side bows down over the 3 bow. Let them from the door frame. 8.
UNDERSTANDING THE FEATURES OF YOUR VEHICLE 93 6. Move to the rear of the vehicle and gently pull the sail panels over the sport bar. 3 NOTE: Do not tuck the drip rails into the door frame at this time. Grasp the drip rail retainer and untuck them hang down into bracket on door rails. Make sure door rail Sunrider pins engage into bracket on side bows (Unlimited Models Only). 7. Guide side bows down over the 3 bow. Let them from the door frame. 8.

Owner's Manual
Page 103
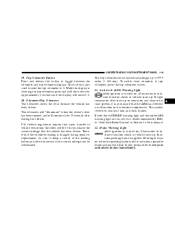
... . To turn these features is completed and before you are driving off-road with low range operation preferred, if you return to remove the doors, see your passenger should wear seat belts at all times, on-road and off-road, regardless of whether the windshield is raised or folded ... VEHICLE 103 NOTE: Before lowering windshield, disconnect the electrical connector for certain off-road uses, the side bars can be limited to "Fuse Panel" in the fuse panel. It is recommended that required their removal is then lost. Both you remove the side bars and fold down . If required for the...
... . To turn these features is completed and before you are driving off-road with low range operation preferred, if you return to remove the doors, see your passenger should wear seat belts at all times, on-road and off-road, regardless of whether the windshield is raised or folded ... VEHICLE 103 NOTE: Before lowering windshield, disconnect the electrical connector for certain off-road uses, the side bars can be limited to "Fuse Panel" in the fuse panel. It is recommended that required their removal is then lost. Both you remove the side bars and fold down . If required for the...
Owner's Manual
Page 117
... light will sound. 8. This gauge does not indicate oil level, and pressure varies with engine speed, temperature and oil viscosity. UNDERSTANDING YOUR INSTRUMENT PANEL 117 7. Front Axle Lock Indicator Light - If Equipped Indicates when the front axle lock has been activated. 11. Rear Axle Lock Indicator Light ...for best fuel economy (4.0L Only). 14. Speedometer Indicates vehicle speed. 10. Oil Pressure Gauge Indicates engine oil pressure. If the driver's door is open, and the headlights or parklights are left on high beam. When the belt is in the four-wheel drive mode, and the...
... light will sound. 8. This gauge does not indicate oil level, and pressure varies with engine speed, temperature and oil viscosity. UNDERSTANDING YOUR INSTRUMENT PANEL 117 7. Front Axle Lock Indicator Light - If Equipped Indicates when the front axle lock has been activated. 11. Rear Axle Lock Indicator Light ...for best fuel economy (4.0L Only). 14. Speedometer Indicates vehicle speed. 10. Oil Pressure Gauge Indicates engine oil pressure. If the driver's door is open, and the headlights or parklights are left on high beam. When the belt is in the four-wheel drive mode, and the...
Owner's Manual
Page 119
... a possible brake system fluid leak or low pressure level, see your authorized dealer immediately. 4 This button is applied. The odometer will "illuminate" when the driver's door has been opened, and will reset to standard non-anti-lock brakes. federal regulations require that the vehicle has been driven. Refer to "Anti-Lock... keep a record of the reading before and after the service so the correct mileage can be determined. The system reverts to 0. 20. UNDERSTANDING YOUR INSTRUMENT PANEL 119 19.
... a possible brake system fluid leak or low pressure level, see your authorized dealer immediately. 4 This button is applied. The odometer will "illuminate" when the driver's door has been opened, and will reset to standard non-anti-lock brakes. federal regulations require that the vehicle has been driven. Refer to "Anti-Lock... keep a record of the reading before and after the service so the correct mileage can be determined. The system reverts to 0. 20. UNDERSTANDING YOUR INSTRUMENT PANEL 119 19.

Owner's Manual
Page 251
... both zipper halves with a soft and slightly moist, clean cloth. 4. Special Care • If you drive on zipper operation. Rinse both sides of the doors, rocker panels and tailgate must clean the window quickly. 5. If a stuck zipper slide is considered the responsibility of the window zippers, each wheel. 7 Even normal on-road...
... both zipper halves with a soft and slightly moist, clean cloth. 4. Special Care • If you drive on zipper operation. Rinse both sides of the doors, rocker panels and tailgate must clean the window quickly. 5. If a stuck zipper slide is considered the responsibility of the window zippers, each wheel. 7 Even normal on-road...

Owner's Manual
Page 255
... Yellow Transmission: Manual Clutch Interlock Switch Bypass Automatic - Rotate glove box door to insure proper installation. MAINTAINING YOUR VEHICLE 255 To access the fuse panel the glove box must be removed. To reinstall, position the glove box door at an 8 o'clock orientation, engage the hinge hook formations on the... lower edge of the glove box door with the hinge pins on the lower edge of the glove box door upward toward the instrument panel enough to reattach the glove box strap to the door. Open and close to closed position. Tilt the upper edge ...
... Yellow Transmission: Manual Clutch Interlock Switch Bypass Automatic - Rotate glove box door to insure proper installation. MAINTAINING YOUR VEHICLE 255 To access the fuse panel the glove box must be removed. To reinstall, position the glove box door at an 8 o'clock orientation, engage the hinge hook formations on the... lower edge of the glove box door with the hinge pins on the lower edge of the glove box door upward toward the instrument panel enough to reattach the glove box strap to the door. Open and close to closed position. Tilt the upper edge ...


