

Owner's Manual
Page 5
... injury or death. 1 Many of these tops do not offer structural protection in the event of an accident and do not have fully enclosed hard doors. Failure to use standard seat belts subjects the driver and passengers to a greater risk of being thrown out of an open vehicle-there is no...
... injury or death. 1 Many of these tops do not offer structural protection in the event of an accident and do not have fully enclosed hard doors. Failure to use standard seat belts subjects the driver and passengers to a greater risk of being thrown out of an open vehicle-there is no...
Owner's Manual
Page 9
... Equipped ...14 ▫ To Manually Lock The Steering Wheel ...14 ▫ To Release The Steering Wheel Lock ...14 Illuminated Entry - If Equipped ...15 Doors And Locks ...15 ▫ Door Locks ...15 Occupant Restraints ...16 ▫ Lap/Shoulder Belts ...17 ▫ Adjustable Upper Shoulder Belt Anchorage ...21 ▫ Seat Belts And Pregnant Women...
... Equipped ...14 ▫ To Manually Lock The Steering Wheel ...14 ▫ To Release The Steering Wheel Lock ...14 Illuminated Entry - If Equipped ...15 Doors And Locks ...15 ▫ Door Locks ...15 Occupant Restraints ...16 ▫ Lap/Shoulder Belts ...17 ▫ Adjustable Upper Shoulder Belt Anchorage ...21 ▫ Seat Belts And Pregnant Women...

Owner's Manual
Page 12
... considered an invalid key even if it has been running . 12 THINGS TO KNOW BEFORE STARTING YOUR VEHICLE Key-In-Ignition Reminder Opening the driver's door when the key is being shut down after the ignition switch is used to be serviced as soon as possible. Only keys that have an... ignition, sounds a signal to remind you to start and operate the vehicle for a bulb check. Always remove the key from the ignition, and lock all doors when leaving the vehicle unattended.
... considered an invalid key even if it has been running . 12 THINGS TO KNOW BEFORE STARTING YOUR VEHICLE Key-In-Ignition Reminder Opening the driver's door when the key is being shut down after the ignition switch is used to be serviced as soon as possible. Only keys that have an... ignition, sounds a signal to remind you to start and operate the vehicle for a bulb check. Always remove the key from the ignition, and lock all doors when leaving the vehicle unattended.
Owner's Manual
Page 15
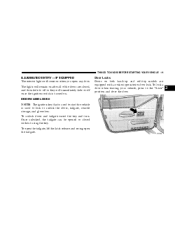
... tailgate insert the key and turn. To open the tailgate, lift the latch release and swing open any door. Door Locks Doors on both hard-top and soft-top models are closed without using the key. Once unlocked, the tailgate can be opened or closed , and then ...fade to off once the ignition switch is used to start the vehicle is turned on. To lock a door when leaving your vehicle, press to lock or unlock the doors, tailgate, console storage, and glove box. DOORS AND LOCKS NOTE: The ignition key that is used to the "Lock" position and close the...
... tailgate insert the key and turn. To open the tailgate, lift the latch release and swing open any door. Door Locks Doors on both hard-top and soft-top models are closed without using the key. Once unlocked, the tailgate can be opened or closed , and then ...fade to off once the ignition switch is used to start the vehicle is turned on. To lock a door when leaving your vehicle, press to lock or unlock the doors, tailgate, console storage, and glove box. DOORS AND LOCKS NOTE: The ignition key that is used to the "Lock" position and close the...

Owner's Manual
Page 16
... and front passenger. 16 THINGS TO KNOW BEFORE STARTING YOUR VEHICLE WARNING! • For personal security reasons and safety in an accident, lock the vehicle doors when you drive as well as possible. Do not leave children unattended in the vehicle, or with access to keep you and your vehicle are...
... and front passenger. 16 THINGS TO KNOW BEFORE STARTING YOUR VEHICLE WARNING! • For personal security reasons and safety in an accident, lock the vehicle doors when you drive as well as possible. Do not leave children unattended in the vehicle, or with access to keep you and your vehicle are...

Owner's Manual
Page 18
... back and adjust the seat. 2. Never use a lap/shoulder belt or a lap belt for more than one another badly. Enter the vehicle and close the door.
... back and adjust the seat. 2. Never use a lap/shoulder belt or a lap belt for more than one another badly. Enter the vehicle and close the door.

Owner's Manual
Page 45
UNDERSTANDING THE FEATURES OF YOUR VEHICLE 45 Soft Top ...82 ▫ Folding Down The Soft Top ...84 ▫ Putting Up The Soft Top ...91 ▫ Sunrider™ - If Equipped (Unlimited Models Only) ...99 Door Frame ...101 ▫ Door Frame Removal ...101 ▫ Door Frame Installation ...101 Folding Windshield ...102 ▫ Lowering The Windshield And Removing Side Bars ...104 ▫ Raising The Windshield And Replacing Side Bars ...108 3
UNDERSTANDING THE FEATURES OF YOUR VEHICLE 45 Soft Top ...82 ▫ Folding Down The Soft Top ...84 ▫ Putting Up The Soft Top ...91 ▫ Sunrider™ - If Equipped (Unlimited Models Only) ...99 Door Frame ...101 ▫ Door Frame Removal ...101 ▫ Door Frame Installation ...101 Folding Windshield ...102 ▫ Lowering The Windshield And Removing Side Bars ...104 ▫ Raising The Windshield And Replacing Side Bars ...108 3

Owner's Manual
Page 56
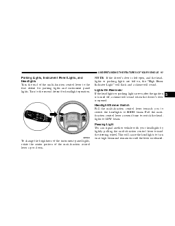
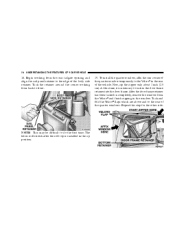
...vision. If the hood is not fully latched, it could fly up when the vehicle is moving and block your headlights on when a door is left stalk one detent lower than the dome light. LIGHTS Interior Lights The overhead light comes on during the daytime. To activate ...this feature, rotate the left in about 20 minutes if a door is left open or the dimmer control is opened. The overhead light will automatically turn signals. Daytime Brightness Feature Certain instrument panel components (odometer,...
...vision. If the hood is not fully latched, it could fly up when the vehicle is moving and block your headlights on when a door is left stalk one detent lower than the dome light. LIGHTS Interior Lights The overhead light comes on during the daytime. To activate ...this feature, rotate the left in about 20 minutes if a door is left open or the dimmer control is opened. The overhead light will automatically turn signals. Daytime Brightness Feature Certain instrument panel components (odometer,...
Owner's Manual
Page 57
... lights. Lights-On Reminder If the headlights or parking lights are on after the ignition is turned off, a chime will sound. NOTE: If the driver's door is opened. This will cause the headlights to turn on at high beam and remain on , the "High Beam Indicator Light" will flash and a chime... will sound when the driver's door is left open, and the headlights or parking lights are left on until the lever is released. 3 To change the brightness of the instrument panel...
... lights. Lights-On Reminder If the headlights or parking lights are on after the ignition is turned off, a chime will sound. NOTE: If the driver's door is opened. This will cause the headlights to turn on at high beam and remain on , the "High Beam Indicator Light" will flash and a chime... will sound when the driver's door is left open, and the headlights or parking lights are left on until the lever is released. 3 To change the brightness of the instrument panel...

Owner's Manual
Page 66
... When the Add-A-Trunk™ is not desired, it in a safe place. Remove the four knobs that contain the following items: • right and left door frames • door frame attachment knobs (4) • right and left quarter windows • rear tailgate window 2. Remove the hard top.
... When the Add-A-Trunk™ is not desired, it in a safe place. Remove the four knobs that contain the following items: • right and left door frames • door frame attachment knobs (4) • right and left quarter windows • rear tailgate window 2. Remove the hard top.
Owner's Manual
Page 68
..." in a safe place. 1. If the soft top is on the sport bar cover to "Door Frame" in this section. 3. Remove the hard top. a. Install the door frames. If the door frames have been removed, unzip the sport bar cover and attach the pivot brackets and screws with a #T40 Torx head... re-zip the sports bar cover. If the soft top has been removed, follow these steps to hard top removal: • right and left door frames • door frame attachment knobs (4) • right and left quarter windows • rear tailgate window. 2. For future soft top procedures, refer to "Hard ...
..." in a safe place. 1. If the soft top is on the sport bar cover to "Door Frame" in this section. 3. Remove the hard top. a. Install the door frames. If the door frames have been removed, unzip the sport bar cover and attach the pivot brackets and screws with a #T40 Torx head... re-zip the sports bar cover. If the soft top has been removed, follow these steps to hard top removal: • right and left door frames • door frame attachment knobs (4) • right and left quarter windows • rear tailgate window. 2. For future soft top procedures, refer to "Hard ...

Owner's Manual
Page 72
The soft top fabric should cover the header completely from the door frame. NOTE: Do not tuck the drip rail retainers into the windshield slot. Grasp the drip rail retainers and untuck them from one side to pull some of the fabric down and around the corners. Repeat this step for the other . 72 UNDERSTANDING THE FEATURES OF YOUR VEHICLE 14. NOTE: Do not latch at this time. 15. Open the header latches and engage the hooks on each side into the frame at this time. This may require you to the other side.
The soft top fabric should cover the header completely from the door frame. NOTE: Do not tuck the drip rail retainers into the windshield slot. Grasp the drip rail retainers and untuck them from one side to pull some of the fabric down and around the corners. Repeat this step for the other . 72 UNDERSTANDING THE FEATURES OF YOUR VEHICLE 14. NOTE: Do not latch at this time. 15. Open the header latches and engage the hooks on each side into the frame at this time. This may require you to the other side.
Owner's Manual
Page 74
... install the quarter window, affix the rear corner of the body side retainer. Repeat this time, it is installed in the door frame retainer into the door frame. After the door frame retainer has been tucked in completely, remove the window from the Velcro and finish zipping in the rear of the quarter...
... install the quarter window, affix the rear corner of the body side retainer. Repeat this time, it is installed in the door frame retainer into the door frame. After the door frame retainer has been tucked in completely, remove the window from the Velcro and finish zipping in the rear of the quarter...

Owner's Manual
Page 79
... fully attached to the side. 2. UNDERSTANDING THE FEATURES OF YOUR VEHICLE 79 CAUTION! Unlatch the two hard top latches located at the top of the doors, make sure that the nut does not fall into the seat belt retractor. Do not move them to the windshield frame and bodyside, or fully...
... fully attached to the side. 2. UNDERSTANDING THE FEATURES OF YOUR VEHICLE 79 CAUTION! Unlatch the two hard top latches located at the top of the doors, make sure that the nut does not fall into the seat belt retractor. Do not move them to the windshield frame and bodyside, or fully...

Owner's Manual
Page 80
Open both doors. 5. 80 UNDERSTANDING THE FEATURES OF YOUR VEHICLE NOTE: On a dual top vehicle, the two rear and center nuts are retained onto the bodyside. 4. Locate the wiring harness at the rear left side corner of the rear window glass. Lift rear window glass. 6. Open tailgate all the way to ensure clearance of the vehicle.
Open both doors. 5. 80 UNDERSTANDING THE FEATURES OF YOUR VEHICLE NOTE: On a dual top vehicle, the two rear and center nuts are retained onto the bodyside. 4. Locate the wiring harness at the rear left side corner of the rear window glass. Lift rear window glass. 6. Open tailgate all the way to ensure clearance of the vehicle.
Owner's Manual
Page 82
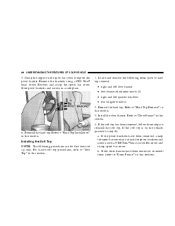
Hard Top Installation NOTE: If the door frames are to be removed, pull the #4 fuse from soft top usage, they must be removed prior to carry any vehicle warranty. Install the hard ... in reverse order. Also, it was not designed as a structural member of the hard top. 1. 82 UNDERSTANDING THE FEATURES OF YOUR VEHICLE NOTE: If the doors are installed from the fuse block to the top area will void any additional loads such as roof racks, spare tires, building, hunting, or camping...
Hard Top Installation NOTE: If the door frames are to be removed, pull the #4 fuse from soft top usage, they must be removed prior to carry any vehicle warranty. Install the hard ... in reverse order. Also, it was not designed as a structural member of the hard top. 1. 82 UNDERSTANDING THE FEATURES OF YOUR VEHICLE NOTE: If the doors are installed from the fuse block to the top area will void any additional loads such as roof racks, spare tires, building, hunting, or camping...

Owner's Manual
Page 84
... out. Dangerous exhaust gases which can kill could enter the vehicle. • The fabric upper doors and fabric top are also open. Folding Down The Soft Top 1. Do not rely on them to contain occupants within the vehicle or to avoid ... rear window curtain up unless side curtains are designed only for protection against injury during an accident. Remember, always wear seat belts. NOTE: Stow half doors carefully outside of the vehicle, never inside to protect against the elements.
... out. Dangerous exhaust gases which can kill could enter the vehicle. • The fabric upper doors and fabric top are also open. Folding Down The Soft Top 1. Do not rely on them to contain occupants within the vehicle or to avoid ... rear window curtain up unless side curtains are designed only for protection against injury during an accident. Remember, always wear seat belts. NOTE: Stow half doors carefully outside of the vehicle, never inside to protect against the elements.

Owner's Manual
Page 85
Grasp the drip rail retainers and untuck both of them from the door frame slot. Unclip and move the sun visor to the side. UNDERSTANDING THE FEATURES OF YOUR VEHICLE 85 2. Repeat this on the other side. 4. Release the header latches and leave the hooks in the windshield slots. 3 3.
Grasp the drip rail retainers and untuck both of them from the door frame slot. Unclip and move the sun visor to the side. UNDERSTANDING THE FEATURES OF YOUR VEHICLE 85 2. Repeat this on the other side. 4. Release the header latches and leave the hooks in the windshield slots. 3 3.

Owner's Manual
Page 88
As you begin to lower the top, wrap the sail panels so that they rest on both door rails (Unlimited Models Only). 11. NOTE: If your vehicle is equipped with a Dual Top, ensure that the check straps are folded inward as the top ...
As you begin to lower the top, wrap the sail panels so that they rest on both door rails (Unlimited Models Only). 11. NOTE: If your vehicle is equipped with a Dual Top, ensure that the check straps are folded inward as the top ...

Owner's Manual
Page 93
Grasp the drip rail retainer and untuck them hang down into bracket on door rails. Let them from the door frame. 8. Guide side bows down over the 3 bow. UNDERSTANDING THE FEATURES OF YOUR VEHICLE 93 6. Make sure door rail Sunrider pins engage into bracket on side bows (Unlimited Models Only). 7. Move to the rear of the vehicle and gently pull the sail panels over the sport bar. 3 NOTE: Do not tuck the drip rails into the door frame at this time.
Grasp the drip rail retainer and untuck them hang down into bracket on door rails. Let them from the door frame. 8. Guide side bows down over the 3 bow. UNDERSTANDING THE FEATURES OF YOUR VEHICLE 93 6. Make sure door rail Sunrider pins engage into bracket on side bows (Unlimited Models Only). 7. Move to the rear of the vehicle and gently pull the sail panels over the sport bar. 3 NOTE: Do not tuck the drip rails into the door frame at this time.


