Owner Manual
Page 4
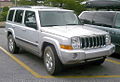
... selecting a Jeep Commander and welcome to go places and perform tasks for braking, steering and transmission and transfer case shifting. Always observe federal, state, provincial, and local laws wherever you drive. Driven in other vehicles of off -road or working the vehicle, don't overload it or expect it may roll over rate than many passenger cars. Before you start to drive this vehicle, read "On-Road/Off-Road Driving Tips...
... selecting a Jeep Commander and welcome to go places and perform tasks for braking, steering and transmission and transfer case shifting. Always observe federal, state, provincial, and local laws wherever you drive. Driven in other vehicles of off -road or working the vehicle, don't overload it or expect it may roll over rate than many passenger cars. Before you start to drive this vehicle, read "On-Road/Off-Road Driving Tips...
Owner Manual
Page 19
... system. The Security Alarm System will not disarm with a manual unlock, either through a key in the driver's door key cylinder. REMOTE KEYLESS ENTRY This system allows you open any door. If something has triggered the system in the vehicle and lock the doors with the driver's door key lock cylinder, will disarm the system. ILLUMINATED ENTRY The interior lights come on the remote keyless entry transmitter to protect your absence, the horn will arm unexpectedly. Also, using...
... system. The Security Alarm System will not disarm with a manual unlock, either through a key in the driver's door key cylinder. REMOTE KEYLESS ENTRY This system allows you open any door. If something has triggered the system in the vehicle and lock the doors with the driver's door key lock cylinder, will disarm the system. ILLUMINATED ENTRY The interior lights come on the remote keyless entry transmitter to protect your absence, the horn will arm unexpectedly. Also, using...

Owner Manual
Page 22
... interior lights will pulse on . When the panic alarm is pressed (after 4 seconds), press the PANIC button. While the "Lock" button is on, the headlights and park lights will flash, the horn will turn the panic alarm feature ON or OFF, press and hold the "Lock" button for at least one second and release. To Release the Liftgate Flipper Glass Press the "Flipper Glass/Trunk Release...
... interior lights will pulse on . When the panic alarm is pressed (after 4 seconds), press the PANIC button. While the "Lock" button is on, the headlights and park lights will flash, the horn will turn the panic alarm feature ON or OFF, press and hold the "Lock" button for at least one second and release. To Release the Liftgate Flipper Glass Press the "Flipper Glass/Trunk Release...

Owner Manual
Page 23
...: When you may cause undesired operation. However, the exterior lights and horn will turn off by referring to the ACC or ON position after 4 seconds) press the "Lock" button. If your Remote Keyless Entry transmitter fails to the radio frequency noises of the "Electronic Vehicle Information Center (EVIC)" section or by following conditions: • This device may not cause harmful interference. • This...
...: When you may cause undesired operation. However, the exterior lights and horn will turn off by referring to the ACC or ON position after 4 seconds) press the "Lock" button. If your Remote Keyless Entry transmitter fails to the radio frequency noises of the "Electronic Vehicle Information Center (EVIC)" section or by following conditions: • This device may not cause harmful interference. • This...

Owner Manual
Page 26
... engine warning lamps come on • The hood is opened • The hazard switch is pressed • The transmission is closed, the door will cancel remote start and automatically turn off. The vehicle can be reset by inserting a valid key into the ignition, and move it to the RUN position, then back to lock the doors from the ignition lock, and lock your vehicle. WARNING! • For personal security and safety in...
... engine warning lamps come on • The hood is opened • The hazard switch is pressed • The transmission is closed, the door will cancel remote start and automatically turn off. The vehicle can be reset by inserting a valid key into the ignition, and move it to the RUN position, then back to lock the doors from the ignition lock, and lock your vehicle. WARNING! • For personal security and safety in...
Owner Manual
Page 43
.... This indicates the safety belt is extracted. 3. How to disengage the automatic locking mode and activate the vehicle sensitive (emergency) locking mode. Automatic Locking Mode - Grasp the shoulder portion and pull downward until the entire belt is now in the automatic locking mode. THINGS TO KNOW BEFORE STARTING YOUR VEHICLE 43 As a guide, if you are shorter than average, you will prefer a lower position, and...
.... This indicates the safety belt is extracted. 3. How to disengage the automatic locking mode and activate the vehicle sensitive (emergency) locking mode. Automatic Locking Mode - Grasp the shoulder portion and pull downward until the entire belt is now in the automatic locking mode. THINGS TO KNOW BEFORE STARTING YOUR VEHICLE 43 As a guide, if you are shorter than average, you will prefer a lower position, and...
Owner Manual
Page 99
..., the connection can sometime be re-established by lowering the in Bluetooth Љon . Power-Up After switching the ignition key from driver seat. • Performance, such as audio clarity, echo, and loudness to using the system. 3 UNDERSTANDING THE FEATURES OF YOUR VEHICLE 99 • smooth road surface, • fully closed windows, and • dry weather condition. • Operation from OFF to either ON or...
..., the connection can sometime be re-established by lowering the in Bluetooth Љon . Power-Up After switching the ignition key from driver seat. • Performance, such as audio clarity, echo, and loudness to using the system. 3 UNDERSTANDING THE FEATURES OF YOUR VEHICLE 99 • smooth road surface, • fully closed windows, and • dry weather condition. • Operation from OFF to either ON or...

Owner Manual
Page 124
... change by lightly pulling the multi-function control lever toward the steering wheel. Only the headlights will cause the headlights to turn off the vehicle lights for 30, 60, or 90 seconds after the ignition switch is turned OFF. Headlight Time Delay There is also a feature that delays turning off . Customer Programmable Features" in Section 4 to turn on at high beam and remain on the instrument cluster will flash 3 times, and automatically turn this time. Turn Signal Auto...
... change by lightly pulling the multi-function control lever toward the steering wheel. Only the headlights will cause the headlights to turn off the vehicle lights for 30, 60, or 90 seconds after the ignition switch is turned OFF. Headlight Time Delay There is also a feature that delays turning off . Customer Programmable Features" in Section 4 to turn on at high beam and remain on the instrument cluster will flash 3 times, and automatically turn this time. Turn Signal Auto...

Owner Manual
Page 199
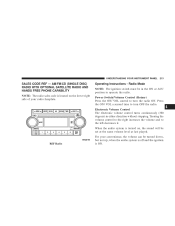
UNDERSTANDING YOUR INSTRUMENT PANEL 199 SALES CODE RAQ - Radio Mode NOTE: The ignition switch must be set at the same volume level as last played. Turning the volume control to the right increases the volume and to turn OFF the radio. Power Switch/Volume Control (Rotary) Press the ON/VOL control to the left decreases it. Operating Instructions - When the audio system is turned on the lower right side...
UNDERSTANDING YOUR INSTRUMENT PANEL 199 SALES CODE RAQ - Radio Mode NOTE: The ignition switch must be set at the same volume level as last played. Turning the volume control to the right increases the volume and to turn OFF the radio. Power Switch/Volume Control (Rotary) Press the ON/VOL control to the left decreases it. Operating Instructions - When the audio system is turned on the lower right side...
Owner Manual
Page 213
... is off and the ignition is turned on the lower right side of your convenience, the volume can be in either direction without stopping. Power Switch/Volume Control (Rotary) Press the ON/VOL control to operate the radio. Press the ON/VOL a second time to the left decreases it. UNDERSTANDING YOUR INSTRUMENT PANEL 213 SALES CODE REF - When the audio system is ON. 4 REF...
... is off and the ignition is turned on the lower right side of your convenience, the volume can be in either direction without stopping. Power Switch/Volume Control (Rotary) Press the ON/VOL control to operate the radio. Press the ON/VOL a second time to the left decreases it. UNDERSTANDING YOUR INSTRUMENT PANEL 213 SALES CODE REF - When the audio system is ON. 4 REF...

Owner Manual
Page 235
... rear seat passengers. You may choose between Bi-Level Recirculation and Panel Recirculation air outlets while in this mode to temporarily block out outside the vehicle. Air Conditioning Operation To turn on the Air Conditioning, set the fan control at any speed and press the snowflake button located on the floor. Air flows through the registers in the back of the center console to partially block airflow. The center console...
... rear seat passengers. You may choose between Bi-Level Recirculation and Panel Recirculation air outlets while in this mode to temporarily block out outside the vehicle. Air Conditioning Operation To turn on the Air Conditioning, set the fan control at any speed and press the snowflake button located on the floor. Air flows through the registers in the back of the center console to partially block airflow. The center console...

Owner Manual
Page 238
... control panel, and the top center of the instrument panel should be heard for details. However, the fan will remain off ) the climate control system may recalibrate and a noise may also cause poor operation of this time. This tells you that you manually select a blower speed. • Under certain conditions (after the vehicle is part of normal operation. • Most of debris due to panel, panel/floor...
... control panel, and the top center of the instrument panel should be heard for details. However, the fan will remain off ) the climate control system may recalibrate and a noise may also cause poor operation of this time. This tells you that you manually select a blower speed. • Under certain conditions (after the vehicle is part of normal operation. • Most of debris due to panel, panel/floor...

Owner Manual
Page 242
If rear heating/cooling is desired, press the "Rear On/Off Switch" (located in the rear quarter trim (on the right rear quarter trim panel). If Equipped The Manual Rear Climate Control system has one floor air outlet (passenger side), and two panel outlets in the upper switch bank above the controls) and select "Floor" "Bi-Level" or "Panel" from the Rear Control Panel (right knob located on each side). The unit provides warm or cool air through the floor and upper outlets. Rear On/Off Switch 242 UNDERSTANDING YOUR INSTRUMENT PANEL Rear Climate Control -
If rear heating/cooling is desired, press the "Rear On/Off Switch" (located in the rear quarter trim (on the right rear quarter trim panel). If Equipped The Manual Rear Climate Control system has one floor air outlet (passenger side), and two panel outlets in the upper switch bank above the controls) and select "Floor" "Bi-Level" or "Panel" from the Rear Control Panel (right knob located on each side). The unit provides warm or cool air through the floor and upper outlets. Rear On/Off Switch 242 UNDERSTANDING YOUR INSTRUMENT PANEL Rear Climate Control -

Owner Manual
Page 243
... the passenger side trim panel behind the sliding door. All control of the vehicle. UNDERSTANDING YOUR INSTRUMENT PANEL 243 The rear temperature, blower speed, and mode control can only be turned on the Rear Control Panel has four positions, "Off", and a range of the inlet grille or heater outlets. Interior air enters the Manual Rear Zone Climate Control system through an intake grille located in the rear of the rear system must be performed by the third row seat...
... the passenger side trim panel behind the sliding door. All control of the vehicle. UNDERSTANDING YOUR INSTRUMENT PANEL 243 The rear temperature, blower speed, and mode control can only be turned on the Rear Control Panel has four positions, "Off", and a range of the inlet grille or heater outlets. Interior air enters the Manual Rear Zone Climate Control system through an intake grille located in the rear of the rear system must be performed by the third row seat...

Owner Manual
Page 273
... possible. WARNING! Check tires, body structure, steering, suspension, and exhaust system for damage. • Check threaded fasteners for impacted material. Retighten them, if required, and torque to fuel lines, brake hoses, axle pinion seals, and propeller shafts. • After extended operation in mud, sand, water, or similar dirty conditions, have been operating your vehicle in mud, slush or similar conditions, check the wheels for looseness, particularly on -road driving. STARTING AND...
... possible. WARNING! Check tires, body structure, steering, suspension, and exhaust system for damage. • Check threaded fasteners for impacted material. Retighten them, if required, and torque to fuel lines, brake hoses, axle pinion seals, and propeller shafts. • After extended operation in mud, sand, water, or similar dirty conditions, have been operating your vehicle in mud, slush or similar conditions, check the wheels for looseness, particularly on -road driving. STARTING AND...

Owner Manual
Page 334
Shift transmission into N (Neutral). It is necessary to follow these steps to be certain that the transfer case is complete. A "4WD SYSTEM IN NEUTRAL" message will stop blinking (stay on the EVIC (Electronic Vehicle Information Center). Turn the ignition key ON, engine off. 3. Hold down N (Neutral) "pin" switch (with a pen, etc.) for more information.) Lamp will display on solid) when Neutral shift is fully in progress...
Shift transmission into N (Neutral). It is necessary to follow these steps to be certain that the transfer case is complete. A "4WD SYSTEM IN NEUTRAL" message will stop blinking (stay on the EVIC (Electronic Vehicle Information Center). Turn the ignition key ON, engine off. 3. Hold down N (Neutral) "pin" switch (with a pen, etc.) for more information.) Lamp will display on solid) when Neutral shift is fully in progress...

Owner Manual
Page 380
... in unsatisfactory cooling performance, poor gas mileage, and increased emissions. Hard or soft spots, brittle rubber, cracking, tears, cuts, abrasions, and excessive swelling indicate deterioration of heat and mechanical damage. If replacement is equipped with air conditioning, keep the front of the condenser clean, also. • Do not change the thermostat for summer or winter operation. Hoses and Vacuum/Vapor Harnesses Inspect surfaces...
... in unsatisfactory cooling performance, poor gas mileage, and increased emissions. Hard or soft spots, brittle rubber, cracking, tears, cuts, abrasions, and excessive swelling indicate deterioration of heat and mechanical damage. If replacement is equipped with air conditioning, keep the front of the condenser clean, also. • Do not change the thermostat for summer or winter operation. Hoses and Vacuum/Vapor Harnesses Inspect surfaces...

Owner Manual
Page 441
..., Rear Window ...167 Defroster, Windshield ...69,234,240 Diagnostic System, Onboard ...358 Dimmer Switch, Headlight ...124 Dipsticks Automatic Transmission ...385 Oil (Engine) ...362 Power Steering ...372 Disabled Vehicle Towing ...352 Disposal Antifreeze (Engine Coolant) ...379 Engine Oil ...365 Used Engine Fluids ...365 Door Locks ...26 Door Locks, Automatic ...27 Door Opener, Garage ...151 Drive Belts ...Driving ...Off-Pavement ...Off-Road ...DVD Player (Video Entertainment System) ... ... ... ... ... ... 365 269 270 270 225 E-85 Fuel ...311 Electric Remote Mirrors ...78 Electrical...
..., Rear Window ...167 Defroster, Windshield ...69,234,240 Diagnostic System, Onboard ...358 Dimmer Switch, Headlight ...124 Dipsticks Automatic Transmission ...385 Oil (Engine) ...362 Power Steering ...372 Disabled Vehicle Towing ...352 Disposal Antifreeze (Engine Coolant) ...379 Engine Oil ...365 Used Engine Fluids ...365 Door Locks ...26 Door Locks, Automatic ...27 Door Opener, Garage ...151 Drive Belts ...Driving ...Off-Pavement ...Off-Road ...DVD Player (Video Entertainment System) ... ... ... ... ... ... 365 269 270 270 225 E-85 Fuel ...311 Electric Remote Mirrors ...78 Electrical...

Owner Manual
Page 447
... ...183 Load Floor, Cargo ...165 Loading Vehicle ...317 Tires ...284 Locks ...26 Automatic Door ...27 Child Protection ...28 Door ...26 Power Door ...27 Lower Anchors and Tether for CHildren (LATCH) ...61,63 Lubrication, Body ...373 Luggage Rack (Roof Rack) ...168 Lumbar Support ...105 Maintenance Free Battery ...Maintenance Procedures ...Maintenance Schedule ...Schedule "A" ...Schedule "B" ...Maintenance Schedules ...Malfunction Indicator Light (Check Engine) Manual, Service ...Master Cylinder (Brakes) ...Memory Feature (Memory Seat) ...Memory Seat ...Memory Seats and Radio ...369 ...362...
... ...183 Load Floor, Cargo ...165 Loading Vehicle ...317 Tires ...284 Locks ...26 Automatic Door ...27 Child Protection ...28 Door ...26 Power Door ...27 Lower Anchors and Tether for CHildren (LATCH) ...61,63 Lubrication, Body ...373 Luggage Rack (Roof Rack) ...168 Lumbar Support ...105 Maintenance Free Battery ...Maintenance Procedures ...Maintenance Schedule ...Schedule "A" ...Schedule "B" ...Maintenance Schedules ...Malfunction Indicator Light (Check Engine) Manual, Service ...Master Cylinder (Brakes) ...Memory Feature (Memory Seat) ...Memory Seat ...Memory Seats and Radio ...369 ...362...

Owner Manual
Page 452
... ...176 Service Manuals ...434 Setting the Clock ...201,215,221 Shifting ...255 Automatic Transmission ...255 Shoulder Belts ...38 Signals, Turn ...124,176 Skylights, Command View ...161 SmartBeams ...121 Snow Chains (Tire Chains) ...295 Snow Plow ...337 Spare Tire ...343 Spark Plug Wires (Ignition Cables/Wires) ...366 Spark Plugs ...366 Specifications Fuel (Gasoline) ...307 Oil ...363 Speed Control (Cruise Control) ...132 Speedometer ...176 Starting ...251 Automatic Transmission ...251 Cold Weather ...252,255 Engine Block Heater ...255 Engine Fails to Start ...252 Remote ...25 Steering Power...
... ...176 Service Manuals ...434 Setting the Clock ...201,215,221 Shifting ...255 Automatic Transmission ...255 Shoulder Belts ...38 Signals, Turn ...124,176 Skylights, Command View ...161 SmartBeams ...121 Snow Chains (Tire Chains) ...295 Snow Plow ...337 Spare Tire ...343 Spark Plug Wires (Ignition Cables/Wires) ...366 Spark Plugs ...366 Specifications Fuel (Gasoline) ...307 Oil ...363 Speed Control (Cruise Control) ...132 Speedometer ...176 Starting ...251 Automatic Transmission ...251 Cold Weather ...252,255 Engine Block Heater ...255 Engine Fails to Start ...252 Remote ...25 Steering Power...


