

Owners Manual
Page 5
... questions. Keep this vehicle on the floor while gripping the handhold. Maximum Seating Capacity Do not exceed seating capacity: 2 occupants. it if you in every accident, but in many cases a seat belt can reduce the severity of injury in designated seating positions and with this Owner's Manual. Do not operate this Owner's Manual with only one person in your body outside of serious injury...
... questions. Keep this vehicle on the floor while gripping the handhold. Maximum Seating Capacity Do not exceed seating capacity: 2 occupants. it if you in every accident, but in many cases a seat belt can reduce the severity of injury in designated seating positions and with this Owner's Manual. Do not operate this Owner's Manual with only one person in your body outside of serious injury...

Owners Manual
Page 6
... source of accessories may produce dangerous handling conditions or adversely affect vehicle reliability. Even drugs prescribed by a physician can affect the vehicle's handling characteristics. Tire Air Pressure Tire inflation and type can be dangerous. Never operate at speeds too fast for replacement. Habitual performance of this vehicle change depending upon cargo load and driving modes. Close the Doors Be sure all doors are : 1. 2. 3. Apply the parking brake, Put the shift lever in...
... source of accessories may produce dangerous handling conditions or adversely affect vehicle reliability. Even drugs prescribed by a physician can affect the vehicle's handling characteristics. Tire Air Pressure Tire inflation and type can be dangerous. Never operate at speeds too fast for replacement. Habitual performance of this vehicle change depending upon cargo load and driving modes. Close the Doors Be sure all doors are : 1. 2. 3. Apply the parking brake, Put the shift lever in...

Owners Manual
Page 8
... original emission related parts: Throttle body and internal parts Spark plugs Magneto or electronic battery ignition system Fuel filter/Fuel injector/Fuel pump Air cleaner element Electronic Control Unit (ECU) PLEASE DO NOT TAMPER WITH NOISE CONTROL SYSTEM To minimize the noise emissions from this manual where an authorized Kawasaki dealer, or someone equally competent, can record the maintenance. You should also retain copies of maintenance work orders, bills, etc., as...
... original emission related parts: Throttle body and internal parts Spark plugs Magneto or electronic battery ignition system Fuel filter/Fuel injector/Fuel pump Air cleaner element Electronic Control Unit (ECU) PLEASE DO NOT TAMPER WITH NOISE CONTROL SYSTEM To minimize the noise emissions from this manual where an authorized Kawasaki dealer, or someone equally competent, can record the maintenance. You should also retain copies of maintenance work orders, bills, etc., as...
Owners Manual
Page 10
... 44 44 44 44 45 45 45 45 45 Fuel ...Glove Compartment ...Cupholders ...Compartment Side Covers ...Storage Case ...Carrier Tray ...Ignition Switch ...Keys ...Light Switch ...Shift Lever ...Selectable 2WD/4WD/DIFF-LOCK Shift Switch...Belt Drive Transmission...Parking Brake Lever ...Doors ...Seats ...Seat Belts ...Steering Wheel...Throttle Pedal ...Trailer Hitch Bracket ...Winch Installation ...BREAK-IN ...HOW TO OPERATE ...Daily Checks ...Starting the Engine...Jump Starting ...Moving Off ...Braking ...Stopping the Engine ...Parking the Vehicle...Shifting Gears...46 48 49 49 50 51 52 53 54...
... 44 44 44 44 45 45 45 45 45 Fuel ...Glove Compartment ...Cupholders ...Compartment Side Covers ...Storage Case ...Carrier Tray ...Ignition Switch ...Keys ...Light Switch ...Shift Lever ...Selectable 2WD/4WD/DIFF-LOCK Shift Switch...Belt Drive Transmission...Parking Brake Lever ...Doors ...Seats ...Seat Belts ...Steering Wheel...Throttle Pedal ...Trailer Hitch Bracket ...Winch Installation ...BREAK-IN ...HOW TO OPERATE ...Daily Checks ...Starting the Engine...Jump Starting ...Moving Off ...Braking ...Stopping the Engine ...Parking the Vehicle...Shifting Gears...46 48 49 49 50 51 52 53 54...
Owners Manual
Page 11
... Maintenance Chart ...98 Engine Oil...102 Front and Rear Final Gear Case Oil...107 Cooling System ...112 Spark Plugs ...Valve Clearance ...Engine Air Cleaner ...Spark Arrester ...Throttle Pedal ...Idle Adjustment...Fuel Pump Filter ...Fuel Hose ...Fuel Tank Vent...Belt Drive Transmission (CVT) ...Brakes ...Brake Pedal:...Front Brake:...Rear Brake: ...Brake Light Switch...Steering Wheel...Power Steering System (KRF800B/C/D)...Wheels ...Rims: ...Wheel Nuts:...Tires: ...Joint Boots...Suspension...Front Shock Absorber: ...Rear Shock Absorber: ...Seat Belts ...Headlight Beam ...Battery ...Fuse...
... Maintenance Chart ...98 Engine Oil...102 Front and Rear Final Gear Case Oil...107 Cooling System ...112 Spark Plugs ...Valve Clearance ...Engine Air Cleaner ...Spark Arrester ...Throttle Pedal ...Idle Adjustment...Fuel Pump Filter ...Fuel Hose ...Fuel Tank Vent...Belt Drive Transmission (CVT) ...Brakes ...Brake Pedal:...Front Brake:...Rear Brake: ...Brake Light Switch...Steering Wheel...Power Steering System (KRF800B/C/D)...Wheels ...Rims: ...Wheel Nuts:...Tires: ...Joint Boots...Suspension...Front Shock Absorber: ...Rear Shock Absorber: ...Seat Belts ...Headlight Beam ...Battery ...Fuse...
Owners Manual
Page 14
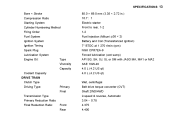
... Starting System Cylinder Numbering Method Firing Order Fuel System Ignition System Ignition Timing Spark Plug Lubrication System Engine Oil: Type Viscosity Capacity Coolant Capacity DRIVE TRAIN Clutch Type Driving Type: Transmission Type Primary Reduction Ratio Final Reduction Ratio: Front Rear Primary Final Wet, centrifugal Belt drive torque converter (CVT) Shaft 2WD/4WD 2-speed & reverse, Automatic 3.04 ∼ 0.78 4.375 4.400 85.0 × 69.0 mm (3.35 × 2.72 in.) 10.7 : 1 Electric starter Front to rear, 1-2 1-2 Fuel Injection (Mikuni 36 × 2) Battery...
... Starting System Cylinder Numbering Method Firing Order Fuel System Ignition System Ignition Timing Spark Plug Lubrication System Engine Oil: Type Viscosity Capacity Coolant Capacity DRIVE TRAIN Clutch Type Driving Type: Transmission Type Primary Reduction Ratio Final Reduction Ratio: Front Rear Primary Final Wet, centrifugal Belt drive torque converter (CVT) Shaft 2WD/4WD 2-speed & reverse, Automatic 3.04 ∼ 0.78 4.375 4.400 85.0 × 69.0 mm (3.35 × 2.72 in.) 10.7 : 1 Electric starter Front to rear, 1-2 1-2 Fuel Injection (Mikuni 36 × 2) Battery...

Owners Manual
Page 31
... a trailer. NOTE • • NOTICE The front body work and fenders are personally responsible for use of your vehicle may affect vehicle handling in an unpredictable manner. Cargo weight should be carried as low as possible to reduce the effect on the vehicle's center of the ROPS. We strongly recommend that all parts and accessories you add to increases in weight and changes...
... a trailer. NOTE • • NOTICE The front body work and fenders are personally responsible for use of your vehicle may affect vehicle handling in an unpredictable manner. Cargo weight should be carried as low as possible to reduce the effect on the vehicle's center of the ROPS. We strongly recommend that all parts and accessories you add to increases in weight and changes...

Owners Manual
Page 42
... displays start blinking again. j ○Pushing the Left button momentarily advances the NOTE A. hour or minute step by step. A. Minute Display The hour display only • Push blinks. Odometer: The odometer shows the total distance in kilometers or miles that the vehicle has ... they are stopped and locked. Push the Left button to 1:00, and starts working . Pushing and holding the button advances the hour or minute continuously. ○The clock works normally from the back-up power while the ignition switch is turned off. ○When the battery is connected. The hour...
... displays start blinking again. j ○Pushing the Left button momentarily advances the NOTE A. hour or minute step by step. A. Minute Display The hour display only • Push blinks. Odometer: The odometer shows the total distance in kilometers or miles that the vehicle has ... they are stopped and locked. Push the Left button to 1:00, and starts working . Pushing and holding the button advances the hour or minute continuously. ○The clock works normally from the back-up power while the ignition switch is turned off. ○When the battery is connected. The hour...
Owners Manual
Page 45
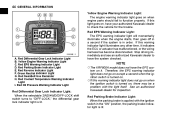
... Light F. Red Coolant Temperature Warning Indicator Light I. Red Differential Gear Lock Indicator Light B. Red Parking Brake Indicator Light E. Red EPS Warning Indicator Light D. NOTE Red Differential Gear Lock Indicator Light: When the selectable 2WD/4WD/DIFF-LOCK shift switch turns to "DIFF-LOCK," the differential gear lock indicator light is turned on , have your authorized Kawasaki dealer to function properly. tem on when engine parts should fail to check the vehicle for inspection. If this warning indicator light illuminates any other time, it . Green Neutral...
... Light F. Red Coolant Temperature Warning Indicator Light I. Red Differential Gear Lock Indicator Light B. Red Parking Brake Indicator Light E. Red EPS Warning Indicator Light D. NOTE Red Differential Gear Lock Indicator Light: When the selectable 2WD/4WD/DIFF-LOCK shift switch turns to "DIFF-LOCK," the differential gear lock indicator light is turned on , have your authorized Kawasaki dealer to function properly. tem on when engine parts should fail to check the vehicle for inspection. If this warning indicator light illuminates any other time, it . Green Neutral...

Owners Manual
Page 46
... the engine cools down. j ○When you touch the fan, be sure to check that passenger has buckled their seat belts. The light is lit. If it stays on . NOTE NOTICE Do not let the engine continue running , and goes off . Red Coolant Temperature Warning Indicator Light: The coolant temperature warning indicator light stays on for more detailed engine oil information. Prolonged engine operation can turn automatically even with a warning indicator light...
... the engine cools down. j ○When you touch the fan, be sure to check that passenger has buckled their seat belts. The light is lit. If it stays on . NOTE NOTICE Do not let the engine continue running , and goes off . Red Coolant Temperature Warning Indicator Light: The coolant temperature warning indicator light stays on for more detailed engine oil information. Prolonged engine operation can turn automatically even with a warning indicator light...

Owners Manual
Page 53
... shift lever is a three-position, key-operated switch. OFF ON Engine off . D. C. Wait 15 seconds between each operation of the starter to let it is equipped with the engine running, or damage to "ON" position. Do not turn the ignition switch key to recover power. A. START NOTICE Do not operate the starter continuously for the battery to the "START" position with a starter lockout system. B. Hour meter works. Upon release, key...
... shift lever is a three-position, key-operated switch. OFF ON Engine off . D. C. Wait 15 seconds between each operation of the starter to let it is equipped with the engine running, or damage to "ON" position. Do not turn the ignition switch key to recover power. A. START NOTICE Do not operate the starter continuously for the battery to the "START" position with a starter lockout system. B. Hour meter works. Upon release, key...

Owners Manual
Page 57
... wheels. Move it back to the Unlocked-Axle Mode when you can cause the operator to Locked-Axle Mode while turning or before entering a turn . Changing operating mode while moving can cause the operator to the "Multifunction Meter" section in the "GENERAL INFORMATION" chapter, together with the 2WD/4WD indicator symbols and differential gear lock indicator light. After shifting, there is a time lag before changing...
... wheels. Move it back to the Unlocked-Axle Mode when you can cause the operator to Locked-Axle Mode while turning or before entering a turn . Changing operating mode while moving can cause the operator to the "Multifunction Meter" section in the "GENERAL INFORMATION" chapter, together with the 2WD/4WD indicator symbols and differential gear lock indicator light. After shifting, there is a time lag before changing...

Owners Manual
Page 69
... Service Manual for cuts, cracks, damage, or excessive wear. j WARNING Failure to a safe operating condition. DANGER Exhaust gas contains carbon monoxide, a colorless, odorless poisonous gas. Operate only in enclosed areas. Tires ...Air pressure (when cold): Front Rear 78.4 kPa (0.80 kgf/cm², 11.4 psi) 110 kPa (1.12 kgf/cm², 16 psi) Check for the action required to return the vehicle to perform...
... Service Manual for cuts, cracks, damage, or excessive wear. j WARNING Failure to a safe operating condition. DANGER Exhaust gas contains carbon monoxide, a colorless, odorless poisonous gas. Operate only in enclosed areas. Tires ...Air pressure (when cold): Front Rear 78.4 kPa (0.80 kgf/cm², 11.4 psi) 110 kPa (1.12 kgf/cm², 16 psi) Check for the action required to return the vehicle to perform...

Owners Manual
Page 70
... controls are in .). Seat Belts ...Make sure that steering and suspension components, axles, and all seat belts are properly fastened. Doors ...Make sure there is cold), no leaks. Steering ...Steering wheel free play 15 ∼ 20 mm (0.6 ∼ 0.8 in .). Brake fluid level between level lines (when engine is no damage to rest position when released. ROPS ...Make sure there is pushed firmly. clean or replace as required. Parking brake: Stops vehicle completely. j Electrical...
... controls are in .). Seat Belts ...Make sure that steering and suspension components, axles, and all seat belts are properly fastened. Doors ...Make sure there is cold), no leaks. Steering ...Steering wheel free play 15 ∼ 20 mm (0.6 ∼ 0.8 in .). Brake fluid level between level lines (when engine is no damage to rest position when released. ROPS ...Make sure there is pushed firmly. clean or replace as required. Parking brake: Stops vehicle completely. j Electrical...

Owners Manual
Page 101
... * Wheel nuts tightness - inspect Brake pedal play - inspect Wheels - inspect Joint boots - replace Brake fluid level - inspect Parking brake lever - replace Rear brake master cylinder cup, O-ring, and boot-replace * Front brake caliper piston seal and dust seal - inspect Wheel hub bearings - inspect • • j • D D • • • D D D D • • replace Brake hoses - inspect Tire wear - 100 MAINTENANCE AND ADJUSTMENT FREQUENCY First Service After 20 h, or 200 km (120 mile) of use Regular Service...
... * Wheel nuts tightness - inspect Brake pedal play - inspect Wheels - inspect Joint boots - replace Brake fluid level - inspect Parking brake lever - replace Rear brake master cylinder cup, O-ring, and boot-replace * Front brake caliper piston seal and dust seal - inspect Wheel hub bearings - inspect • • j • D D • • • D D D D • • replace Brake hoses - inspect Tire wear - 100 MAINTENANCE AND ADJUSTMENT FREQUENCY First Service After 20 h, or 200 km (120 mile) of use Regular Service...

Owners Manual
Page 111
...°F) SAE 80 j A. Replace gaskets with a good quality oil specified in the table. the oil has completely drained out, install the • After drain plugs and gaskets. Rear Final Gear Case B. Dispose of the • Fill filler opening with new ones. Drain Plug WARNING Gear case oil is a toxic substance. 110 MAINTENANCE AND ADJUSTMENT Drain Plug Tightening Torque Front Final Gear 15 N·m (1.5 kgf·...
...°F) SAE 80 j A. Replace gaskets with a good quality oil specified in the table. the oil has completely drained out, install the • After drain plugs and gaskets. Rear Final Gear Case B. Dispose of the • Fill filler opening with new ones. Drain Plug WARNING Gear case oil is a toxic substance. 110 MAINTENANCE AND ADJUSTMENT Drain Plug Tightening Torque Front Final Gear 15 N·m (1.5 kgf·...

Owners Manual
Page 131
... brake light switch. B. Brake Pedal B. 10 mm (0.4 in.) Brake Light Switch Adjusting Nut Light Turns on Later Light Turns on . C. The brake light switch should • go on after about 10 mm (0.4 in accordance with the Periodic Maintenance Chart. A. The brake light should be sure that the switch body does not turn during adjustment. j A. NOTICE To avoid damaging the electrical connections inside the switch, be inspected in .) of pedal travel. Inspection the ignition switch...
... brake light switch. B. Brake Pedal B. 10 mm (0.4 in.) Brake Light Switch Adjusting Nut Light Turns on Later Light Turns on . C. The brake light switch should • go on after about 10 mm (0.4 in accordance with the Periodic Maintenance Chart. A. The brake light should be sure that the switch body does not turn during adjustment. j A. NOTICE To avoid damaging the electrical connections inside the switch, be inspected in .) of pedal travel. Inspection the ignition switch...

Owners Manual
Page 146
... unhook the lock. D. B. If it is blown out, replace the fuse. Before replacing a fuse, check the wiring harness and electrical equipment for bare wires or other possible causes. NOTICE Do not use a fuse of the latch plate simultaneously to the "Fuse Location" label on the control panel cover. MAINTENANCE AND ADJUSTMENT 145 Fuse There are 7 fuses (EPS equipped models: 8 fuses) in the fuse box under the front hood. If the electrical systems do...
... unhook the lock. D. B. If it is blown out, replace the fuse. Before replacing a fuse, check the wiring harness and electrical equipment for bare wires or other possible causes. NOTICE Do not use a fuse of the latch plate simultaneously to the "Fuse Location" label on the control panel cover. MAINTENANCE AND ADJUSTMENT 145 Fuse There are 7 fuses (EPS equipped models: 8 fuses) in the fuse box under the front hood. If the electrical systems do...

Owners Manual
Page 149
... it can cause mechanical problems and increase the risk of fire. To remove the moisture, start the engine and turn on rainy days, rough terrain, or in and around the vehicle, inspect the engine, electrical component and exhaust areas frequently. cover with tape. if water gets into bearings and other components causing eventual failure from rust and corrosion. 148 MAINTENANCE AND ADJUSTMENT Cleaning...
... it can cause mechanical problems and increase the risk of fire. To remove the moisture, start the engine and turn on rainy days, rough terrain, or in and around the vehicle, inspect the engine, electrical component and exhaust areas frequently. cover with tape. if water gets into bearings and other components causing eventual failure from rust and corrosion. 148 MAINTENANCE AND ADJUSTMENT Cleaning...

Owners Manual
Page 151
... to coat the cylinder walls. Run the engine for Storage: Clean the entire vehicle thoroughly. Dispose of fuel properly. oil on rubber parts or in all unpainted metal surfaces to keep • Put dampness away from the spark plug holes and could get oil in ·lb) WARNING An air/oil mist may be explosive under the front and rear wheels to pre•...
... to coat the cylinder walls. Run the engine for Storage: Clean the entire vehicle thoroughly. Dispose of fuel properly. oil on rubber parts or in all unpainted metal surfaces to keep • Put dampness away from the spark plug holes and could get oil in ·lb) WARNING An air/oil mist may be explosive under the front and rear wheels to pre•...