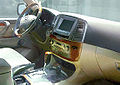

1998 and later Air Bag Switch Kit for all models Air Bag
Page 1
... airbag will also simultaneously turn OFF the side airbag on that side only. They are permitted to operate this Owner's Manual in order to the "ACCESSORY" position or the "ON" position. To check the airbag manual ON-OFF system status, turn (s) the airbag OFF when needed, and is an example of...
... airbag will also simultaneously turn OFF the side airbag on that side only. They are permitted to operate this Owner's Manual in order to the "ACCESSORY" position or the "ON" position. To check the airbag manual ON-OFF system status, turn (s) the airbag OFF when needed, and is an example of...

1998 and later Air Bag Switch Kit for all models Air Bag
Page 2
... from the airbag manual ON-OFF switch, and insert the key in the ignition switch and turn to the "ACCESSORY" or "ON" position. D Take your ignition key into the airbag manual ON-OFF switch located in the...from the airbag manual ON-OFF switch, and insert the key in the ignition switch and turn to the "ACCESSORY" or "ON" position. CAUTION If the airbag is turned off for a person who is not in a.... The airbag will remain OFF until you turn ON an airbag, insert your vehicle to an authorized Toyota/Lexus Dealer to let you that the airbag is OFF. 2. In a crash, the airbag would not be able...
... from the airbag manual ON-OFF switch, and insert the key in the ignition switch and turn to the "ACCESSORY" or "ON" position. D Take your ignition key into the airbag manual ON-OFF switch located in the...from the airbag manual ON-OFF switch, and insert the key in the ignition switch and turn to the "ACCESSORY" or "ON" position. CAUTION If the airbag is turned off for a person who is not in a.... The airbag will remain OFF until you turn ON an airbag, insert your vehicle to an authorized Toyota/Lexus Dealer to let you that the airbag is OFF. 2. In a crash, the airbag would not be able...

Owners Manual
Page 5
... is general maintenance. Included in Section 6 is performed. Accessories, spare parts and modification of your Lexus dealer. If you install any damage they may cause to, or adverse effect they may have on, your Lexus vehicle. In addition, damage or performance problems resulting from... measures or special instructions regarding installation. Section 5 of this Owner's Manual gives details of non-genuine spare parts and accessories for Lexus vehicles are currently available in your vehicle could affect its performance, safety or durability, and may even violate governmental regulations...
... is general maintenance. Included in Section 6 is performed. Accessories, spare parts and modification of your Lexus dealer. If you install any damage they may cause to, or adverse effect they may have on, your Lexus vehicle. In addition, damage or performance problems resulting from... measures or special instructions regarding installation. Section 5 of this Owner's Manual gives details of non-genuine spare parts and accessories for Lexus vehicles are currently available in your vehicle could affect its performance, safety or durability, and may even violate governmental regulations...

Owners Manual
Page 125
INTERIOR EQUIPMENT The power outlets are not in the "ACC" or "ON" position for car accessories. The ignition key must be used. Inserting a foreign object other than necessary when the engine is not running. NOTICE D To prevent the fuse from being ...
INTERIOR EQUIPMENT The power outlets are not in the "ACC" or "ON" position for car accessories. The ignition key must be used. Inserting a foreign object other than necessary when the engine is not running. NOTICE D To prevent the fuse from being ...

Owners Manual
Page 131
INTERIOR EQUIPMENT CUP HOLDERS Front 14X057d "Separator To use it as an accessory box by removing the separator inside. 107 The cup holder can be adjustable to the size of the cups by changing the separator position or moving the separator arms. You can use the cup holder, push the cup holder lid.
INTERIOR EQUIPMENT CUP HOLDERS Front 14X057d "Separator To use it as an accessory box by removing the separator inside. 107 The cup holder can be adjustable to the size of the cups by changing the separator position or moving the separator arms. You can use the cup holder, push the cup holder lid.

Owners Manual
Page 360
Starter motor on . For starting tips, see page 339. "ON" - If you to the "ON" position when released. Engine on and all accessories on . Accessories such as the radio operate, but the engine is the normal driving position. NOTICE Do not leave the key in the "ACC" or "LOCK" position ...
Starter motor on . For starting tips, see page 339. "ON" - If you to the "ON" position when released. Engine on and all accessories on . Accessories such as the radio operate, but the engine is the normal driving position. NOTICE Do not leave the key in the "ACC" or "LOCK" position ...
Owners Manual
Page 363
... start See "If your foot off the accelerator pedal, crank the engine by turning the key to the floor until driving off unnecessary lights and accessories. 3. After the engine runs for more than 30 seconds at a time. If the engine stalls ...Simply restart it when the engine starts. 2. With your vehicle...
... start See "If your foot off the accelerator pedal, crank the engine by turning the key to the floor until driving off unnecessary lights and accessories. 3. After the engine runs for more than 30 seconds at a time. If the engine stalls ...Simply restart it when the engine starts. 2. With your vehicle...

Owners Manual
Page 457
During jump starting, run for about 5 minutes. Connect the clamp at about 2000 rpm with the booster battery is not necessary to the positive (+) terminal of each battery. Connect the clamp at the other end of the positive (... positive (+) and negative (-) terminals of the booster battery. If the booster battery is cranked. 433 JUMP STARTING PROCEDURE 1. If required, remove all unnecessary lights and accessories. 3 4 Lay a cloth over the open vents on the booster battery. (This helps reduce the explosion hazard, personal injuries and burns.) If the booster battery is...
During jump starting, run for about 5 minutes. Connect the clamp at about 2000 rpm with the booster battery is not necessary to the positive (+) terminal of each battery. Connect the clamp at the other end of the positive (... positive (+) and negative (-) terminals of the booster battery. If the booster battery is cranked. 433 JUMP STARTING PROCEDURE 1. If required, remove all unnecessary lights and accessories. 3 4 Lay a cloth over the open vents on the booster battery. (This helps reduce the explosion hazard, personal injuries and burns.) If the booster battery is...

Owners Manual
Page 566
... warm water and baking soda. D When checking the battery, remove the ground cable first and reinstall it . 542 NOTICE D Make sure the engine and all accessories are loose, tighten the clamp bolts - D Be careful not to prevent further corrosion. 2. Overtightening may damage the battery case. ELECTRICAL COMPONENTS " 1 Terminals 2 Hold-down clamp...
... warm water and baking soda. D When checking the battery, remove the ground cable first and reinstall it . 542 NOTICE D Make sure the engine and all accessories are loose, tighten the clamp bolts - D Be careful not to prevent further corrosion. 2. Overtightening may damage the battery case. ELECTRICAL COMPONENTS " 1 Terminals 2 Hold-down clamp...

Owners Manual
Page 569
The battery may explode causing personal injuries. NOTICE Never recharge the battery while the engine is dangerous. CHECKING AND REPLACING THE BLADE TYPE FUSES 545 Charging at a quicker rate is running. Also, make sure all accessories are turned off. D Only do a slow charge (5 A or less). ELECTRICAL COMPONENTS CAUTION D Always charge the battery in a garage or closed room where there is not sufficient ventilation. Do not charge the battery in an unconfined area.
The battery may explode causing personal injuries. NOTICE Never recharge the battery while the engine is dangerous. CHECKING AND REPLACING THE BLADE TYPE FUSES 545 Charging at a quicker rate is running. Also, make sure all accessories are turned off. D Only do a slow charge (5 A or less). ELECTRICAL COMPONENTS CAUTION D Always charge the battery in a garage or closed room where there is not sufficient ventilation. Do not charge the battery in an unconfined area.