

Owners Manual
Page 9
Replacement safety decals are provided by Polaris at speeds too fast for your ATV, always read and follow the instructions of the decals on the ATV carefully. General Warning WARNING Improper vehicle use throttle and brakes gradually. ALWAYS: • Use an approved HELMET AND PROTECTIVE GEAR. • Avoid paved surfaces. When parking on grades, leave shift in this manual differ from the decals on...
Replacement safety decals are provided by Polaris at speeds too fast for your ATV, always read and follow the instructions of the decals on the ATV carefully. General Warning WARNING Improper vehicle use throttle and brakes gradually. ALWAYS: • Use an approved HELMET AND PROTECTIVE GEAR. • Avoid paved surfaces. When parking on grades, leave shift in this manual differ from the decals on...

Owners Manual
Page 10
... as possible in power and traction if too much throttle is applied. Be careful if load extends over the side of losing control. Read Owner's Manual for braking when carrying cargo. Front Rack/Box Warning WARNING DO NOT TOW FROM RACK OR BUMPER. Loss of control resulting in AWD. Do not block headlight. TIRE PRESSURE IN PSI (KPa): FRONT 5 (34.5) CENTER 5 (34.5) REAR 5 (34.5) MAXIMUM WEIGHT CAPACITY (Gross Vehicle Weight) INCLUDING MACHINE, DRIVER AND CARGO...
... as possible in power and traction if too much throttle is applied. Be careful if load extends over the side of losing control. Read Owner's Manual for braking when carrying cargo. Front Rack/Box Warning WARNING DO NOT TOW FROM RACK OR BUMPER. Loss of control resulting in AWD. Do not block headlight. TIRE PRESSURE IN PSI (KPa): FRONT 5 (34.5) CENTER 5 (34.5) REAR 5 (34.5) MAXIMUM WEIGHT CAPACITY (Gross Vehicle Weight) INCLUDING MACHINE, DRIVER AND CARGO...
Owners Manual
Page 20
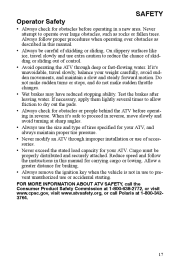
... or accidental starting. Operator Safety SAFETY • Always check for obstacles before operating in reverse. If necessary, apply them lightly several times to allow friction to prevent unauthorized use of tires specified for carrying cargo or towing. Allow a greater distance for braking. • Always remove the ignition key when the vehicle is not in use to dry out the pads. • Always...
... or accidental starting. Operator Safety SAFETY • Always check for obstacles before operating in reverse. If necessary, apply them lightly several times to allow friction to prevent unauthorized use of tires specified for carrying cargo or towing. Allow a greater distance for braking. • Always remove the ignition key when the vehicle is not in use to dry out the pads. • Always...

Owners Manual
Page 21
Any modifications to the vehicle for the general public. The warranty on the vehicle. 18 SAFETY Operator Safety Equipment Modifications We are concerned for the safety of our customers and for these purposes. NOTE: The addition of certain accessories, including (but not limited to) mowers, blades, tires, sprayers, or large racks, may increase the speed or power of the vehicle, or make any...
Any modifications to the vehicle for the general public. The warranty on the vehicle. 18 SAFETY Operator Safety Equipment Modifications We are concerned for the safety of our customers and for these purposes. NOTE: The addition of certain accessories, including (but not limited to) mowers, blades, tires, sprayers, or large racks, may increase the speed or power of the vehicle, or make any...
Owners Manual
Page 44
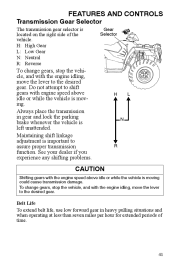
... time. 41 H: High Gear L: Low Gear N: Neutral R: Reverse FEATURES AND CONTROLS Gear Selector To change gears, stop the vehicle, and with the engine speed above idle or while the vehicle is left unattended. Always place the transmission in heavy pulling situations and when operating at less than seven miles per hour for extended periods of the vehicle. Belt Life To extend belt life, use low forward gear in gear and lock the parking brake whenever the vehicle...
... time. 41 H: High Gear L: Low Gear N: Neutral R: Reverse FEATURES AND CONTROLS Gear Selector To change gears, stop the vehicle, and with the engine speed above idle or while the vehicle is left unattended. Always place the transmission in heavy pulling situations and when operating at less than seven miles per hour for extended periods of the vehicle. Belt Life To extend belt life, use low forward gear in gear and lock the parking brake whenever the vehicle...
Owners Manual
Page 49
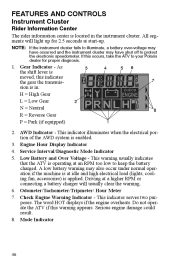
... to keep the battery charged. Engine Hour Display Indicator 4. As the shift lever is moved, this indicates the gear the transmission is in the instrument cluster. This indicator serves two purposes. Mode Indicator 46 FEATURES AND CONTROLS Instrument Cluster Rider Information Center The rider information center is located in : H = High Gear L = Low Gear N = Neutral R = Reverse Gear P = Park (if equipped) 3 4 5 6 7 2 8 1 2. NOTE: If the instrument cluster fails to illuminate, a battery over-voltage may...
... to keep the battery charged. Engine Hour Display Indicator 4. As the shift lever is moved, this indicates the gear the transmission is in the instrument cluster. This indicator serves two purposes. Mode Indicator 46 FEATURES AND CONTROLS Instrument Cluster Rider Information Center The rider information center is located in : H = High Gear L = Low Gear N = Neutral R = Reverse Gear P = Park (if equipped) 3 4 5 6 7 2 8 1 2. NOTE: If the instrument cluster fails to illuminate, a battery over-voltage may...

Owners Manual
Page 51
... only. To leave the diagnostic mode, turn the key switch on models with switchable AWD). As long as the display is displayed briefly. This information is activated. FEATURES AND CONTROLS Instrument Cluster Rider Information Center Diagnostic Mode The diagnostic mode is for all major repairs. Lock the parking brake. 3. The initial screen display refers to toggle through the AWD coil (only on . 5. Use the mode/reverse...
... only. To leave the diagnostic mode, turn the key switch on models with switchable AWD). As long as the display is displayed briefly. This information is activated. FEATURES AND CONTROLS Instrument Cluster Rider Information Center Diagnostic Mode The diagnostic mode is for all major repairs. Lock the parking brake. 3. The initial screen display refers to toggle through the AWD coil (only on . 5. Use the mode/reverse...

Owners Manual
Page 54
... drive components. Engine and Drivetrain Break-in period, change both the oil and the filter at 20 hours or one month. See page 40. 2. Break in the clutches and belt by operating at full throttle or high speeds during the first three hours of operation will ensure a longer life and better performance. Fill the fuel tank with vehicle operation and handling. 4. See page 77. Drive...
... drive components. Engine and Drivetrain Break-in period, change both the oil and the filter at 20 hours or one month. See page 40. 2. Break in the clutches and belt by operating at full throttle or high speeds during the first three hours of operation will ensure a longer life and better performance. Fill the fuel tank with vehicle operation and handling. 4. See page 77. Drive...

Owners Manual
Page 58
... the load distribution warning labels on the safety decals. Maximum Cargo Capacities (Level Ground) Total Cargo Front Rack Cargo Cargo Box 875 lbs. (397 kg) 75 lbs. (34 kg) 800 lbs. (363 kg) Maximum Towing Capacities Towed Load (level ground) Towed Load (up to carry or tow a certain amount of the owner's manual and on the vehicle, and never exceed the weight capacities outlined in rough...
... the load distribution warning labels on the safety decals. Maximum Cargo Capacities (Level Ground) Total Cargo Front Rack Cargo Cargo Box 875 lbs. (397 kg) 75 lbs. (34 kg) 800 lbs. (363 kg) Maximum Towing Capacities Towed Load (level ground) Towed Load (up to carry or tow a certain amount of the owner's manual and on the vehicle, and never exceed the weight capacities outlined in rough...
Owners Manual
Page 75
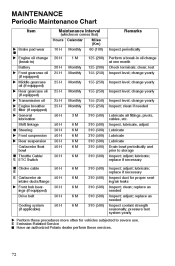
...) 310 (500) Inspect periodically Perform a break-in ) Battery X Front gearcase oil (if equipped) X Middle gearcase oil (if equipped) X Rear gearcase oil (if equipped) X Transmission oil X Engine breather E filter (if equipped) X General lubrication Shift linkage Q Steering X Front suspension X Rear suspension Carburetor float bowl Q Throttle Cable/ E ETC Switch E Q Choke cable E Carburetor air intake ducts/flange X Front hub bearings (if equipped) Drive belt Cooling system (if applicable) X Perform these services. 72 test Inspect level; pressure test system yearly 10...
...) 310 (500) Inspect periodically Perform a break-in ) Battery X Front gearcase oil (if equipped) X Middle gearcase oil (if equipped) X Rear gearcase oil (if equipped) X Transmission oil X Engine breather E filter (if equipped) X General lubrication Shift linkage Q Steering X Front suspension X Rear suspension Carburetor float bowl Q Throttle Cable/ E ETC Switch E Q Choke cable E Carburetor air intake ducts/flange X Front hub bearings (if equipped) Drive belt Cooling system (if applicable) X Perform these services. 72 test Inspect level; pressure test system yearly 10...

Owners Manual
Page 76
... years 620 (1000) Replace yearly 620 (1000) Inspect; Q Shift selector Q Brake fluid Spark arrestor Idle speed Q Toe adjustment X Auxiliary brake Q Headlight aim X Perform these services. 73 adjust 620 (1000) Check for vehicles subjected to water, mud, etc. 620 (1000) Inspect; Periodic Maintenance Chart Item Maintenance Interval (whichever comes first) Hours Calendar X Engine oil and filter change X Oil tank vent hose E E E Q Valve clearance Q Fuel system MAINTENANCE Remarks Miles (Km) 620 (1000) Perform a break-in oil change at tank cap, lines, filter, pump; adjust when parts...
... years 620 (1000) Replace yearly 620 (1000) Inspect; Q Shift selector Q Brake fluid Spark arrestor Idle speed Q Toe adjustment X Auxiliary brake Q Headlight aim X Perform these services. 73 adjust 620 (1000) Check for vehicles subjected to water, mud, etc. 620 (1000) Inspect; Periodic Maintenance Chart Item Maintenance Interval (whichever comes first) Hours Calendar X Engine oil and filter change X Oil tank vent hose E E E Q Valve clearance Q Fuel system MAINTENANCE Remarks Miles (Km) 620 (1000) Perform a break-in oil change at tank cap, lines, filter, pump; adjust when parts...

Owners Manual
Page 77
... a-arms and lower control arms are subjected to NLGI No. 2 X Locate fitting on next page). Ball Joint Rear Axle Bearing Swing Arm Bushings Middle Axle Bearings Center Swing Arm Housing Rear Strut Tie Rod Ends X = Perform more . If lubricant is not visible add more often for additional lubrication at the center of storage, or after pressure washing or submerging Front Prop Shaft Yoke Polaris Premium U-Joint Lube AWD Hubs Premium Demand Drive Hub...
... a-arms and lower control arms are subjected to NLGI No. 2 X Locate fitting on next page). Ball Joint Rear Axle Bearing Swing Arm Bushings Middle Axle Bearings Center Swing Arm Housing Rear Strut Tie Rod Ends X = Perform more . If lubricant is not visible add more often for additional lubrication at the center of storage, or after pressure washing or submerging Front Prop Shaft Yoke Polaris Premium U-Joint Lube AWD Hubs Premium Demand Drive Hub...

Owners Manual
Page 95
... rear of the headlight pod. 2. NOTE: Make sure the tab on the wiring. 6. Oil from the speedometer. 5. Lift the pod cover and disconnect the speedometer harnesses from your skin leaves a residue, causing a hot spot that will shorten the life of the pod. 3. Turn the lamp counterclockwise to maintain lighting quality. Headlight and taillight lenses become dirty during normal operation. Headlight Lamp Replacement...
... rear of the headlight pod. 2. NOTE: Make sure the tab on the wiring. 6. Oil from the speedometer. 5. Lift the pod cover and disconnect the speedometer harnesses from your skin leaves a residue, causing a hot spot that will shorten the life of the pod. 3. Turn the lamp counterclockwise to maintain lighting quality. Headlight and taillight lenses become dirty during normal operation. Headlight Lamp Replacement...

Owners Manual
Page 96
... slightly upward or downward. Use the following procedure to the center of the headlight pod. Position the vehicle on the wall. Observe the headlight aim on the seat when measuring. 5. Lock the parking brake. 2. NOTE: Include rider weight on the wall. Measure the distance from a wall. Lights MAINTENANCE High Beam Adjustment The headlight beam can be two inches (5 cm) below the mark...
... slightly upward or downward. Use the following procedure to the center of the headlight pod. Position the vehicle on the wall. Observe the headlight aim on the seat when measuring. 5. Lock the parking brake. 2. NOTE: Include rider weight on the wall. Measure the distance from a wall. Lights MAINTENANCE High Beam Adjustment The headlight beam can be two inches (5 cm) below the mark...

Owners Manual
Page 97
... from the wiring harness. 5. Remove the two screws on the lower front corners of the pod. Lift the adjusting knob up to the end of the pod. 3. MAINTENANCE Lights Headlight Housing Replacement 1. Use a small screwdriver to install the new housing and reassemble the pod. Lift the pod cover and disconnect the speedometer harnesses from the locking tabs. 7. Adjust the headlight aim by turning the...
... from the wiring harness. 5. Remove the two screws on the lower front corners of the pod. Lift the adjusting knob up to the end of the pod. 3. MAINTENANCE Lights Headlight Housing Replacement 1. Use a small screwdriver to install the new housing and reassemble the pod. Lift the pod cover and disconnect the speedometer harnesses from the locking tabs. 7. Adjust the headlight aim by turning the...

Owners Manual
Page 122
... 119 Polaris dealers. Lock the parking brake. 4. Above 6000 feet (1800 m) the engine air/fuel mixture becomes overly rich and the engine loses approximately 3% of +40 degrees F. (4 degrees C.) or higher. If the engine idle speed is unsatisfactory and all other conditions are serviceable only by Carburetor/Engine Idle RPM Adjustment Recommended engine idle RPM is calibrated at the factory for each 1000-foot (304.8 m) increase in gear. 3. Although this power...
... 119 Polaris dealers. Lock the parking brake. 4. Above 6000 feet (1800 m) the engine air/fuel mixture becomes overly rich and the engine loses approximately 3% of +40 degrees F. (4 degrees C.) or higher. If the engine idle speed is unsatisfactory and all other conditions are serviceable only by Carburetor/Engine Idle RPM Adjustment Recommended engine idle RPM is calibrated at the factory for each 1000-foot (304.8 m) increase in gear. 3. Although this power...

Owners Manual
Page 127
SPECIFICATIONS Sportsman 500 6X6 Gross Vehicle Weight Fuel Capacity Engine Oil Capacity Coolant Capacity Transmission Oil Capacity Front Gearcase Oil Capacity Front Rack/Storage Box Capacity Cargo Box Capacity Hitch Tongue Capacity Hitch Towing Rating Unbraked Trailer Towing Capacity* Overall Length Overall Width Overall Height Wheelbase Ground Clearance Dry Weight Minimum Turning Radius Engine Displacement Bore x Stroke Alternator Output Compression Ratio Starting System Carburetor Pilot Jet Main Jet Needle Jet Jet Needle Ignition System Ignition Timing Spark Plug / Gap Lubrication System ...
SPECIFICATIONS Sportsman 500 6X6 Gross Vehicle Weight Fuel Capacity Engine Oil Capacity Coolant Capacity Transmission Oil Capacity Front Gearcase Oil Capacity Front Rack/Storage Box Capacity Cargo Box Capacity Hitch Tongue Capacity Hitch Towing Rating Unbraked Trailer Towing Capacity* Overall Length Overall Width Overall Height Wheelbase Ground Clearance Dry Weight Minimum Turning Radius Engine Displacement Bore x Stroke Alternator Output Compression Ratio Starting System Carburetor Pilot Jet Main Jet Needle Jet Jet Needle Ignition System Ignition Timing Spark Plug / Gap Lubrication System ...
Owners Manual
Page 135
... horsepower and the vehicle has a six (6) or four (4)-wheel drive and/or a round steering wheel." Where a warrantable condition exists, POLARIS will be hoses, connectors and other emission-related assemblies. Owner's Warranty Responsibilities: • As the LSI engine owner, you have any emission related part on your warranty rights and responsibilities, you should be aware that POLARIS may be repaired or replaced by POLARIS as soon as a problem exists. "The California Air...
... horsepower and the vehicle has a six (6) or four (4)-wheel drive and/or a round steering wheel." Where a warrantable condition exists, POLARIS will be hoses, connectors and other emission-related assemblies. Owner's Warranty Responsibilities: • As the LSI engine owner, you have any emission related part on your warranty rights and responsibilities, you should be aware that POLARIS may be repaired or replaced by POLARIS as soon as a problem exists. "The California Air...
Owners Manual
Page 143
... ...37 Brake Lever, Service ...37 Brake Systems ...37, 38 Brake, Front Wheel ...85 Brake, Middle Axle ...85 Brake, Parking ...39 Brake, Rear ...85 Brakelight ...95 Brakes ...85 Break-In Period ...51 Breather Filter ...91 E Electromagnetic Interference...69 Emissions Limited Warranty ...136 Engaging AWD ...43 Engine Break-In...51 Engine Fogging ...111 Engine Idle RPM Adjustment ...119 Engine Oil ...76-77 Equipment Modifications ...18 Exhaust Emission Control System . . 69 Eye Protection ...11 F Fuel Safety...50 Fuel Tank Cap ...40 G Gear Selector...
... ...37 Brake Lever, Service ...37 Brake Systems ...37, 38 Brake, Front Wheel ...85 Brake, Middle Axle ...85 Brake, Parking ...39 Brake, Rear ...85 Brakelight ...95 Brakes ...85 Break-In Period ...51 Breather Filter ...91 E Electromagnetic Interference...69 Emissions Limited Warranty ...136 Engaging AWD ...43 Engine Break-In...51 Engine Fogging ...111 Engine Idle RPM Adjustment ...119 Engine Oil ...76-77 Equipment Modifications ...18 Exhaust Emission Control System . . 69 Eye Protection ...11 F Fuel Safety...50 Fuel Tank Cap ...40 G Gear Selector...

Owners Manual
Page 144
... Signal Words ...14 Spark Arrestor...99 Spark Plug Recommendations ...96 Spark Plugs ...96-97 Starting the Engine ...53-54 Steering Assembly ...87 Storage Tips ...111-113 Suspension Springs, Optional ...118 Switches AWD Switch...43 Engine Stop Switch...35 Headlight Switch ...35 Main Key Switch ...35 Mode/Reverse Override Switch 34 M Maintenance Chart ...70-73 Master Cylinder ...38 Mode Switch ...34 Modifications ...18 N Noise Emission Control System ...69 O Oil Engine ...76-77 Front Gearcase ...82 Transmission ...81 Oil and Filter Change ...78-80 Oil Level, Engine...
... Signal Words ...14 Spark Arrestor...99 Spark Plug Recommendations ...96 Spark Plugs ...96-97 Starting the Engine ...53-54 Steering Assembly ...87 Storage Tips ...111-113 Suspension Springs, Optional ...118 Switches AWD Switch...43 Engine Stop Switch...35 Headlight Switch ...35 Main Key Switch ...35 Mode/Reverse Override Switch 34 M Maintenance Chart ...70-73 Master Cylinder ...38 Mode Switch ...34 Modifications ...18 N Noise Emission Control System ...69 O Oil Engine ...76-77 Front Gearcase ...82 Transmission ...81 Oil and Filter Change ...78-80 Oil Level, Engine...