

Owners Manual
Page 7
... safety and emission regulations for choosing a VICTORY motorcycle! If you misplace or damage your owner's manual, you 're not satisfied with the performance of your model may be considered part of the motorcycle after you for the area of the photographs and illustrations used in the manual are generalizations, so your VICTORY dealer, please contact the Polaris Consumer Service...
... safety and emission regulations for choosing a VICTORY motorcycle! If you misplace or damage your owner's manual, you 're not satisfied with the performance of your model may be considered part of the motorcycle after you for the area of the photographs and illustrations used in the manual are generalizations, so your VICTORY dealer, please contact the Polaris Consumer Service...

Owners Manual
Page 16
... shift their body erratically, which can make the motorcycle hard to handle, which could cause loss of control. Safe Riding Practices SAFETY S Ground clearance is equipped with passenger seat and passenger footrests. Carrying a Passenger* NOTE: *Some models are not equipped from the factory with a passenger seat or passenger footrests. Discuss any safety information unfamiliar to contact the road surface when leaning the motorcycle in handling, acceleration and braking caused...
... shift their body erratically, which can make the motorcycle hard to handle, which could cause loss of control. Safe Riding Practices SAFETY S Ground clearance is equipped with passenger seat and passenger footrests. Carrying a Passenger* NOTE: *Some models are not equipped from the factory with a passenger seat or passenger footrests. Discuss any safety information unfamiliar to contact the road surface when leaning the motorcycle in handling, acceleration and braking caused...

Owners Manual
Page 22
... the brake line, exhaust, and drive belt. S Position and restrain the motorcycle so it can cause loss of the fuel tank if the motorcycle leans to make room for the tiedown strap. SAFETY Transporting the Motorcycle If you must transport the motorcycle: S Use a truck or trailer. Loosen the front turn signal up to one side. Soft strap Loosen screw, slide turn signal mounts and...
... the brake line, exhaust, and drive belt. S Position and restrain the motorcycle so it can cause loss of the fuel tank if the motorcycle leans to make room for the tiedown strap. SAFETY Transporting the Motorcycle If you must transport the motorcycle: S Use a truck or trailer. Loosen the front turn signal up to one side. Soft strap Loosen screw, slide turn signal mounts and...

Owners Manual
Page 23
... not: - Obscure lights or reflectors. An electrical failure could result and cause hazardous loss of engine power or lights or damage to operate controls. - An improperly designed or installed windshield, backrest or luggage rack can cause instability (due to add a windshield, backrest or luggage rack, choose one designed and approved by VICTORY specifically for proper installation and use. SAFETY Accessory Selection and Installation...
... not: - Obscure lights or reflectors. An electrical failure could result and cause hazardous loss of engine power or lights or damage to operate controls. - An improperly designed or installed windshield, backrest or luggage rack can cause instability (due to add a windshield, backrest or luggage rack, choose one designed and approved by VICTORY specifically for proper installation and use. SAFETY Accessory Selection and Installation...
Owners Manual
Page 25
... Service Manual or contact your authorized VICTORY Dealer for fork oil or shock absorber fluid leaks. To repair steering or suspension system wear or damage, see the VICTORY Service Manual or your authorized VICTORY Dealer. 20 Operating the motorcycle without performing periodic maintenance can cause damage to the motorcycle or result in an accident. S Maintain proper tire pressure and tread condition and proper wheel and tire balance. S Perform periodic maintenance...
... Service Manual or contact your authorized VICTORY Dealer for fork oil or shock absorber fluid leaks. To repair steering or suspension system wear or damage, see the VICTORY Service Manual or your authorized VICTORY Dealer. 20 Operating the motorcycle without performing periodic maintenance can cause damage to the motorcycle or result in an accident. S Maintain proper tire pressure and tread condition and proper wheel and tire balance. S Perform periodic maintenance...

Owners Manual
Page 35
COMPONENT IDENTIFICATION Use the information on the following pages to identify and locate the major components of the VICTORY VEGAS JACKPOT motorcycle, including the vehicle and engine identification numbers, model number and ignition key number. Speedometer Front Brake Fluid Reservoir Right Mirror Throttle Control Grip Front Brake Lever Right Handlebar Switch Throttle Cables Indicator Lamps Fuel Cap Left Handlebar Switch Clutch Lever Left Mirror Fast Idle Lever Clutch Cable 1 12 13 14 4 2 3 5 11 10 6 7 8 9 30 HANDLEBAR AREA 1. 2. 3. 4. 5. 6. 7. 8. 9. 10. 11. 12. 13. 14.
COMPONENT IDENTIFICATION Use the information on the following pages to identify and locate the major components of the VICTORY VEGAS JACKPOT motorcycle, including the vehicle and engine identification numbers, model number and ignition key number. Speedometer Front Brake Fluid Reservoir Right Mirror Throttle Control Grip Front Brake Lever Right Handlebar Switch Throttle Cables Indicator Lamps Fuel Cap Left Handlebar Switch Clutch Lever Left Mirror Fast Idle Lever Clutch Cable 1 12 13 14 4 2 3 5 11 10 6 7 8 9 30 HANDLEBAR AREA 1. 2. 3. 4. 5. 6. 7. 8. 9. 10. 11. 12. 13. 14.

Owners Manual
Page 40
... ignition key into the switch while selecting the Park position. 35 Ignition Key INSTRUMENTS, FEATURES AND CONTROLS The ignition key operates the ignition switch and parking lights. On Position In the ON position, all other electrical features. 3 2 1 Caution 1. Ignition Switch The ignition switch energizes the ignition, the lighting system, and all electrical circuits are energized and the ignition key cannot be removed. P (Park) Before starting the engine, read the instructions for starting the engine beginning on page 65. Park Position (P) In the PARK...
... ignition key into the switch while selecting the Park position. 35 Ignition Key INSTRUMENTS, FEATURES AND CONTROLS The ignition key operates the ignition switch and parking lights. On Position In the ON position, all other electrical features. 3 2 1 Caution 1. Ignition Switch The ignition switch energizes the ignition, the lighting system, and all electrical circuits are energized and the ignition key cannot be removed. P (Park) Before starting the engine, read the instructions for starting the engine beginning on page 65. Park Position (P) In the PARK...
Owners Manual
Page 46
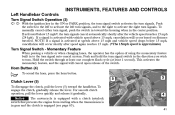
... right to turn signals. Push and hold the turn signals. Turn Signal Switch - If a signal is activated with a clutch interlock switch that prevents the engine from starting when the transmission is in the ON or PARK position, the turn signal switch activates the turn signal switch in the center position. Left Handlebar Controls INSTRUMENTS, FEATURES AND CONTROLS Turn Signal Switch Operation (3) With the ignition key in gear and the clutch is engaged (see page 65). 5 3 4 41 To engage the clutch, gradually release the lever...
... right to turn signals. Push and hold the turn signals. Turn Signal Switch - If a signal is activated with a clutch interlock switch that prevents the engine from starting when the transmission is in the ON or PARK position, the turn signal switch activates the turn signal switch in the center position. Left Handlebar Controls INSTRUMENTS, FEATURES AND CONTROLS Turn Signal Switch Operation (3) With the ignition key in gear and the clutch is engaged (see page 65). 5 3 4 41 To engage the clutch, gradually release the lever...

Owners Manual
Page 50
Lift the key slot cover (1) on the cap. To close the key slot cover. For fueling procedure, see Fueling and Fill Height, page 64. 1 45 Remove key and close the fuel cap, turn key clockwise and press down lightly to release latch and open the cap. Turn clockwise while pushing down on the cap. Turn key counterclockwise while maintaining pressure on the cap and insert key. Fuel Cap INSTRUMENTS, FEATURES AND CONTROLS The fuel cap must be opened and closed with the ignition key.
Lift the key slot cover (1) on the cap. To close the key slot cover. For fueling procedure, see Fueling and Fill Height, page 64. 1 45 Remove key and close the fuel cap, turn key clockwise and press down lightly to release latch and open the cap. Turn clockwise while pushing down on the cap. Turn key counterclockwise while maintaining pressure on the cap and insert key. Fuel Cap INSTRUMENTS, FEATURES AND CONTROLS The fuel cap must be opened and closed with the ignition key.
Owners Manual
Page 53
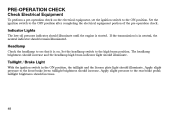
... the ON position. Taillight / Brake Light With the ignition switch in neutral, the neutral indicator should illuminate. taillight brightness should illuminate until the engine is on the electrical equipment, set the ignition switch to see that it is started. Set the ignition switch to the rear brake pedal; Indicator Lights The low oil pressure indicator should increase. 48 PRE-OPERATION CHECK Check Electrical Equipment To perform a pre-operation check on...
... the ON position. Taillight / Brake Light With the ignition switch in neutral, the neutral indicator should illuminate. taillight brightness should illuminate until the engine is on the electrical equipment, set the ignition switch to see that it is started. Set the ignition switch to the rear brake pedal; Indicator Lights The low oil pressure indicator should increase. 48 PRE-OPERATION CHECK Check Electrical Equipment To perform a pre-operation check on...

Owners Manual
Page 57
Tire Condition Inspect the tire sidewalls, road contact surface, and tread base for the total weight of the wear bars, replace the tire. 52 When the road contact surface has worn to the tire pressure table on page 115. Refer to the top of your intended load. Replace damaged tires immediately (see the VICTORY Service Manual or an authorized VICTORY dealer). Tire Tread Depth Raised areas at...
Tire Condition Inspect the tire sidewalls, road contact surface, and tread base for the total weight of the wear bars, replace the tire. 52 When the road contact surface has worn to the tire pressure table on page 115. Refer to the top of your intended load. Replace damaged tires immediately (see the VICTORY Service Manual or an authorized VICTORY dealer). Tire Tread Depth Raised areas at...
Owners Manual
Page 72
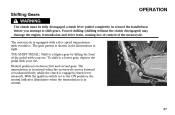
.... N 2 3 45 O/D 1 67 Forced shifting (shifting without the clutch disengaged) may damage the engine, transmission and drive train, causing loss of control of the pedal with your toe. To shift to the ON position, the neutral indicator illuminates when the transmission is in the illustrations at right. TOE SHIFT PEDAL: Shift to shift gears. The transmission is in neutral. With the ignition switch set to a lower gear, depress the pedal with...
.... N 2 3 45 O/D 1 67 Forced shifting (shifting without the clutch disengaged) may damage the engine, transmission and drive train, causing loss of control of the pedal with your toe. To shift to the ON position, the neutral indicator illuminates when the transmission is in the illustrations at right. TOE SHIFT PEDAL: Shift to shift gears. The transmission is in neutral. With the ignition switch set to a lower gear, depress the pedal with...

Owners Manual
Page 92
... of the base of the tension gauge bracket. Make sure the tension gauge is seated squarely against the lower strand of the drive belt halfway between the front and rear drive sprockets. Position the small O-ring ...lowering kit is installed, tension must be measured and adjusted with the belt at tightest spot DBelt and sprockets must be adjusted after 500 miles to the drive belt as necessary (page 88). Belt Tension Gauge Important Drive Belt Deflection Information DMeasure / adjust belt deflection at the tightest spot. DLowering kits affect belt deflection specifications...
... of the base of the tension gauge bracket. Make sure the tension gauge is seated squarely against the lower strand of the drive belt halfway between the front and rear drive sprockets. Position the small O-ring ...lowering kit is installed, tension must be measured and adjusted with the belt at tightest spot DBelt and sprockets must be adjusted after 500 miles to the drive belt as necessary (page 88). Belt Tension Gauge Important Drive Belt Deflection Information DMeasure / adjust belt deflection at the tightest spot. DLowering kits affect belt deflection specifications...

Owners Manual
Page 95
MAINTENANCE Rear Wheel Alignment (cont.) NOTE: Turn the axle adjusters about 1/16 of the swingarm (tighten each adjusters lightly after each adjustment. Recheck rear wheel alignment after tightening the axle nut). 9. Be sure the adjuster screws are still in firm contact with the end of a turn the axle adjuster screws (5) IN (clockwise) to draw the axle back, or OUT (counterclockwise) to allow the...
MAINTENANCE Rear Wheel Alignment (cont.) NOTE: Turn the axle adjusters about 1/16 of the swingarm (tighten each adjusters lightly after each adjustment. Recheck rear wheel alignment after tightening the axle nut). 9. Be sure the adjuster screws are still in firm contact with the end of a turn the axle adjuster screws (5) IN (clockwise) to draw the axle back, or OUT (counterclockwise) to allow the...

Owners Manual
Page 101
... the rear suspension a few times. If the wheel does not rotate smoothly, inspect the wheel bearings, rear axle, belt adjustment, and wheel alignment (see the VICTORY Service Manual or an authorized VICTORY dealer). 4. Use an appropriate motorcycle lift or a block of the ground. Elevate the rear of the motorcycle until the rear wheel is movement at the front of the swing arm, inspect the swing arm pivot bushings / bearings and...
... the rear suspension a few times. If the wheel does not rotate smoothly, inspect the wheel bearings, rear axle, belt adjustment, and wheel alignment (see the VICTORY Service Manual or an authorized VICTORY dealer). 4. Use an appropriate motorcycle lift or a block of the ground. Elevate the rear of the motorcycle until the rear wheel is movement at the front of the swing arm, inspect the swing arm pivot bushings / bearings and...

Owners Manual
Page 103
... not rotate smoothly, inspect the wheel bearings, front axle, and brakes (see the VICTORY Service Manual or an authorized VICTORY dealer). 5. Slowly rotate the front wheel. Use an appropriate motorcycle lift or a block of the ground. Point the front wheel straight ahead. NOTE: If there is movement at the steering head when checked (see the VICTORY Service Manual or an authorized VICTORY dealer...
... not rotate smoothly, inspect the wheel bearings, front axle, and brakes (see the VICTORY Service Manual or an authorized VICTORY dealer). 5. Slowly rotate the front wheel. Use an appropriate motorcycle lift or a block of the ground. Point the front wheel straight ahead. NOTE: If there is movement at the steering head when checked (see the VICTORY Service Manual or an authorized VICTORY dealer...

Owners Manual
Page 145
... minutes in neutral, press the electric starter button to pass the stabilized fuel through entire fuel-injection system. Remove the spark plugs (see page 82). This procedure inhibits corrosion by coating the cylinder walls with the oil you remove the motorcycle from the area around each spark plug hole. 4. WARNING Wear face protection when using pressurized air. 3. Connect the spark plugs to the spark plug wires and ground the spark plugs to...
... minutes in neutral, press the electric starter button to pass the stabilized fuel through entire fuel-injection system. Remove the spark plugs (see page 82). This procedure inhibits corrosion by coating the cylinder walls with the oil you remove the motorcycle from the area around each spark plug hole. 4. WARNING Wear face protection when using pressurized air. 3. Connect the spark plugs to the spark plug wires and ground the spark plugs to...
Owners Manual
Page 150
... that you retain all scheduled maintenance. is less than 280 cubic centimeters; As the motorcycle owner, you should contact VICTORY Motorcycle Division, Polaris Sales Inc., P.O. Limited Warranty on the engine displacement, of 12,000 kilometers (7,456 miles), if the motorcycle's engine displacement is designed, built and equipped so as to ensure the performance of all receipts covering maintenance on your motorcycle, but...
... that you retain all scheduled maintenance. is less than 280 cubic centimeters; As the motorcycle owner, you should contact VICTORY Motorcycle Division, Polaris Sales Inc., P.O. Limited Warranty on the engine displacement, of 12,000 kilometers (7,456 miles), if the motorcycle's engine displacement is designed, built and equipped so as to ensure the performance of all receipts covering maintenance on your motorcycle, but...

Owners Manual
Page 161
SPECIFICATIONS Model Year 2007 Wheels and Tires Front Wheel Type/Size Rear Wheel Type Size Front Tire Type/Size Rear Tire Type/Size Electrical Alternator Battery Lights and Fuses Fuses Engine / ECM Fuel Pump Headlamp / Brake Lamp Tail Lamp, Flashers, Indicator Lamps, Horn Ignition / Gauges Bulbs Headlamp (International) Taillight Turn Signal Indicator 15 amp 10 amp 15 amp 15 amp 15 amp High: H8 / Low H11 (H4) Non-Serviceable LED R10W (Auto-Cancel System) 2.3 Watt Wedge Base 38 Amp Max Output YTX20HL-BS / 12 Volts...
SPECIFICATIONS Model Year 2007 Wheels and Tires Front Wheel Type/Size Rear Wheel Type Size Front Tire Type/Size Rear Tire Type/Size Electrical Alternator Battery Lights and Fuses Fuses Engine / ECM Fuel Pump Headlamp / Brake Lamp Tail Lamp, Flashers, Indicator Lamps, Horn Ignition / Gauges Bulbs Headlamp (International) Taillight Turn Signal Indicator 15 amp 10 amp 15 amp 15 amp 15 amp High: H8 / Low H11 (H4) Non-Serviceable LED R10W (Auto-Cancel System) 2.3 Watt Wedge Base 38 Amp Max Output YTX20HL-BS / 12 Volts...

Owners Manual
Page 166
... Ignition Key Number ...34 Ignition Switch ...35 Indicator Lamp, Overdrive ...37 Indicator Lights ...38, 48 Initial Maintenance ...76 Instrument Cluster ...36 Instruments ...35-46 N Neutral Indicator ...38 Noise Emission Warranty ...143 Noise Regulation ...143 R INDEX O Odometer ...37 Oil ...82-84 Oil Change ...82-83 Oil Fill Cap/Dipstick ...84 Oil Filter ...82-83 Oil Filter Change ...82-83 Oil Level ...50, 83-84 Oil Recommendation ...83 Oil Specifications ...157 Operator's Seat ...121-122 Overdrive, Indicator Lamp ...37 K Key Number ...34 Rear Brake...
... Ignition Key Number ...34 Ignition Switch ...35 Indicator Lamp, Overdrive ...37 Indicator Lights ...38, 48 Initial Maintenance ...76 Instrument Cluster ...36 Instruments ...35-46 N Neutral Indicator ...38 Noise Emission Warranty ...143 Noise Regulation ...143 R INDEX O Odometer ...37 Oil ...82-84 Oil Change ...82-83 Oil Fill Cap/Dipstick ...84 Oil Filter ...82-83 Oil Filter Change ...82-83 Oil Level ...50, 83-84 Oil Recommendation ...83 Oil Specifications ...157 Operator's Seat ...121-122 Overdrive, Indicator Lamp ...37 K Key Number ...34 Rear Brake...