

Owners Manual
Page 45
... change gears, stop the vehicle, and with the engine speed above idle or while the vehicle is left unattended, always place the transmission in PARK and lock the parking brake. Fuel Filter (500 EFI) The in heavy pulling situations and when operating at less than seven miles per hour for extended periods of time. Fuel Tank Cap Remove the fuel tank cap to add fuel to the desired gear. Fuel Tank Cap 45 Belt Life To extend belt life, use E-85 fuel. H: High Gear L: Low Gear...
... change gears, stop the vehicle, and with the engine speed above idle or while the vehicle is left unattended, always place the transmission in PARK and lock the parking brake. Fuel Filter (500 EFI) The in heavy pulling situations and when operating at less than seven miles per hour for extended periods of time. Fuel Tank Cap Remove the fuel tank cap to add fuel to the desired gear. Fuel Tank Cap 45 Belt Life To extend belt life, use E-85 fuel. H: High Gear L: Low Gear...

Owners Manual
Page 49
... switch to neutral or park 49 Active Descent Control (ADC) System FEATURES AND CONTROLS The ADC system allows engine braking to all four of the following conditions occur: • The 4X4 switch must be in the ADC 4X4 position • Vehicle speed must be 15 mph (24 km/h) or less • The throttle must be closed (throttle lever released) • The transmission must be in gear...
... switch to neutral or park 49 Active Descent Control (ADC) System FEATURES AND CONTROLS The ADC system allows engine braking to all four of the following conditions occur: • The 4X4 switch must be in the ADC 4X4 position • Vehicle speed must be 15 mph (24 km/h) or less • The throttle must be closed (throttle lever released) • The transmission must be in gear...

Owners Manual
Page 53
... gear shifter position: 8 H = High Gear L = Low Gear N = Neutral R = Reverse Gear 2 P = Park 2. 4X4 Indicator - Check Engine Warning Indicator - Instrument Cluster FEATURES AND CONTROLS Rider Information Center The rider information center is located in the LCD, and the speedometer needle will blink. This warning usually indicates that the ATV is operating at a higher RPM or recharge the battery to your Polaris dealer for 2.5 seconds at idle and high electrical load (lights, cooling fan, accessories...
... gear shifter position: 8 H = High Gear L = Low Gear N = Neutral R = Reverse Gear 2 P = Park 2. 4X4 Indicator - Check Engine Warning Indicator - Instrument Cluster FEATURES AND CONTROLS Rider Information Center The rider information center is located in the LCD, and the speedometer needle will blink. This warning usually indicates that the ATV is operating at a higher RPM or recharge the battery to your Polaris dealer for 2.5 seconds at idle and high electrical load (lights, cooling fan, accessories...

Owners Manual
Page 58
... 2 times (code 42), then pause longer, blink 3 times, pause, and blink 6 times (code 36). 5. Short-to-Battery: The wire leading from the item listed in the chart (injector, fuel pump, etc.), or the item has failed. FEATURES AND CONTROLS Instrument Cluster Rider Information Center Downloading Codes The EFI diagnostic mode is for Blink Codes and Failure Descriptions. Place the transmission in less than five seconds. Stop the engine. The...
... 2 times (code 42), then pause longer, blink 3 times, pause, and blink 6 times (code 36). 5. Short-to-Battery: The wire leading from the item listed in the chart (injector, fuel pump, etc.), or the item has failed. FEATURES AND CONTROLS Instrument Cluster Rider Information Center Downloading Codes The EFI diagnostic mode is for Blink Codes and Failure Descriptions. Place the transmission in less than five seconds. Stop the engine. The...

Owners Manual
Page 61
... speed operation during the first three hours of gasoline. Break-In Period OPERATION The break-in 1. Engine and Drivetrain Break-in period for these components. See page 45. 2. Add oil if necessary to familiarize yourself with gasoline. Perform regular checks on fluid levels, controls and areas outlined on the dipstick. Pull only light loads. Fill the fuel tank with vehicle...
... speed operation during the first three hours of gasoline. Break-In Period OPERATION The break-in 1. Engine and Drivetrain Break-in period for these components. See page 45. 2. Add oil if necessary to familiarize yourself with gasoline. Perform regular checks on fluid levels, controls and areas outlined on the dipstick. Pull only light loads. Fill the fuel tank with vehicle...

Owners Manual
Page 63
Position the vehicle on the vehicle and move the engine stop if engaged for longer than 5 seconds. Place the transmission in an enclosed area. 1. Activate the starter for engine heater kits, which provide quicker warm-ups and easier starting if the transmission is in colder weather. 63 Never run an engine in PARK. 3. NOTE: The starter interlock will automatically stop switch to engage the starter. NOTE: 5. Turn the ignition key past...
Position the vehicle on the vehicle and move the engine stop if engaged for longer than 5 seconds. Place the transmission in an enclosed area. 1. Activate the starter for engine heater kits, which provide quicker warm-ups and easier starting if the transmission is in colder weather. 63 Never run an engine in PARK. 3. NOTE: The starter interlock will automatically stop switch to engage the starter. NOTE: 5. Turn the ignition key past...

Owners Manual
Page 64
... DO NOT BLOCK THE FRONT HEADLIGHT BEAM when carrying loads on only the front rack or cargo bed may cause an imbalanced condition and increases the possibility of control or brake instability. OPERATION Hauling Cargo WARNING Overloading the vehicle or carrying or towing cargo improperly can alter vehicle handling and may cause loss of vehicle overturn. REDUCE SPEED AND ALLOW GREATER DISTANCES FOR...
... DO NOT BLOCK THE FRONT HEADLIGHT BEAM when carrying loads on only the front rack or cargo bed may cause an imbalanced condition and increases the possibility of control or brake instability. OPERATION Hauling Cargo WARNING Overloading the vehicle or carrying or towing cargo improperly can alter vehicle handling and may cause loss of vehicle overturn. REDUCE SPEED AND ALLOW GREATER DISTANCES FOR...

Owners Manual
Page 65
... owner's manual and on the vehicle, and never exceed the weight capacities outlined in the rear of load. Balance, handling, and control may be mounted as low as possible. 2. Always read and understand the load distribution warning labels on the safety decals. Use low forward gear when hauling or towing heavy cargo to maintain stable driving conditions. Make sure the cargo box dump latch is securely latched...
... owner's manual and on the vehicle, and never exceed the weight capacities outlined in the rear of load. Balance, handling, and control may be mounted as low as possible. 2. Always read and understand the load distribution warning labels on the safety decals. Use low forward gear when hauling or towing heavy cargo to maintain stable driving conditions. Make sure the cargo box dump latch is securely latched...

Owners Manual
Page 66
... the hitch point. Avoid towing on your ATV warranty. The combination of tongue weight. Maximum 6 3/4" (17 cm) Maximum Towing Capacities Do not exceed the following maximum capacities when towing. OPERATION Towing Loads Hauling Cargo Always attach a towed load to the vehicle and will void your Polaris ATV. Always install Polaris-approved (or equivalent) accessories designed for ATV use. If towing a load, reduce rear box cargo weight by...
... the hitch point. Avoid towing on your ATV warranty. The combination of tongue weight. Maximum 6 3/4" (17 cm) Maximum Towing Capacities Do not exceed the following maximum capacities when towing. OPERATION Towing Loads Hauling Cargo Always attach a towed load to the vehicle and will void your Polaris ATV. Always install Polaris-approved (or equivalent) accessories designed for ATV use. If towing a load, reduce rear box cargo weight by...
Owners Manual
Page 86
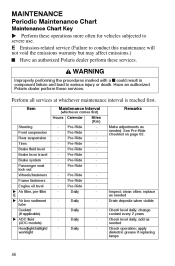
... Calendar Steering Front suspension Rear suspension Tires Brake fluid level Brake lever travel Brake system Passenger seat lock-out Wheels/fasteners Frame fasteners Engine oil level X Air filter, pre-filter E X Air box sediment tube Coolant (if applicable) X ADC fluid (ADC models) Headlight/taillight/ worklight Pre-Ride Pre-Ride Pre-Ride Pre-Ride Pre-Ride Pre-Ride Pre-Ride Pre-Ride Pre-Ride Pre-Ride Pre-Ride Daily Daily Daily Daily Daily Miles (Km) Inspect; replace...
... Calendar Steering Front suspension Rear suspension Tires Brake fluid level Brake lever travel Brake system Passenger seat lock-out Wheels/fasteners Frame fasteners Engine oil level X Air filter, pre-filter E X Air box sediment tube Coolant (if applicable) X ADC fluid (ADC models) Headlight/taillight/ worklight Pre-Ride Pre-Ride Pre-Ride Pre-Ride Pre-Ride Pre-Ride Pre-Ride Pre-Ride Pre-Ride Pre-Ride Pre-Ride Daily Daily Daily Daily Daily Miles (Km) Inspect; replace...

Owners Manual
Page 87
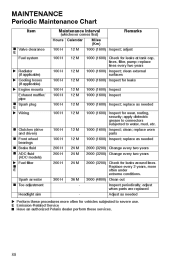
... lubrication Shift linkage Q Steering X Front suspension X Rear suspension E ETC Switch Q Throttle Cable/ E Throttle Body Intake Duct Drive belt Cooling system (if applicable) X Engine oil change X Oil filter change yearly Inspect; pressure test system yearly 1000 (1600) Perform a break-in wet conditions Inspect periodically Check terminals; change yearly Inspect level; adjust; Periodic Maintenance Chart Item Maintenance Interval (whichever comes first) Hours Calendar X Air filter, E main element Recoil housing (if applicable) X Brake pad wear Q MAINTENANCE Remarks Miles (Km...
... lubrication Shift linkage Q Steering X Front suspension X Rear suspension E ETC Switch Q Throttle Cable/ E Throttle Body Intake Duct Drive belt Cooling system (if applicable) X Engine oil change X Oil filter change yearly Inspect; pressure test system yearly 1000 (1600) Perform a break-in wet conditions Inspect periodically Check terminals; change yearly Inspect level; adjust; Periodic Maintenance Chart Item Maintenance Interval (whichever comes first) Hours Calendar X Air filter, E main element Recoil housing (if applicable) X Brake pad wear Q MAINTENANCE Remarks Miles (Km...
Owners Manual
Page 88
...M Fuel system X Radiator (if applicable) X Cooling hoses (if applicable) X Engine mounts Exhaust muffler/ pipe E Q Spark plug X Wiring Q Clutches (drive and driven) bearings 100 H 100 H 200 H 200 H 200 H 12 M 12 M 24 M 24 M 24 M Q Front wheel Q Brake fluid Q ADC fluid (ADC models) X Fuel filter E Q Spark arrestor Q Toe adjustment 300 H 36 M - MAINTENANCE Item Periodic Maintenance Chart Maintenance Interval (whichever comes first) Hours Calendar E Q Valve clearance Remarks Miles (Km) 1000 (1600) Inspect; Replace every 2 years, more often for vehicles subjected to water, mud...
...M Fuel system X Radiator (if applicable) X Cooling hoses (if applicable) X Engine mounts Exhaust muffler/ pipe E Q Spark plug X Wiring Q Clutches (drive and driven) bearings 100 H 100 H 200 H 200 H 200 H 12 M 12 M 24 M 24 M 24 M Q Front wheel Q Brake fluid Q ADC fluid (ADC models) X Fuel filter E Q Spark arrestor Q Toe adjustment 300 H 36 M - MAINTENANCE Item Periodic Maintenance Chart Maintenance Interval (whichever comes first) Hours Calendar E Q Valve clearance Remarks Miles (Km) 1000 (1600) Inspect; Replace every 2 years, more often for vehicles subjected to water, mud...

Owners Manual
Page 108
... wheel nuts to the ground. 6. Nut Type Lug Nut 2-Piece Flange Nut Nut Torque 90 ft. MAINTENANCE Tires Wheel Installation WARNING Improperly installed wheels can adversely affect tire wear and vehicle handling, which can result in PARK. 2. lbs. (37 Nm) Wheel Nut Torque Specifications Check the wheel nut torques occasionally and when they've been loosened for service. Always ensure that have a cotter pin installed. Lock the parking brake...
... wheel nuts to the ground. 6. Nut Type Lug Nut 2-Piece Flange Nut Nut Torque 90 ft. MAINTENANCE Tires Wheel Installation WARNING Improperly installed wheels can adversely affect tire wear and vehicle handling, which can result in PARK. 2. lbs. (37 Nm) Wheel Nut Torque Specifications Check the wheel nut torques occasionally and when they've been loosened for service. Always ensure that have a cotter pin installed. Lock the parking brake...

Owners Manual
Page 112
.... Hot components can result in the housing. 8. WARNING Poor lighting while driving can cause serious burns to pull on the connector, not on the lower front corners of the pod. 4. Remove the two screws on the wiring. 6. Remove the screw from the speedometer. 5. Lift the pod cover and disconnect the speedometer harnesses from the rear of the lamp. Headlight Lamp Replacement 1.
.... Hot components can result in the housing. 8. WARNING Poor lighting while driving can cause serious burns to pull on the connector, not on the lower front corners of the pod. 4. Remove the two screws on the wiring. 6. Remove the screw from the speedometer. 5. Lift the pod cover and disconnect the speedometer harnesses from the rear of the lamp. Headlight Lamp Replacement 1.

Owners Manual
Page 113
... distance from a wall. Lights MAINTENANCE High Beam Adjustment The headlight beam can be two inches (5 cm) below the mark on a level surface with the headlight approximately 25 ft. (7.6 m) from the floor to the center of the headlight and make the adjustment. 25 ft. (7.6 m) 2" (5 cm) 1. Phillips Screw 113 Start the engine.Turn the headlight switch to the desired position by turning the knob either...
... distance from a wall. Lights MAINTENANCE High Beam Adjustment The headlight beam can be two inches (5 cm) below the mark on a level surface with the headlight approximately 25 ft. (7.6 m) from the floor to the center of the headlight and make the adjustment. 25 ft. (7.6 m) 2" (5 cm) 1. Phillips Screw 113 Start the engine.Turn the headlight switch to the desired position by turning the knob either...

Owners Manual
Page 114
... remove it from the locking tabs. 8. Lift the pod cover and disconnect the speedometer harnesses from the wiring harness. 5. Lift the adjusting knob up and out of the adjustment knob stop is 5 1/8" (13 cm). 10. Lift the pod slightly while depressing the tabs at the rear of the headlight pod. 2. MAINTENANCE Lights Headlight Housing Replacement 1. Remove the two screws on the lower front corners of...
... remove it from the locking tabs. 8. Lift the pod cover and disconnect the speedometer harnesses from the wiring harness. 5. Lift the adjusting knob up and out of the adjustment knob stop is 5 1/8" (13 cm). 10. Lift the pod slightly while depressing the tabs at the rear of the headlight pod. 2. MAINTENANCE Lights Headlight Housing Replacement 1. Remove the two screws on the lower front corners of...

Owners Manual
Page 133
... time the fluid looks dark or contaminated) • Coolant (test strength/fill) Fog the Engine 1. If you miss the plug hole, oil will be forced in the Periodic Maintenance Chart beginning on the container. Turn the engine over several minutes so the Carbon Clean reaches the injectors. Start the engine. Stop the engine. 2. Treat the fuel system with the pre-measured amount of clear 1/4" hose...
... time the fluid looks dark or contaminated) • Coolant (test strength/fill) Fog the Engine 1. If you miss the plug hole, oil will be forced in the Periodic Maintenance Chart beginning on the container. Turn the engine over several minutes so the Carbon Clean reaches the injectors. Start the engine. Stop the engine. 2. Treat the fuel system with the pre-measured amount of clear 1/4" hose...
Owners Manual
Page 144
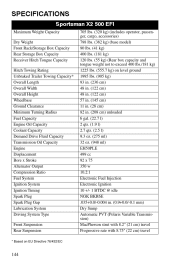
SPECIFICATIONS Sportsman X2 500 EFI Maximum Weight Capacity Dry Weight Front Rack/Storage Box Capacity Rear Storage Box Capacity Receiver Hitch Tongue Capacity Hitch Towing Rating Unbraked Trailer Towing Capacity* Overall Length Overall Width Overall Height Wheelbase Ground Clearance Minimum Turning Radius Fuel Capacity Engine Oil Capacity Coolant Capacity Demand Drive Fluid Capacity Transmission Oil Capacity Engine Displacement Bore x Stroke Alternator Output Compression Ratio Fuel System Ignition System Ignition Timing Spark Plug Spark Plug Gap Lubrication System Driving System Type Front ...
SPECIFICATIONS Sportsman X2 500 EFI Maximum Weight Capacity Dry Weight Front Rack/Storage Box Capacity Rear Storage Box Capacity Receiver Hitch Tongue Capacity Hitch Towing Rating Unbraked Trailer Towing Capacity* Overall Length Overall Width Overall Height Wheelbase Ground Clearance Minimum Turning Radius Fuel Capacity Engine Oil Capacity Coolant Capacity Demand Drive Fluid Capacity Transmission Oil Capacity Engine Displacement Bore x Stroke Alternator Output Compression Ratio Fuel System Ignition System Ignition Timing Spark Plug Spark Plug Gap Lubrication System Driving System Type Front ...

Owners Manual
Page 146
... Drive Fluid Capacity 9.3 oz. (275 ml) Transmission Oil Capacity 32 oz. (948 ml) Engine EH0680LE Displacement 683 cc Bore x Stroke 80 x 68 Alternator Output 500 Watts @3000 RPM Compression Ratio 9.40:1 Starting System Electric Fuel System Electronic Fuel Injection Ignition System ECU Ignition Timing 8 BTDC @ 2000 RPM Spark Plug RC7YC Spark Plug Gap .035 in. (0.9 mm) Lubrication System Pressurized Wet Sump Driving System Type Automatic PVT (Polaris Variable Transmission) Front Suspension MacPherson strut with 8.2" (21 cm) travel Rear Suspension...
... Drive Fluid Capacity 9.3 oz. (275 ml) Transmission Oil Capacity 32 oz. (948 ml) Engine EH0680LE Displacement 683 cc Bore x Stroke 80 x 68 Alternator Output 500 Watts @3000 RPM Compression Ratio 9.40:1 Starting System Electric Fuel System Electronic Fuel Injection Ignition System ECU Ignition Timing 8 BTDC @ 2000 RPM Spark Plug RC7YC Spark Plug Gap .035 in. (0.9 mm) Lubrication System Pressurized Wet Sump Driving System Type Automatic PVT (Polaris Variable Transmission) Front Suspension MacPherson strut with 8.2" (21 cm) travel Rear Suspension...
Owners Manual
Page 148
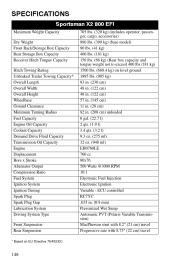
... Ignition Variable - SPECIFICATIONS Sportsman X2 800 EFI Maximum Weight Capacity Dry Weight Front Rack/Storage Box Capacity Rear Storage Box Capacity Receiver Hitch Tongue Capacity Hitch Towing Rating Unbraked Trailer Towing Capacity* Overall Length Overall Width Overall Height Wheelbase Ground Clearance Minimum Turning Radius Fuel Capacity Engine Oil Capacity Coolant Capacity Demand Drive Fluid Capacity Transmission Oil Capacity Engine Displacement Bore x Stroke Alternator Output Compression Ratio Fuel System Ignition System Ignition Timing Spark Plug Spark Plug Gap Lubrication System Driving...
... Ignition Variable - SPECIFICATIONS Sportsman X2 800 EFI Maximum Weight Capacity Dry Weight Front Rack/Storage Box Capacity Rear Storage Box Capacity Receiver Hitch Tongue Capacity Hitch Towing Rating Unbraked Trailer Towing Capacity* Overall Length Overall Width Overall Height Wheelbase Ground Clearance Minimum Turning Radius Fuel Capacity Engine Oil Capacity Coolant Capacity Demand Drive Fluid Capacity Transmission Oil Capacity Engine Displacement Bore x Stroke Alternator Output Compression Ratio Fuel System Ignition System Ignition Timing Spark Plug Spark Plug Gap Lubrication System Driving...