
Owners Manual
Page 14
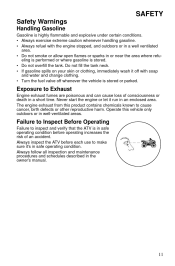
... the ATV is in the owner's manual. 11 Exposure to cause cancer, birth defects or other reproductive harm. SAFETY Safety Warnings Handling Gasoline Gasoline is highly flammable and explosive under certain conditions. • Always exercise extreme caution whenever handling gasoline. • Always refuel with soap and water and change clothing. • Turn the fuel valve off with the engine stopped, and outdoors or in...
... the ATV is in the owner's manual. 11 Exposure to cause cancer, birth defects or other reproductive harm. SAFETY Safety Warnings Handling Gasoline Gasoline is highly flammable and explosive under certain conditions. • Always exercise extreme caution whenever handling gasoline. • Always refuel with soap and water and change clothing. • Turn the fuel valve off with the engine stopped, and outdoors or in...

Owners Manual
Page 34
... engine starting a cold engine. Always refuel with a minimum pump octane number of operation, or annually. Refuel when the gauge indicates a low fuel condition. Do not attempt to the fuel tank. Remove the fuel tank cap to add fuel to clean the fuel filter. 31 FEATURES AND CONTROLS Choke The choke assists in -line fuel filter should be replaced by your dealer after every 100 hours of 87=(R+ M/2) octane. ON OFF Fuel Tank Cap Fuel Tank Cap This vehicle...
... engine starting a cold engine. Always refuel with a minimum pump octane number of operation, or annually. Refuel when the gauge indicates a low fuel condition. Do not attempt to the fuel tank. Remove the fuel tank cap to add fuel to clean the fuel filter. 31 FEATURES AND CONTROLS Choke The choke assists in -line fuel filter should be replaced by your dealer after every 100 hours of 87=(R+ M/2) octane. ON OFF Fuel Tank Cap Fuel Tank Cap This vehicle...
Owners Manual
Page 35
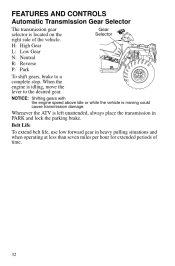
... cause transmission damage. Belt Life To extend belt life, use low forward gear in PARK and lock the parking brake. Whenever the ATV is left unattended, always place the transmission in heavy pulling situations and when operating at less than seven miles per hour for extended periods of the vehicle. When the engine is idling, move the lever to a complete stop. FEATURES AND CONTROLS Automatic Transmission Gear Selector The transmission gear selector...
... cause transmission damage. Belt Life To extend belt life, use low forward gear in PARK and lock the parking brake. Whenever the ATV is left unattended, always place the transmission in heavy pulling situations and when operating at less than seven miles per hour for extended periods of the vehicle. When the engine is idling, move the lever to a complete stop. FEATURES AND CONTROLS Automatic Transmission Gear Selector The transmission gear selector...

Owners Manual
Page 36
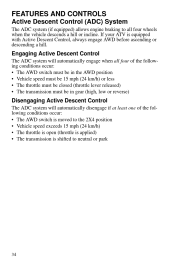
... engine RPM is below 3100. Tip: The override switch allows activation of time the vehicle may be on AWD, the ATV is on . FEATURES AND CONTROLS All Wheel Drive (AWD) System The All Wheel Drive system is turned off. Engage the AWD switch before switching to the length of AWD in two-wheel drive at all wheel AWD drive and the AWD indicator light Switch in AWD, the demand drive unit will automatically disengage. If the rear wheels are spinning, release the throttle...
... engine RPM is below 3100. Tip: The override switch allows activation of time the vehicle may be on AWD, the ATV is on . FEATURES AND CONTROLS All Wheel Drive (AWD) System The All Wheel Drive system is turned off. Engage the AWD switch before switching to the length of AWD in two-wheel drive at all wheel AWD drive and the AWD indicator light Switch in AWD, the demand drive unit will automatically disengage. If the rear wheels are spinning, release the throttle...
Owners Manual
Page 37
... following conditions occur: • The AWD switch is moved to the 2X4 position • Vehicle speed exceeds 15 mph (24 km/h) • The throttle is open (throttle is applied) • The transmission is equipped with Active Descent Control, always engage AWD before ascending or descending a hill. FEATURES AND CONTROLS Active Descent Control (ADC) System The ADC system (if equipped) allows engine braking to neutral or park 34...
... following conditions occur: • The AWD switch is moved to the 2X4 position • Vehicle speed exceeds 15 mph (24 km/h) • The throttle is open (throttle is applied) • The transmission is equipped with Active Descent Control, always engage AWD before ascending or descending a hill. FEATURES AND CONTROLS Active Descent Control (ADC) System The ADC system (if equipped) allows engine braking to neutral or park 34...

Owners Manual
Page 39
... this occurs, take the ATV to your Polaris dealer for 2.5 seconds at idle and high electrical load (lights, cooling fan, accessories) is operating at a higher RPM or recharge the battery to protect the electronic speedometer. If this warning appears. Service Interval/Diagnostic Mode Indicator 5. The segments of the fuel gauge show the level of fuel in the instrument cluster. Refuel immediately. 8. All segments will blink...
... this occurs, take the ATV to your Polaris dealer for 2.5 seconds at idle and high electrical load (lights, cooling fan, accessories) is operating at a higher RPM or recharge the battery to protect the electronic speedometer. If this warning appears. Service Interval/Diagnostic Mode Indicator 5. The segments of the fuel gauge show the level of fuel in the instrument cluster. Refuel immediately. 8. All segments will blink...

Owners Manual
Page 45
... (Clutches/Belt) A proper break-in 1. Perform regular checks on fluid levels, controls and areas outlined on the dipstick. During the break-in period as recommended. Pull only light loads. Always exercise extreme caution whenever handling gasoline. 2. OPERATION Break-In Period Engine and Drivetrain Break-in of the clutches and drive belt will ensure a longer life and better performance. Fill the fuel tank with vehicle operation...
... (Clutches/Belt) A proper break-in 1. Perform regular checks on fluid levels, controls and areas outlined on the dipstick. During the break-in period as recommended. Pull only light loads. Always exercise extreme caution whenever handling gasoline. 2. OPERATION Break-In Period Engine and Drivetrain Break-in of the clutches and drive belt will ensure a longer life and better performance. Fill the fuel tank with vehicle operation...

Owners Manual
Page 61
Carrying loads on the racks raises the center of gravity of the vehicle and creates a less stable operating condition. HEAVY LOADS CAN CAUSE BRAKING AND CONTROL PROBLEMS. Use extreme caution when applying brakes with loads that extend over rough or hilly terrain, reduce speed and cargo to the vehicle, include the weight of the operator, accessories, loads in the rack or box and the load...
Carrying loads on the racks raises the center of gravity of the vehicle and creates a less stable operating condition. HEAVY LOADS CAN CAUSE BRAKING AND CONTROL PROBLEMS. Use extreme caution when applying brakes with loads that extend over rough or hilly terrain, reduce speed and cargo to the vehicle, include the weight of the operator, accessories, loads in the rack or box and the load...

Owners Manual
Page 62
... the rear rack capacity. • The total load (operator, accessories, cargo and weight on the rear rack) and mounted as low as possible. Never install a hitch longer than 4" (10 cm). Never install automotive accessories on warning labels and in serious damage to the vehicle and will void your Polaris ATV. When operating over rough or hilly terrain, reduce speed and cargo weight to the hitch point...
... the rear rack capacity. • The total load (operator, accessories, cargo and weight on the rear rack) and mounted as low as possible. Never install a hitch longer than 4" (10 cm). Never install automotive accessories on warning labels and in serious damage to the vehicle and will void your Polaris ATV. When operating over rough or hilly terrain, reduce speed and cargo weight to the hitch point...

Owners Manual
Page 68
... bowl Q Throttle Cable/ E ETC Switch Remarks Miles (Km) 500 (800) 500 (800) 500 (800) 500 (800) 500 (800 500 (800) Lubricate all fittings, pivots, cables, etc. replace if necessary Inspect; replace if necessary Inspect duct for leaks 1000 (1600) Inspect 1000 (1600) Inspect 1000 (1600) Inspect; apply dielectric grease to connectors subjected to storage Inspect; X Radiator (if applicable) X Cooling hoses (if applicable) X Engine mounts Exhaust muffler/ pipe E E Q Spark plug Q Ignition timing 100 H 100...
... bowl Q Throttle Cable/ E ETC Switch Remarks Miles (Km) 500 (800) 500 (800) 500 (800) 500 (800) 500 (800 500 (800) Lubricate all fittings, pivots, cables, etc. replace if necessary Inspect; replace if necessary Inspect duct for leaks 1000 (1600) Inspect 1000 (1600) Inspect 1000 (1600) Inspect; apply dielectric grease to connectors subjected to storage Inspect; X Radiator (if applicable) X Cooling hoses (if applicable) X Engine mounts Exhaust muffler/ pipe E E Q Spark plug Q Ignition timing 100 H 100...

Owners Manual
Page 87
... the transmission in an accident or overturn. Lock the parking brake. 3. Install the wheel nuts and finger-tighten them. 5. Lower the vehicle to specification. Loose nuts could cause a tire to specification. 90 ft. Nut Type Lug Nut 2-Piece Flange Nut Nut Torque 90 ft. lbs. (37 Nm) Wheel Nut Torque Specifications Check the wheel nut torques occasionally and when they've been loosened for maintenance service...
... the transmission in an accident or overturn. Lock the parking brake. 3. Install the wheel nuts and finger-tighten them. 5. Lower the vehicle to specification. Loose nuts could cause a tire to specification. 90 ft. Nut Type Lug Nut 2-Piece Flange Nut Nut Torque 90 ft. lbs. (37 Nm) Wheel Nut Torque Specifications Check the wheel nut torques occasionally and when they've been loosened for maintenance service...

Owners Manual
Page 91
.... Headlight Lamp Replacement When servicing a halogen lamp, don't touch the lamp with bare fingers. Oil from the speedometer. Remove the two screws on the lower front corners of the pod. 4. CAUTION! Lift the pod slightly while depressing the tabs at the rear of the headlight pod. 2. Allow lamps to the socket and install the new lamp. MAINTENANCE Lights Poor lighting can...
.... Headlight Lamp Replacement When servicing a halogen lamp, don't touch the lamp with bare fingers. Oil from the speedometer. Remove the two screws on the lower front corners of the pod. 4. CAUTION! Lift the pod slightly while depressing the tabs at the rear of the headlight pod. 2. Allow lamps to the socket and install the new lamp. MAINTENANCE Lights Poor lighting can...

Owners Manual
Page 92
... the rear of the headlamp. 2. Adjust the beam to the center of the headlight and make the adjustment. 25 ft. (7.6 m) 2" (5 cm) 1. Tighten the screw. Start the engine.Turn the headlight switch to make a mark on a level surface with the headlight approximately 25 ft. (7.6 m) from the floor to the desired position by turning the knob either clockwise or counterclockwise. Place the transmission in PARK...
... the rear of the headlamp. 2. Adjust the beam to the center of the headlight and make the adjustment. 25 ft. (7.6 m) 2" (5 cm) 1. Tighten the screw. Start the engine.Turn the headlight switch to make a mark on a level surface with the headlight approximately 25 ft. (7.6 m) from the floor to the desired position by turning the knob either clockwise or counterclockwise. Place the transmission in PARK...

Owners Manual
Page 93
... on the lower front corners of the adjustment knob stop is 5 1/8" (13 cm). 10. Unplug the headlamp from the speedometer. 4. Pull the headlight housing up to remove the o-rings from the locking tabs. 8. Lift the pod cover and disconnect the speedometer harnesses from the wiring harness. 5. Use a small screwdriver to remove it from the locking tabs. 7. MAINTENANCE Lights Headlight Housing Replacement 1. Lift the adjusting...
... on the lower front corners of the adjustment knob stop is 5 1/8" (13 cm). 10. Unplug the headlamp from the speedometer. 4. Pull the headlight housing up to remove the o-rings from the locking tabs. 8. Lift the pod cover and disconnect the speedometer harnesses from the wiring harness. 5. Use a small screwdriver to remove it from the locking tabs. 7. MAINTENANCE Lights Headlight Housing Replacement 1. Lift the adjusting...

Owners Manual
Page 94
... secure the headlamp. Turn the headlight harness clockwise to remove it. 3. Reinstall the harness assembly into the headlight assembly. 4. Turn the back of the headlight harness counterclockwise and pull the harness assembly away from the back of the light assembly. 2. Apply dielectric grease to the socket and install the new Lamp lamp. 4. MAINTENANCE Lights Lower Headlamp Replacement 1. Remove the harness connector Connector from the headlight assembly. 2. Test the light for proper operation...
... secure the headlamp. Turn the headlight harness clockwise to remove it. 3. Reinstall the harness assembly into the headlight assembly. 4. Turn the back of the headlight harness counterclockwise and pull the harness assembly away from the back of the light assembly. 2. Apply dielectric grease to the socket and install the new Lamp lamp. 4. MAINTENANCE Lights Lower Headlamp Replacement 1. Remove the harness connector Connector from the headlight assembly. 2. Test the light for proper operation...

Owners Manual
Page 109
Polishing the Vehicle Polaris recommends the use of your Polaris dealer to purchase a replacement. Replacement safety labels are provided by Polaris at the following items: • Wheel bearings • Radiator • Transmission seals • Brakes • Cab and body panels • Electrical components • Switches and controls • Labels and decals If an informational or graphic label becomes illegible or comes off, contact your vehicle. • Always use of automotive...
Polishing the Vehicle Polaris recommends the use of your Polaris dealer to purchase a replacement. Replacement safety labels are provided by Polaris at the following items: • Wheel bearings • Radiator • Transmission seals • Brakes • Cab and body panels • Electrical components • Switches and controls • Labels and decals If an informational or graphic label becomes illegible or comes off, contact your vehicle. • Always use of automotive...

Owners Manual
Page 112
... models) (change every two years) • Rear gearcase (if equipped) • Transmission • Brake fluid (change every two years and any fuel remaining in and around the piston rings and ring lands, coating the cylinder with Polaris Carbon Clean. Turn the engine over several times using the recoil starter. MAINTENANCE Cleaning and Storage Storage Tips Fluid Levels Inspect the fluid levels. Remove the spark plug. Reinstall the spark plug. Reinstall the cap...
... models) (change every two years) • Rear gearcase (if equipped) • Transmission • Brake fluid (change every two years and any fuel remaining in and around the piston rings and ring lands, coating the cylinder with Polaris Carbon Clean. Turn the engine over several times using the recoil starter. MAINTENANCE Cleaning and Storage Storage Tips Fluid Levels Inspect the fluid levels. Remove the spark plug. Reinstall the spark plug. Reinstall the cap...

Owners Manual
Page 116
Lock the parking brake. 4. Optional jets, available from zero to 6,000 feet (1800 m) and temperatures of +40 degrees F. (4 degrees C.) or higher. Pilot screws are sealed with metal plugs and are serviceable only by Polaris dealers. Start the engine and allow more information about jetting the ATV for conditions in (clockwise) to lower RPM. If the engine idle speed is unsatisfactory and all other conditions are...
Lock the parking brake. 4. Optional jets, available from zero to 6,000 feet (1800 m) and temperatures of +40 degrees F. (4 degrees C.) or higher. Pilot screws are sealed with metal plugs and are serviceable only by Polaris dealers. Start the engine and allow more information about jetting the ATV for conditions in (clockwise) to lower RPM. If the engine idle speed is unsatisfactory and all other conditions are...
Owners Manual
Page 123
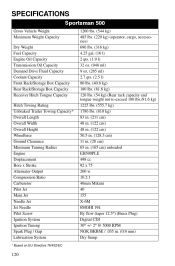
SPECIFICATIONS Sportsman 500 Gross Vehicle Weight Maximum Weight Capacity Dry Weight Fuel Capacity Engine Oil Capacity Transmission Oil Capacity Demand Drive Fluid Capacity Coolant Capacity Front Rack/Storage Box Capacity Rear Rack/Storage Box Capacity Receiver Hitch Tongue Capacity Hitch Towing Rating Unbraked Trailer Towing Capacity* Overall Length Overall Width Overall Height Wheelbase Ground Clearance Minimum Turning Radius Engine Displacement Bore x Stroke Alternator Output Compression Ratio Carburetor Pilot Jet Main Jet Needle Jet Jet Needle Pilot Screw Ignition System Ignition Timing ...
SPECIFICATIONS Sportsman 500 Gross Vehicle Weight Maximum Weight Capacity Dry Weight Fuel Capacity Engine Oil Capacity Transmission Oil Capacity Demand Drive Fluid Capacity Coolant Capacity Front Rack/Storage Box Capacity Rear Rack/Storage Box Capacity Receiver Hitch Tongue Capacity Hitch Towing Rating Unbraked Trailer Towing Capacity* Overall Length Overall Width Overall Height Wheelbase Ground Clearance Minimum Turning Radius Engine Displacement Bore x Stroke Alternator Output Compression Ratio Carburetor Pilot Jet Main Jet Needle Jet Jet Needle Pilot Screw Ignition System Ignition Timing ...

Owners Manual
Page 128
... WHERE SPECIFICALLY REQUIRED BY LAW, THERE IS NO WARRANTY OR SERVICE BULLETIN COVERAGE ON THIS VEHICLE IF IT IS SOLD OUTSIDE THE COUNTRY OF THE SELLING DEALER'S AUTHORIZED LOCATION. If you are traveling within the country where your vehicle to perform the warranty repair. Vehicles importation rules vary considerably from Polaris Industries in order to register your vehicle in order to Safety Recalls.
... WHERE SPECIFICALLY REQUIRED BY LAW, THERE IS NO WARRANTY OR SERVICE BULLETIN COVERAGE ON THIS VEHICLE IF IT IS SOLD OUTSIDE THE COUNTRY OF THE SELLING DEALER'S AUTHORIZED LOCATION. If you are traveling within the country where your vehicle to perform the warranty repair. Vehicles importation rules vary considerably from Polaris Industries in order to register your vehicle in order to Safety Recalls.